WebGL With Three.js – Lesson 4
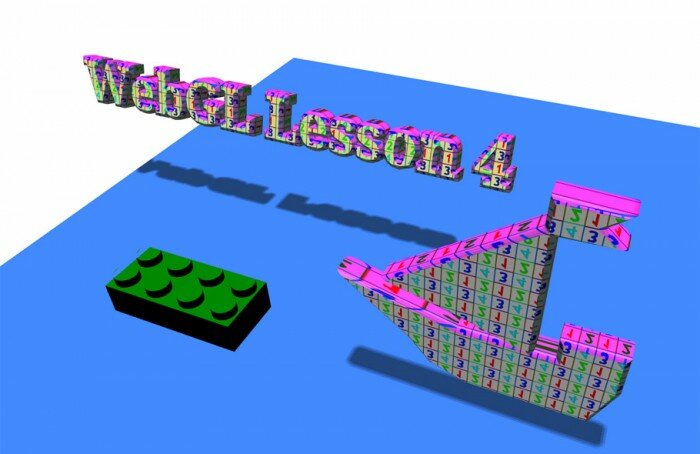
Today we continue our lessons for those who study webgl, and today we will show you how to add 3D text on the scene, how to extrude two-dimensional shapes, we also will consider how to load ready 3D models into the scene using the OBJLoader. It seems to be a difficult process, but it is not – the code for loading 3D models is fairly simple.
Live Demo
HTML
Two new libraries were added into the html: font1.js and OBJLoader.js
<!DOCTYPE html>
<html lang="en" >
    <head>
        <meta charset="utf-8" />
        <meta name="author" content="Script Tutorials" />
        <title>WebGL With Three.js - Lesson 4 | Script Tutorials</title>
        <meta name="viewport" content="width=device-width, initial-scale=1.0, maximum-scale=1.0, user-scalable=no">
        <link href="css/main.css" rel="stylesheet" type="text/css" />
    </head>
    <body>
        <script src="js/three.min.js"></script>
        <script src="js/THREEx.WindowResize.js"></script>
        <script src="js/OrbitControls.js"></script>
        <script src="js/fonts/font1.js"></script>
        <script src="js/OBJLoader.js"></script>
        <script src="js/stats.min.js"></script>
        <script src="js/script.js"></script>
    </body>
</html>
Javascript
First, we create a simple (empty) scene (scene, camera, renderer, controls, light and ground):
// load texture
var texture = THREE.ImageUtils.loadTexture('texture.png');
texture.repeat.set(0.03, 0.03);
texture.wrapS = texture.wrapT = THREE.RepeatWrapping;
texture.anisotropy = 16;
texture.needsUpdate = true;
var lesson4 = {
    scene: null,
    camera: null,
    renderer: null,
    container: null,
    controls: null,
    clock: null,
    stats: null,
    init: function() { // Initialization
        // create main scene
        this.scene = new THREE.Scene();
        var SCREEN_WIDTH = window.innerWidth,
            SCREEN_HEIGHT = window.innerHeight;
        // prepare camera
        var VIEW_ANGLE = 45, ASPECT = SCREEN_WIDTH / SCREEN_HEIGHT, NEAR = 1, FAR = 10000;
        this.camera = new THREE.PerspectiveCamera( VIEW_ANGLE, ASPECT, NEAR, FAR);
        this.scene.add(this.camera);
        this.camera.position.set(0, 400, 800);
        this.camera.lookAt(new THREE.Vector3(0,0,0));
        // prepare renderer
        this.renderer = new THREE.WebGLRenderer({antialias:true, alpha: false});
        this.renderer.setSize(SCREEN_WIDTH, SCREEN_HEIGHT);
        this.renderer.setClearColor(0xffffff);
        this.renderer.shadowMapEnabled = true;
        this.renderer.shadowMapSoft = true;
        // prepare container
        this.container = document.createElement('div');
        document.body.appendChild(this.container);
        this.container.appendChild(this.renderer.domElement);
        // events
        THREEx.WindowResize(this.renderer, this.camera);
        // prepare controls (OrbitControls)
        this.controls = new THREE.OrbitControls(this.camera, this.renderer.domElement);
        this.controls.target = new THREE.Vector3(0, 0, 0);
        // prepare clock
        this.clock = new THREE.Clock();
        // prepare stats
        this.stats = new Stats();
        this.stats.domElement.style.position = 'absolute';
        this.stats.domElement.style.bottom = '0px';
        this.stats.domElement.style.zIndex = 10;
        this.container.appendChild( this.stats.domElement );
        // add directional light
        var dLight = new THREE.DirectionalLight(0xffffff);
        dLight.position.set(0, 1000, 0);
        dLight.castShadow = true;
        // dLight.shadowCameraVisible = true;
        this.scene.add(dLight);
        // add simple ground
        var groundGeometry = new THREE.PlaneGeometry(1000, 1000, 1, 1);
        ground = new THREE.Mesh(groundGeometry, new THREE.MeshLambertMaterial({
            color: 0x4489FE, side: THREE.DoubleSide
        }));
        ground.position.y = -20;
        ground.rotation.x = - Math.PI / 2;
        ground.receiveShadow = true;
        this.scene.add(ground);
    },
};
// Animate the scene
function animate() {
    requestAnimationFrame(animate);
    render();
    update();
}
// Update controls and stats
function update() {
    lesson4.controls.update(lesson4.clock.getDelta());
    lesson4.stats.update();
}
// Render the scene
function render() {
    if (lesson4.renderer) {
        lesson4.renderer.render(lesson4.scene, lesson4.camera);
    }
}
// Initialize lesson on page load
function initializeLesson() {
    lesson4.init();
    animate();
}
if (window.addEventListener)
    window.addEventListener('load', initializeLesson, false);
else if (window.attachEvent)
    window.attachEvent('onload', initializeLesson);
else window.onload = initializeLesson;
3D text
The best way to display text in 3D enviromnemt is to use a ready 3D font (for Three.js). In general, there are many websites where you can download fonts, however we need special javascript fonts (typefaced fonts). This website may help you to convert custom fonts into javascript fonts (upload your font, hit the ‘convert’, and then follow the steps until it let you download the result). However, at the time of writing this tutorial, this service was not available, so I had to use ready-made fonts to create our demonstration. To draw a three-dimensional text I prepared the following function:
    draw3dText: function(x, y, z, text) {
        // prepare text geometry
        var textGeometry = new THREE.TextGeometry(text, {
            size: 60, // Font size
            height: 20, // Font height (depth)
            font: 'droid serif', // Font family
            weight: 'bold', // Font weight
            style: 'normal', // Font style
            curveSegments: 1, // Amount of curve segments
            bevelThickness: 5, // Bevel thickness
            bevelSize: 5, // Bevel size
            bevelEnabled: true, // Enable/Disable the bevel
            material: 0, // Main material
            extrudeMaterial: 1 // Side (extrude) material
        });
        // prepare two materials
        var materialFront = new THREE.MeshPhongMaterial({ map: texture, color: 0xffff00, emissive: 0x888888 });
        var materialSide = new THREE.MeshPhongMaterial({ map: texture, color: 0xff00ff, emissive: 0x444444 });
        // create mesh object
        var textMaterial = new THREE.MeshFaceMaterial([ materialFront, materialSide ]);
        var textMesh = new THREE.Mesh(textGeometry, textMaterial);
        textMesh.castShadow = true;
        // place the mesh in the certain position, rotate it and add to the scene
        textMesh.position.set(x, y, z);
        textMesh.rotation.x = -0.3;
        this.scene.add(textMesh);
    }
Two different materials are used to different sides of the text (for the front and side).
ExtrudeGeometry
This class allows us to create three-dimensional extruded geometry from two-dimensional path shape. I drew the boat for our today’s demonstration:
    drawCustomObject: function(x, y, z) {
        // prepare points for custom shape (ship)
        var objectPoints = [
            new THREE.Vector2 (275, 265),
            new THREE.Vector2 (205, 240),
            new THREE.Vector2 (125, 220),
            new THREE.Vector2 (274, 115),
            new THREE.Vector2 (275, 85),
            new THREE.Vector2 (330, 85),
            new THREE.Vector2 (310, 100),
            new THREE.Vector2 (330, 115),
            new THREE.Vector2 (275, 115),
            new THREE.Vector2 (274, 266),
            new THREE.Vector2 (305, 266),
            new THREE.Vector2 (305, 240),
            new THREE.Vector2 (360, 240),
            new THREE.Vector2 (360, 285),
            new THREE.Vector2 (340, 335),
            new THREE.Vector2 (215, 335),
            new THREE.Vector2 (175, 320),
            new THREE.Vector2 (150, 290),
            new THREE.Vector2 (75, 230),
            new THREE.Vector2 (200, 264),
            new THREE.Vector2 (274, 264),
        ];
        // prepare shape
        var objectShape = new THREE.Shape(objectPoints);
        var extrusionSettings = {
            amount: 20,
            curveSegments: 1, // Amount of curve segments
            bevelThickness: 5, // Bevel thickness
            bevelSize: 5, // Bevel size
            bevelEnabled: true, // Enable/Disable the bevel
            material: 0, // Main material
            extrudeMaterial: 1 // Side (extrude) material
        };
        // prepare ship geometry
        var objectGeometry = new THREE.ExtrudeGeometry( objectShape, extrusionSettings );
        // prepare two materials
        var materialFront = new THREE.MeshPhongMaterial({ map: texture, color: 0xffff00, emissive: 0x888888 });
        var materialSide = new THREE.MeshPhongMaterial({ map: texture, color: 0xff00ff, emissive: 0x444444 });
        // create mesh object of the ship
        var objectMaterial = new THREE.MeshFaceMaterial([ materialFront, materialSide ]);
        var objectMesh = new THREE.Mesh( objectGeometry, objectMaterial );
        objectMesh.castShadow = true;
        // place the object in the certain position, rotate it and add to the scene
        objectMesh.position.set(x, y, z);
        objectMesh.rotation.x = Math.PI;
        this.scene.add(objectMesh);
    }
OBJLoader
I left the most interesting for the end – loading ready OBJ models. The fact that there are a huge number of ready three-dimensional objects (at various websites) that you can add into your scene, and three.js gives us this opportunity through the use of the OBJLoader class:
    loadObjFile: function(x, y, z) {
        // prepare new OBJLoader and load the 'legoBrick.obj' model
        var loader = new THREE.OBJLoader();
        loader.load('legoBrick.obj', function(object) {
            // apply custom material for all children
            var legoMat = new THREE.MeshLambertMaterial({ color: 0x008800 });
            object.traverse( function (child) {
                if (child instanceof THREE.Mesh) {
                    child.material = legoMat;
                    child.material.needsUpdate = true;
                }
            });
            // place the object in the certain position, rotate, scale and add to the scene
            object.position.x = x;
            object.position.y = y;
            object.position.z = z;
            object.rotation.y = Math.PI/2;
            object.scale.set(40, 40, 40);
            lesson4.scene.add(object);
        });
    }
To import the model we just specify the address to this model, as well as the callback function. In this function we applied the custom material for it’s children.
Live Demo
[sociallocker]
download in package
[/sociallocker]
Conclusion
Stay tuned for new lessons and you are sure to find something new and interesting for yourself.


WebGL is a great thing. It’s a very perspective technology for web developers. Could you tell about WebGL for games development? (Sorry for my English, I’m from Russia)
Hi Yevgeniy,
You can consider our lessons about WebGL as the continuation of the series about the game development (as we started earlier)
Hello. I find your tutorials very helpful. How do I include texture and material data with my .obj file? I have one that I have made that has been UV mapped.
Thank you
Keith
Hi Keith,
We will talk about custom texturing of objects (including work with UV mapping) in our next tutorials.