I am a web developer with huge experience (in web languages and even in system languages). Also I am the founder of current website (and several another). I like to write blogs about web development/design.
Who doesn’t want to build interactive websites that involve JavaScript for better user attention? Have you experienced the low responsive websites or applications, only to have nothing happen when you just tapped a link or scroll down? We are pretty sure all of us have been with this. JavaScript is still considered the most expensive resource we utilize for our mobile devices as it can delay interactivity in significant ways mostly byte-for-byte.
In today’s lesson we will continue developing backend Web API and our goal is database access. We will be creating CRUD API entry points handling GET, POST, PUT and DELETE requests.
As you probably remember that last time we simply hardcoded objects (Users) in the code. Today we will solve this issue.
Prerequisites
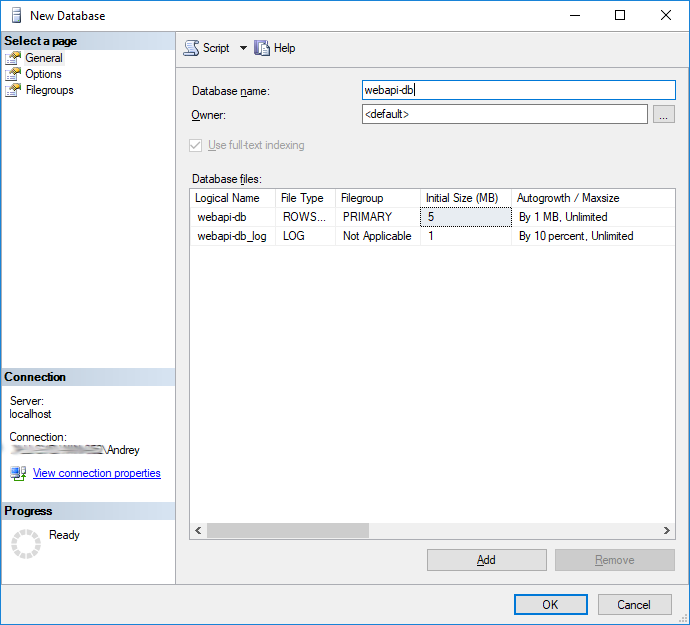
First of all, as we are about to store information in database, we need to prepare a new database to work with.
If you haven’t installed SQL Server Management Studio (SSMS) yet, it is time to do it. I recommend to download it from official Microsoft website.
Once it is ready – open it and create new database from ‘Object Explorer’ tree. For now, it is enough to provide only new database name: ‘webapi-db’
Now you can open your previously created project in Visual Studio.
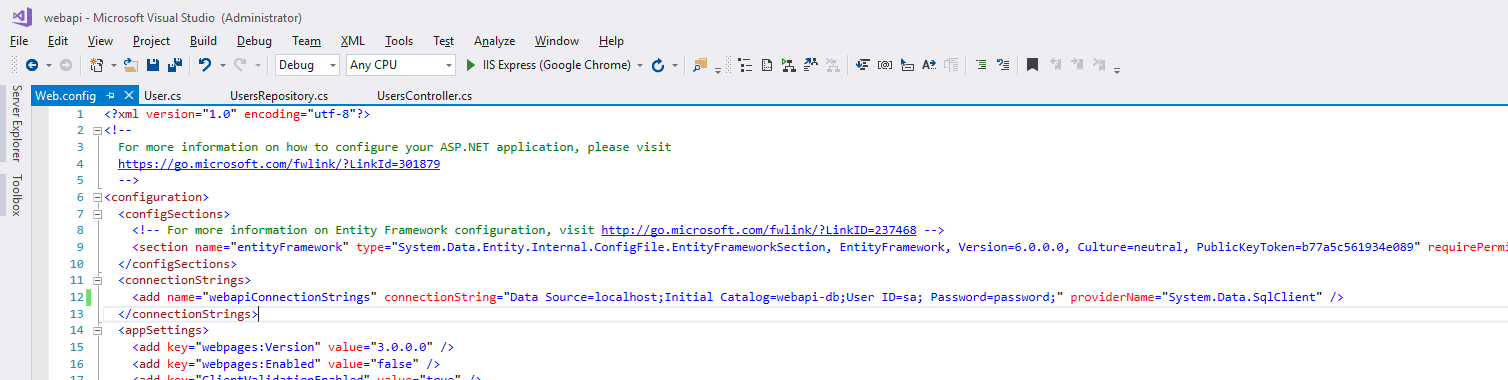
Step 1 – Setting up connection string to SQL server
Pretty easy step, open ‘web.config’ (which is in root folder of your project) and add (or update) the following section:
If you use a remote SQL server, instead of localhost you need to specify your remote server (e.g. its IP address).
Step 2 – A little bit of theory
CRUD abbreviation stands for the four base functions that a model should be able to do – Create, Read, Update, and Delete.
Microsoft introduced a bunch of approaches to work with database: LINQ, Entity Framework (EF) Core, EF using String Path, EF with Lambda Expression, ORM …
You are free to use any of the methods, but need to note that methods have slightly different syntax, own strengths and weaknesses.
LINQ (Language Integrated Query) is a model and certain methodology which adds formal query capabilities into .NET languages. It provides wide and convenient ways for data manipulation.
Entity Framework is an Object Relational Mapper (ORM). Allows to work with database records as with ordinary objects.
Lambda Expression is an anonymous function that you can use to create delegates or expression tree types. By using lambda expressions, you can write local functions that can be passed as arguments or returned as the value of function calls. One of usages of Lambda expressions is writing LINQ query expressions.
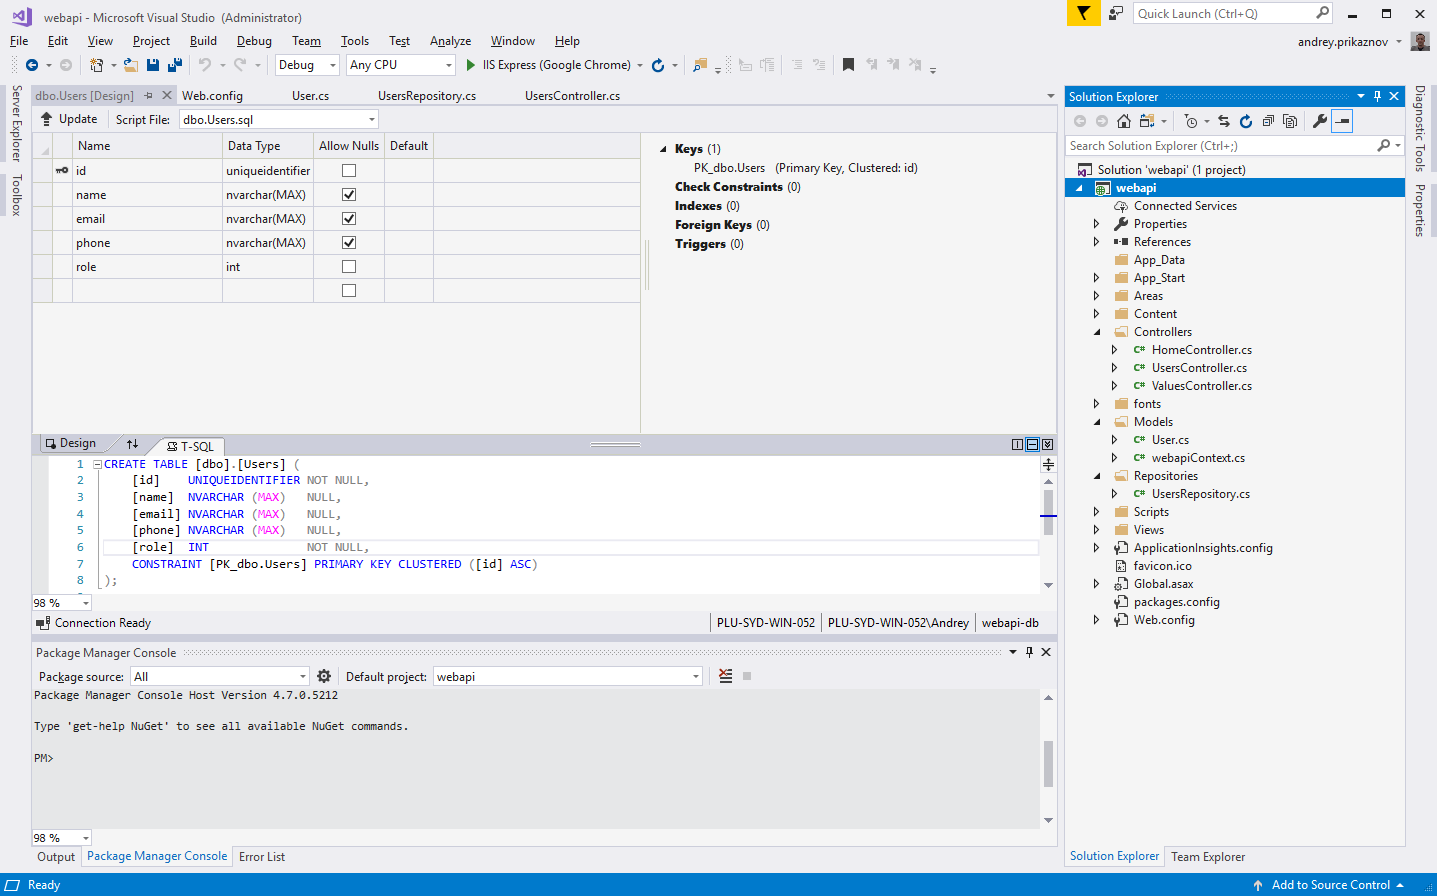
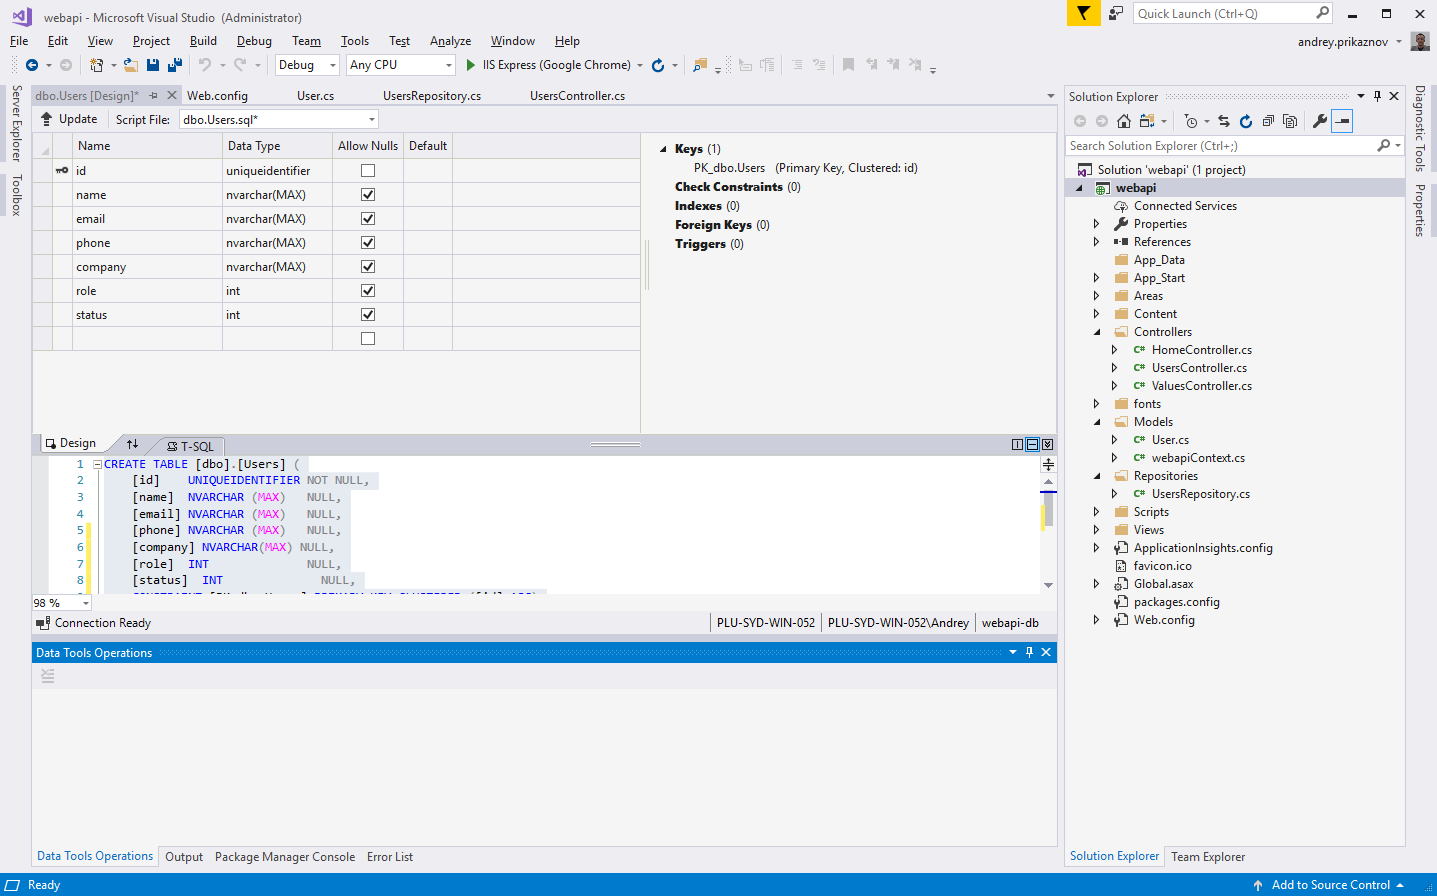
Step 3 – database table
We are ready to build a table in our database. You can do it either in Microsoft SQL Server Management Studio or in your Visual Studio. Both ways are pretty straight forward. Lets create the table in Visual Studio. On the left, find ‘Server Explorer’ and select ‘Connect to Database’.
Once the database is connected, select ‘Add New Table’ in ‘Tables’. Here we can define fields of our Users table: id, name, email, phone and role.
Step 4 – Model
We already had the basic User model. In order to link the model with db table, I used LINQ Mapping properties (Table, Column ..). Find below the updated version of the Users model. This is basic model to keep users information.
using System;
using System.Data.Linq.Mapping;
namespace webapi.Models
{
    [Table(Name="dbo.WebApiUsers")]
    public class User
    {
        private Guid _id;
        private string _name;
        private string _email;
        private string _phone;
        private int? _role;
        [Column(Storage = "_id", AutoSync = AutoSync.OnInsert, DbType = "Int NOT NULL IDENTITY", IsPrimaryKey = true, IsDbGenerated = true)]
        public Guid id { get => _id; set => _id = value; }
        [Column(Storage = "_name", DbType = "NChar(32)")]
        public string name { get => _name; set => _name = value; }
        [Column(Storage = "_email", DbType = "NChar(32)")]
        public string email { get => _email; set => _email = value; }
        [Column(Storage = "_phone", DbType = "NChar(32)")]
        public string phone { get => _phone; set => _phone = value; }
        [Column(Storage = "_role", DbType = "int(2)")]
        public int? role { get => _role; set => _role = value; }
    }
}
Here you can see exactly same fields we prepared in our db table. Pay attention that the id field is Guid, which is primary key in this table.
Step 5 – Repository
Repository represents a pattern to control access to the data source. The class implementation thisdoes not contain business logic, does not manage business processes, it only contains operations on data. As a rule, the repository implements a CRUD interface – operations to extract, add, edit, and delete data.
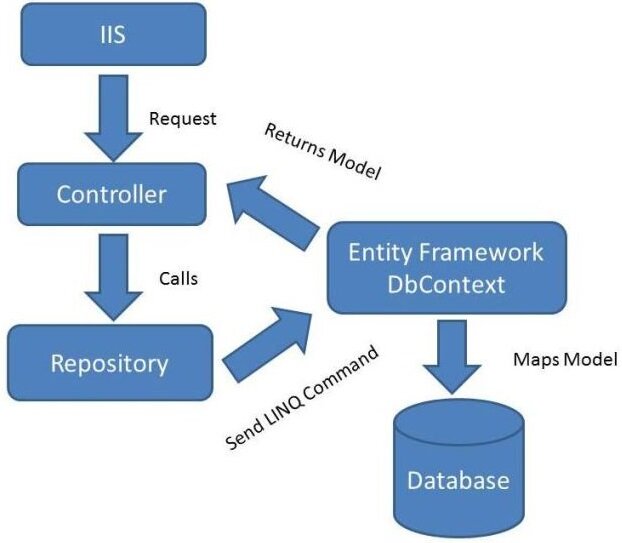
In short, the repository serves to retrieve data from the database. At this stage it is pretty important to understand how it works
All API requests sent to IIS go to API Controller, the controller works via repository.
Now we need to declare a set of CRUD methods in interface
public interface IRepo
{
    T Create(T item);
    T GetOne(Guid id);
    T[] GetAll();
    T Update(UserModel model);
    int Delete(Guid id);
}
UserModel, an another model is used in Update method.
public class UserModel
{
    public Guid id { get; set; }
    public string field { get; set; }
    public string value { get; set; }
}
I decided to make a quick update method (which updates/patches only one field) instead of updating all user fields (which could be heavier).
Now we can start building a repo.
Entity Framework Code First data access approach consider a data access context that is inherited from the DbContext class.
In the beginning I already mentioned various approaches of creation the data contexts and repositories. Let’s review implementations of various approaches.
Linq to Entities/Objects
Linq to Entities offers a simple and intuitive approach for retrieving data using expressions that are close to SQL language.
Working with database, we operate with LINQ queries, but the database understands only queries in the SQL language. Therefore, there is a data provider between LINQ to Entities and the database that allows them to interact. This data provider is EntityClient. It creates an interface for interacting with the ADO.NET provider for SQL Server.
We can use LINQ operators and extensions. Refer to the following realization:
public class UsersDataContextLinq
{
    private DataContext dataContext;
    public DbConnection dbConnection;
    public User[] Users { get; set; }
    public Table usersTable { get; set; }
    public UsersDataContextLinq()
    {
        SqlConnection dbConnection = new SqlConnection(ConfigurationManager.ConnectionStrings["webapiConnectionStrings"].ConnectionString);
        dbConnection.Open();
        var commandText = $@"
            IF NOT EXISTS (SELECT * FROM dbo.sysobjects where id = object_id(N'dbo.WebApiUsers') and OBJECTPROPERTY(id, N'IsTable') = 1)
            BEGIN
                CREATE TABLE [dbo].WebApiUsers(
                    [id] [uniqueidentifier] NOT NULL DEFAULT (newsequentialid()),
                    [name] [nvarchar](128) NOT NULL,
                    [email] [nvarchar](128) NOT NULL,
                    [phone] [nvarchar](128) NOT NULL,
                    [company] [nvarchar](128) NOT NULL,
                    [role] [int] NULL,
                    [status] [int] NULL
                )
            END
        ";
        using (var command = dbConnection.CreateCommand())
        {
            command.CommandText = commandText;
            command.ExecuteNonQuery();
        }
        dataContext = new DataContext(dbConnection);
        usersTable = dataContext.GetTable();
    }
    public User[] GetAll()
    {
        IQueryable users =
            from user in usersTable
            select user;
        return users.ToArray();
    }
    public User Create(User newEntry)
    {
        usersTable.InsertOnSubmit(newEntry);
        dataContext.SubmitChanges();
        return newEntry;
    }
    public int DeleteEntry(Guid id)
    {
        IQueryable deleteUser =
            from user in usersTable
            where user.id == id
            select user;
        usersTable.DeleteOnSubmit(deleteUser.Single());
        try
        {
            dataContext.SubmitChanges();
        }
        catch (Exception e)
        {
            Console.WriteLine(e);
            return 0;
        }
        return 1;
    }
    public User UpdateField(Guid entryId, String field, String value)
    {
        User user = usersTable.FirstOrDefault(p => p.id == entryId);
        if (user != null)
        {
            Type userModelType = typeof(User);
            FieldInfo editFieldInfo = userModelType.GetField("_" + field, BindingFlags.NonPublic | BindingFlags.Instance);
            if (editFieldInfo != null)
            {
                Type editFieldType = Nullable.GetUnderlyingType(editFieldInfo.FieldType) ?? editFieldInfo.FieldType;
                object safeValue = (value == null) ? null : Convert.ChangeType(value, editFieldType);
                editFieldInfo.SetValue(user, safeValue);
                dataContext.SubmitChanges();
            }
        }
        return user;
    }
}
Using our webapiConnectionStrings we create a new SqlConnection and open it.
In case if the table was not created earlier (Step 3), it will be added automatically executing commandText in constructor.
Pay attention to SQL like syntax in GetAll and DeleteEntry methods – this is how we can use LINQ operators to work with db table.
System.Reflection is used in ‘PatchField’ method in order to update any of User field (providing just name of the field and new value).
However, using this approach (via System.Reflection) is pretty a big hit to performance. I don’t recommend to use it.
Repository using Core Entity Framework
Quite easy to create the data context
public class UsersDataContext : DbContext
{
    public DbSet Users { get; set; }
    public UsersDataContext() : base(ConfigurationManager.ConnectionStrings["webapiConnectionStrings"].ConnectionString)
    {
    }
}
You only need to pass our connection string into DbContext.
The repository class became more readable and understandable.
public class UsersRepository : IRepo
{
    public UsersDataContext _dataContext { get; set; }
    public DbSet Users { get; set; }
    public UsersRepository(UsersDataContext context) : base()
    {
        _dataContext = context;
        Users = _dataContext.Set();
    }
    public User Create(User newUser)
    {
        newUser.id = Guid.NewGuid();
        Users.Add(newUser);
        _dataContext.SaveChanges();
        return newUser;
    }
    public User[] GetAll()
    {
        return Users.ToArray();
    }
    public User GetOne(Guid id)
    {
        return Users.SingleOrDefault(s => s.id.Equals(id));
    }
    public User Update(UserModel model)
    {
        var user = GetOne(model.id);
        if (model.field.Any())
        {
            switch (model.field)
            {
                case "name":
                    user.name = model.value;
                    break;
                case "email":
                    user.email = model.value;
                    break;
                case "phone":
                    user.phone = model.value;
                    break;
                case "company":
                    user.company = model.value;
                    break;
            }
            _dataContext.SaveChanges();
        }
        return user;
    }
    public int Delete(Guid id)
    {
        Users.Remove(GetOne(id));
        return _dataContext.SaveChanges();
    }
}
We defined DbSet for Users, binded it with the users data context, and now we can operate with it across all CRUD functions.
As you can see, this is applicable for basic single level queries. If you need to include multiple levels, you can use an eager loading – process whereby a query for one type of entity also loads related entities as part of the query. Eager loading is achieved by use of the Include method.
There are several methods of achieving it:
Using Lambda Expression
var extraData = Users /* or _dataContext.Users depending on your context */
    .Include(i => i.ExtraData.Select(it => it.Items))
    .ToList();
The Include method allows the required depth of eager loading to be specified by providing Select expressions to the appropriate depth.
Using String Path
var extraData = Users
    .Include("ExtraData.Items")
    .ToList();
Speaking about context and performance, fetching objects to the context. What if there are no further actions to change and save them.
If we are not going to modify these objects, AsNoTracking() should be called for this collection
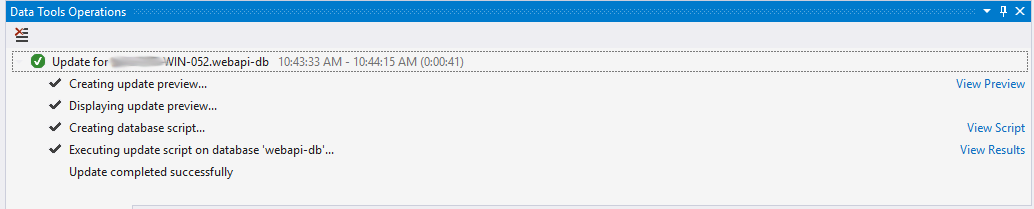
It also can happen that you need to modify your existing db table.
If you create new fields, modify existing, or remove fields, you will need to update your database in Visual Studio.
Next three screenshotes explain how you can do it:
Web scraping is not an illegal activity, but that does not mean you can scrape any site you want. There are some sites that explicitly block any sort of automated data extraction either via the robots.txt file or their Terms of service page.
When you are designing a logo for your online business, blog, or website, then you want it to look professional, appealing, and unique. To achieve that feat, understanding the right process is a must. However, you needn’t fret, for you have come to the right place!
The question of choosing a language for server backend logic is one of the most important question for almost every developer, especially for a beginner.
At the moment there are already a lot of different languages : java, .net (c#, vb), ruby, python, perl, javascript (node.js), go, c++.
So the question of choice is very actual.
As besides to the syntax features of languages, there are also many other problems / questions. Such as the possibility of expansion, the use of different types of databases, a high entry threshold into language, the requirements for fault tolerance, huge amounts of data and so on.
Which languages are the most popular? Which one should you use? Maybe someone will suggest php, with rich enough features and a low entry threshold in the language. However, the fact remains, and most used languages nowaday are Java and .Net.
This tutorial explains how you can build your own web server (Web API) using C# (ASP.Net). It is important to note that to host your server you will need to have windows-based hosting.
Prerequisites
I think we can begin. First of all, as we are working with C#, you need to use Microsoft Visual Studio (you can get it at official microsoft website).
Also you will need to enable IIS (Internet Information Services). It is pretty easy to enable it in windows:
Open Control Panel in Windows 10, click Programs, then find the “Programs and Features” section and click “Turn Windows features on or off“.
Here, find the Internet Information Services. Click the + icon in front of it to expand all available options under it. You can find FTP Server, Web Management Tools and World Wide Web Services. Now enable the Web Management Tools. Click OK button and the selected feature (or features) will be added and applied to your Windows.
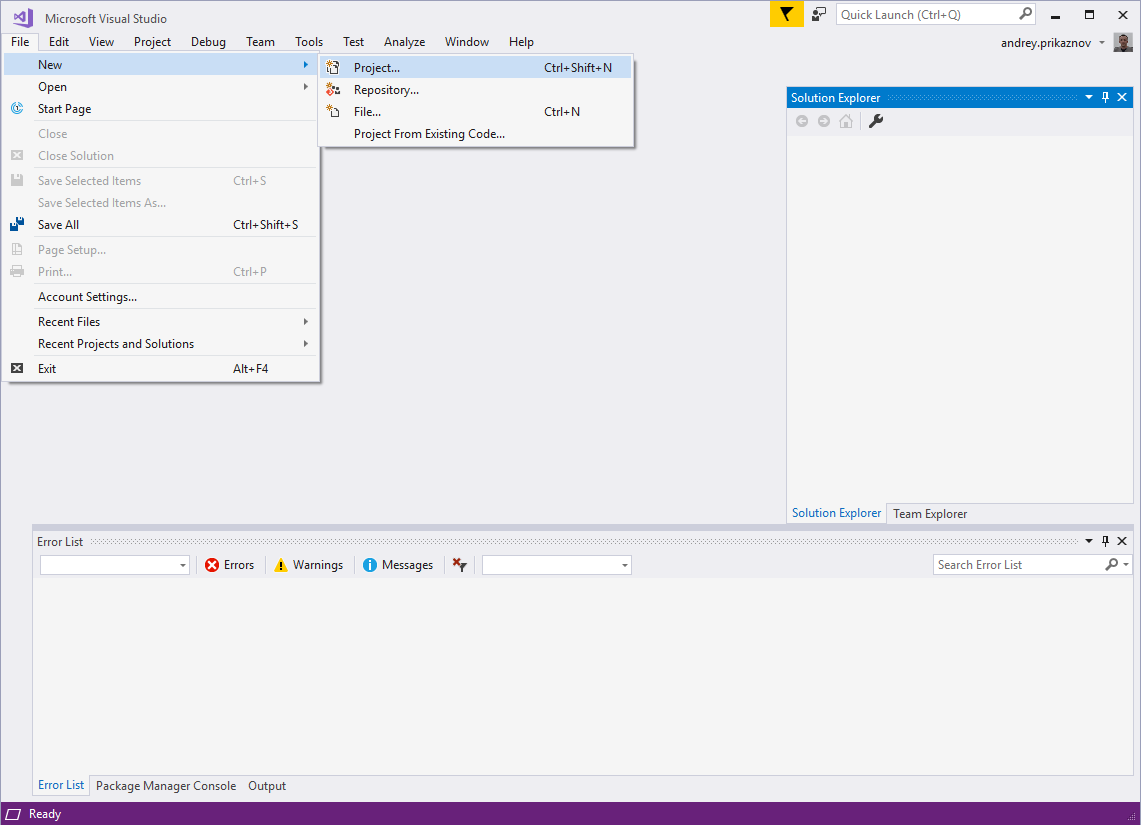
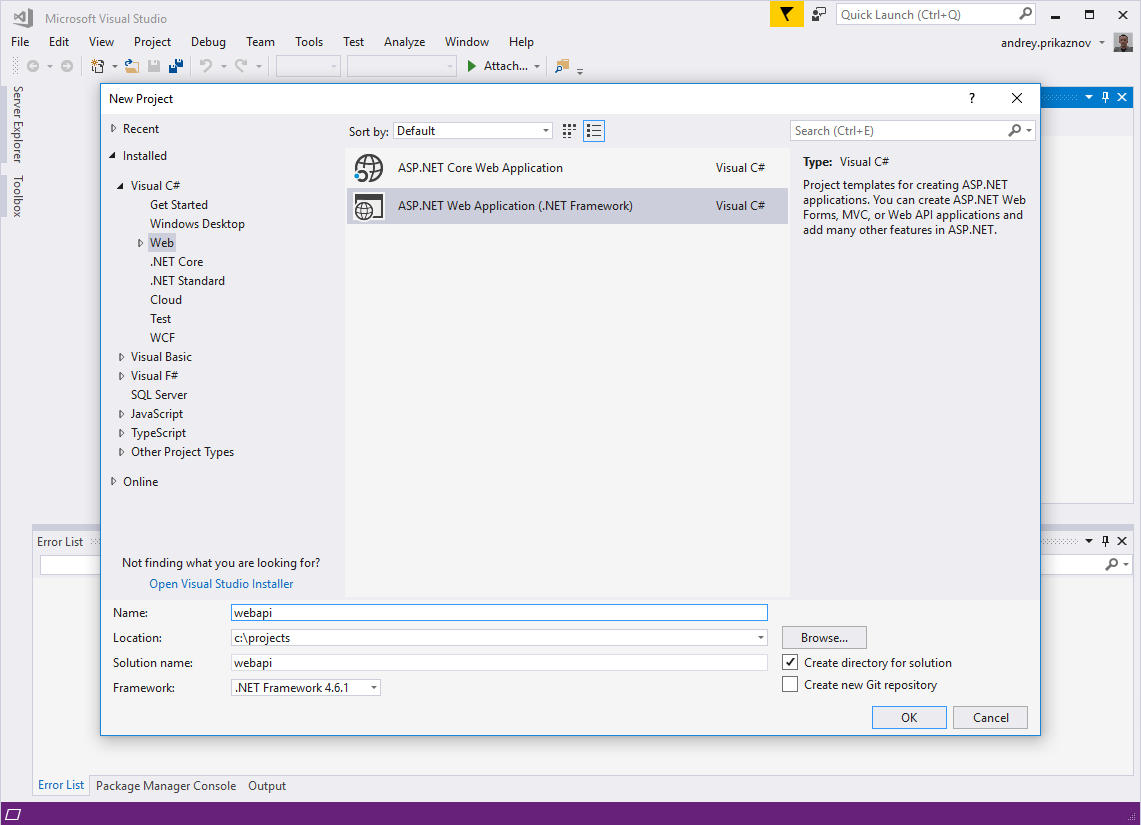
Step 1 – Create new project
Open Microsoft Visual Studio and create a new project (File -> New -> Project). Select “Installed” Templates, select Visual C#. then select Web. In the list of available templates, select ASP.NET Web Application (.NET Framework). Give a name for your project, for my demo, I put “webapi”, click OK.
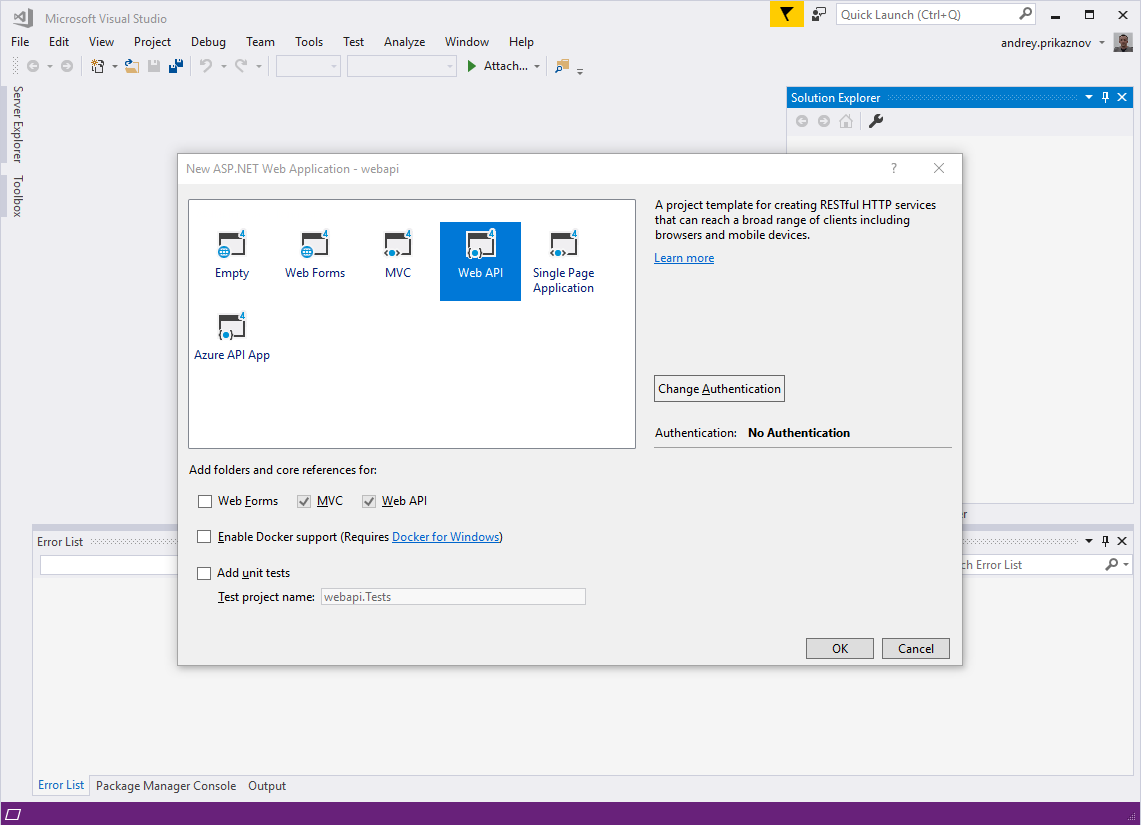
In the next modal dialog, you may choose any suitable template. Let’s select Web API, so it will prepare all basic initial files for the project. Click OK.
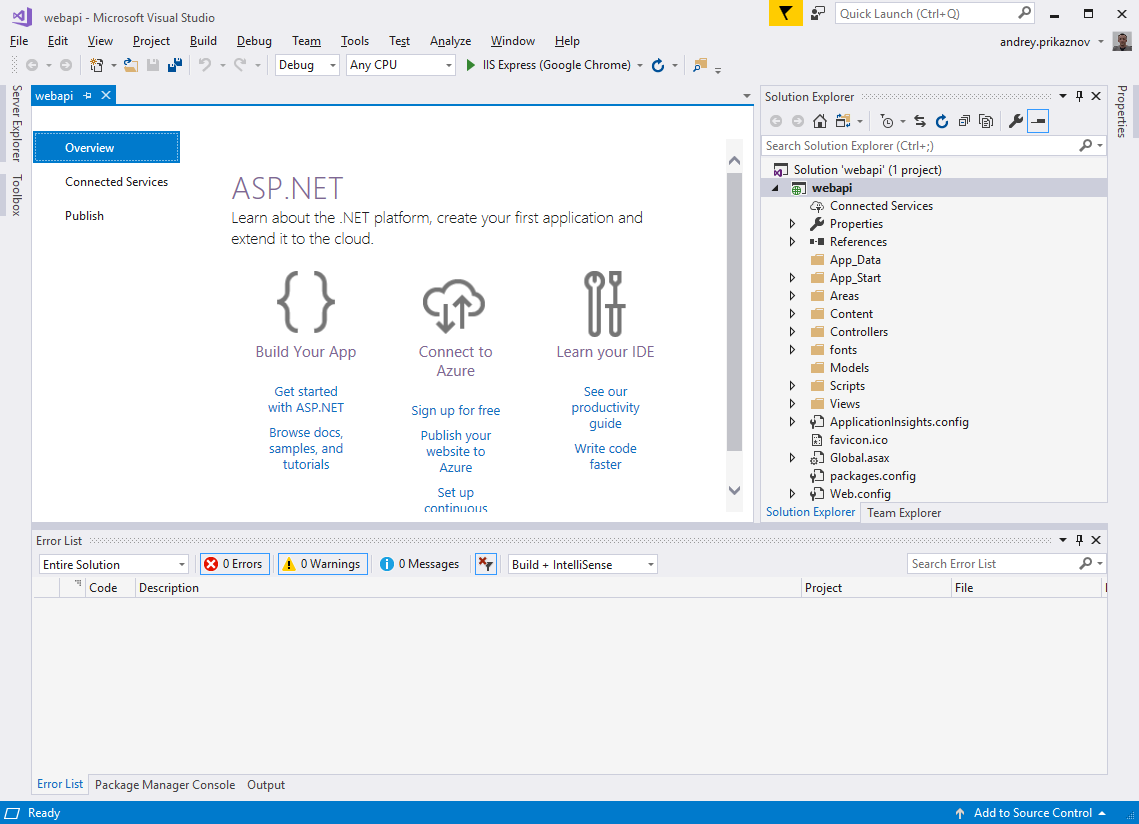
Done. Now you can browse the generated folders and files in the Solution Explorer. There are application configs, help page data, few controllers, fonts, css and js files.
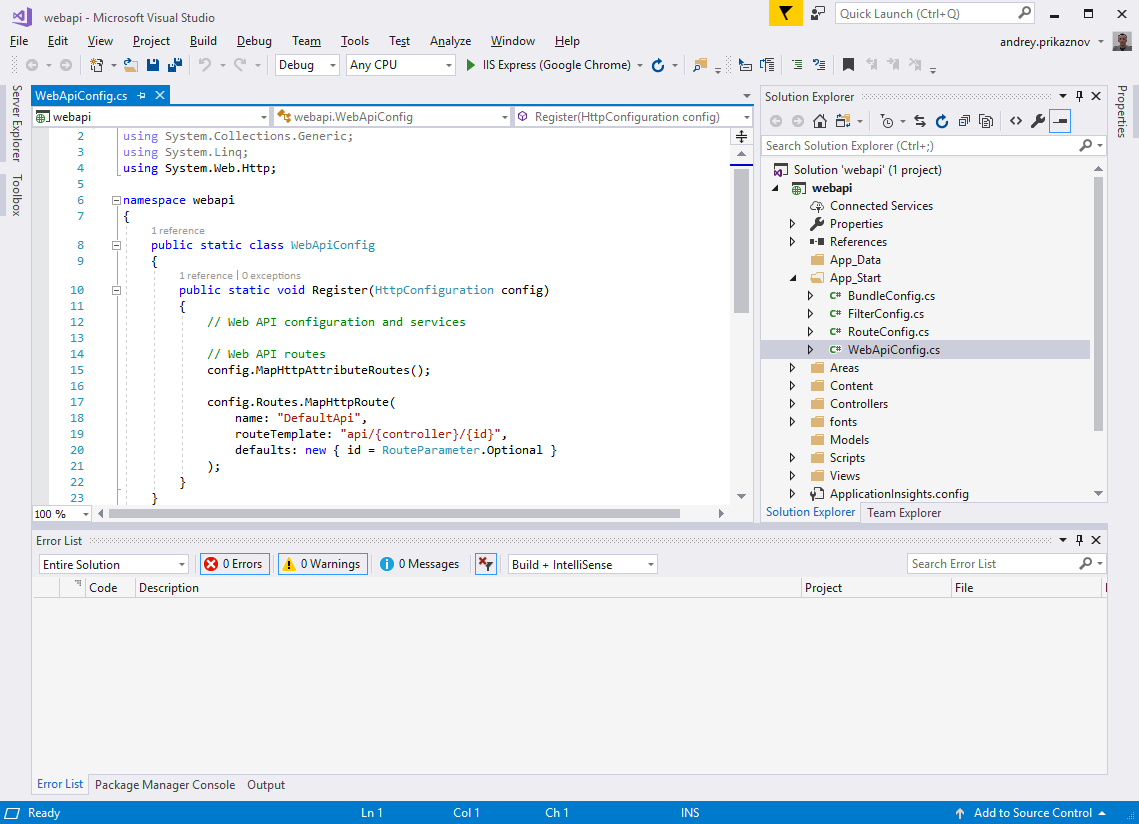
Routing Table
By default, the server uses the Routing Table located in App_Start/WebApiConfig.cs.
Pay attention to routeTemplate: "api/{controller}/{id}", it explains the api routing.
Now, let’s make a basic example. In this tutorial we will prepare API for Users, which is pretty general entity/object of every system.
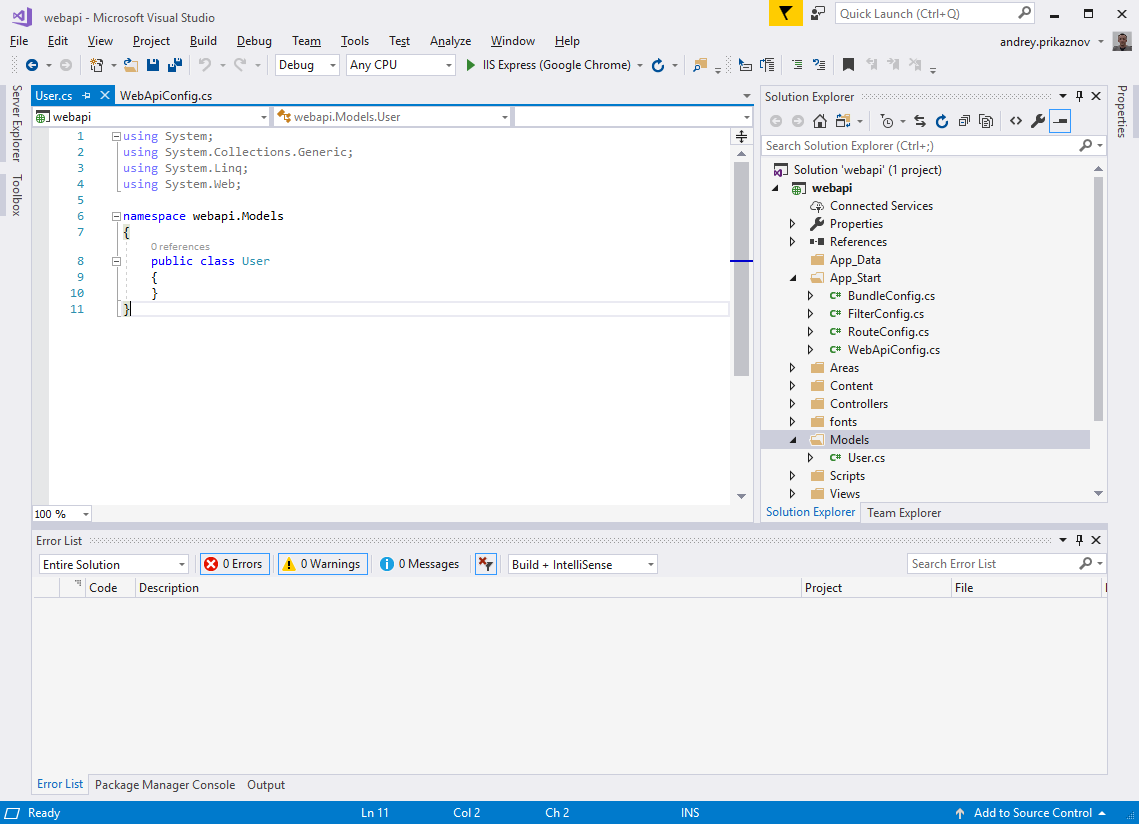
Adding a User model
The model represents the user, we will include various fields like id, name, email, phone and role.
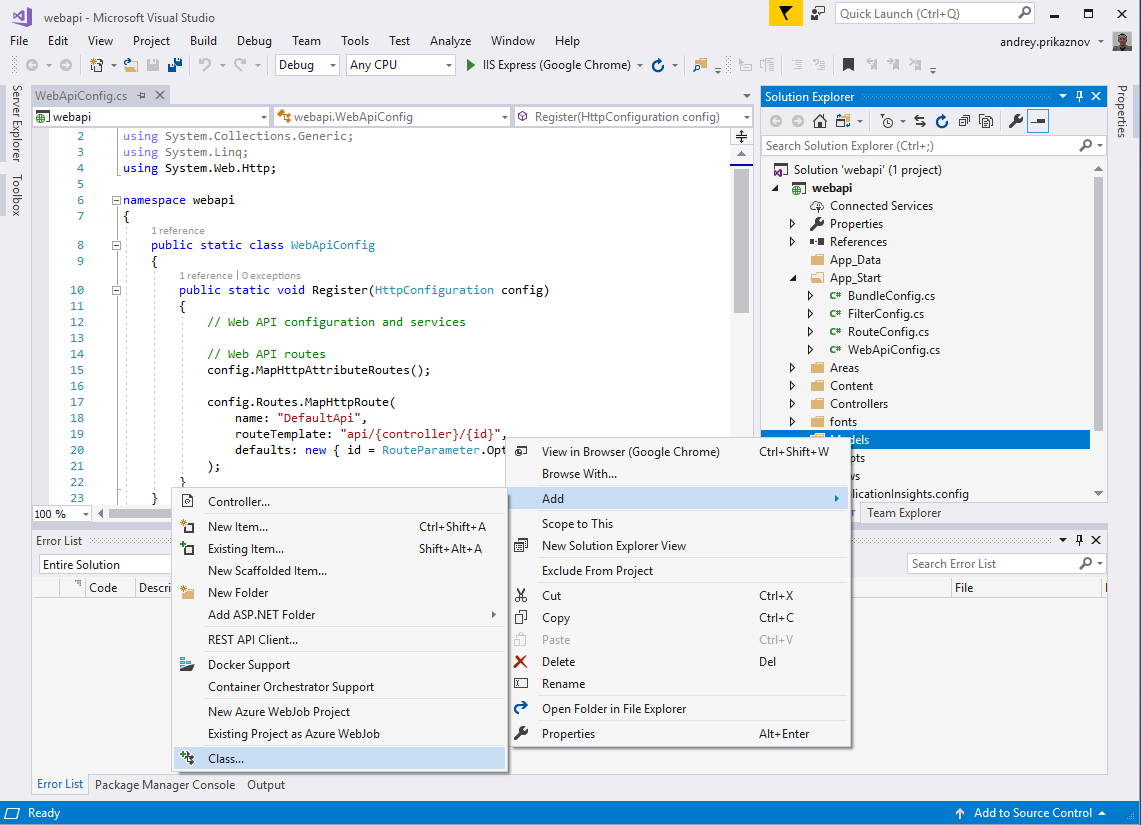
In Solution Explorer, right-click in the Models folder, select Add then select Class. Then provide class name: User. The model class is ready.
Now we just add all the fields we decided to add:
public class User
{
    public int id { get; set; }
    public string name { get; set; }
    public string email { get; set; }
    public string phone { get; set; }
    public int role { get; set; }
}
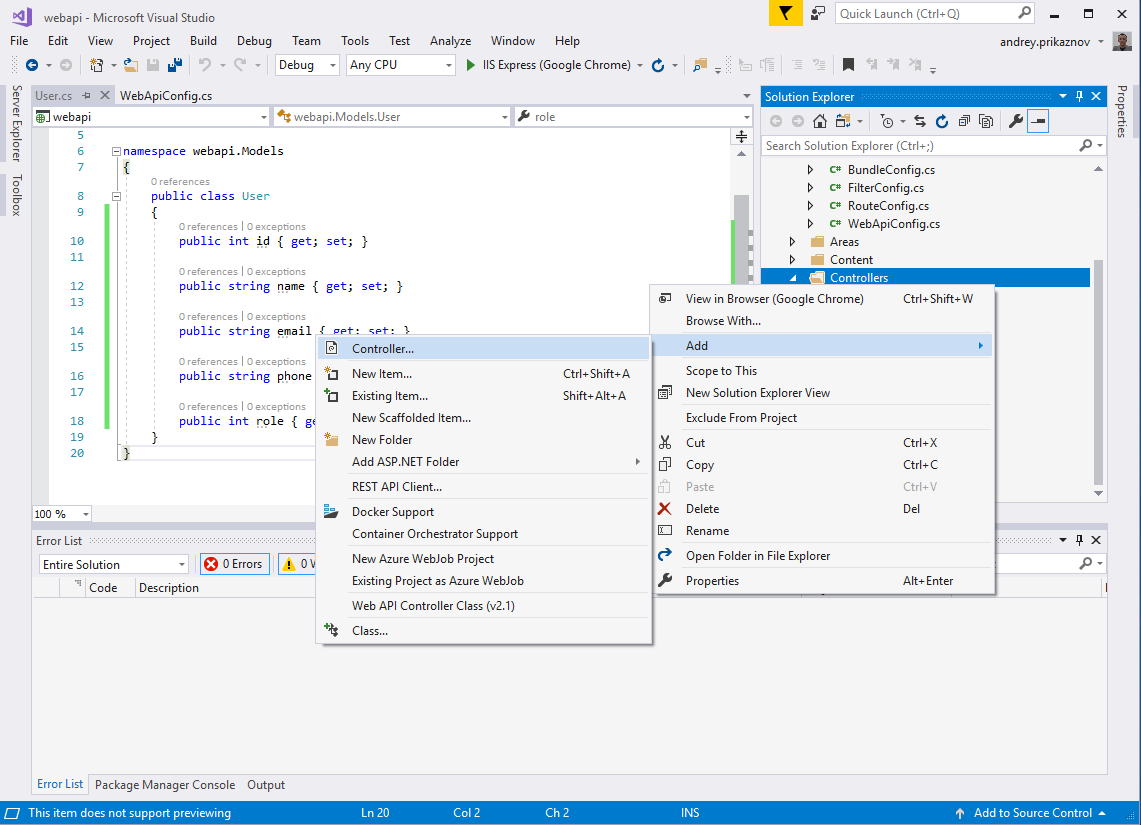
Add a User controller
In Web API, the controller is an object that handles all HTTP requests. In Solution Explorer, right-click the Controllers. Select Add, then select Controller.
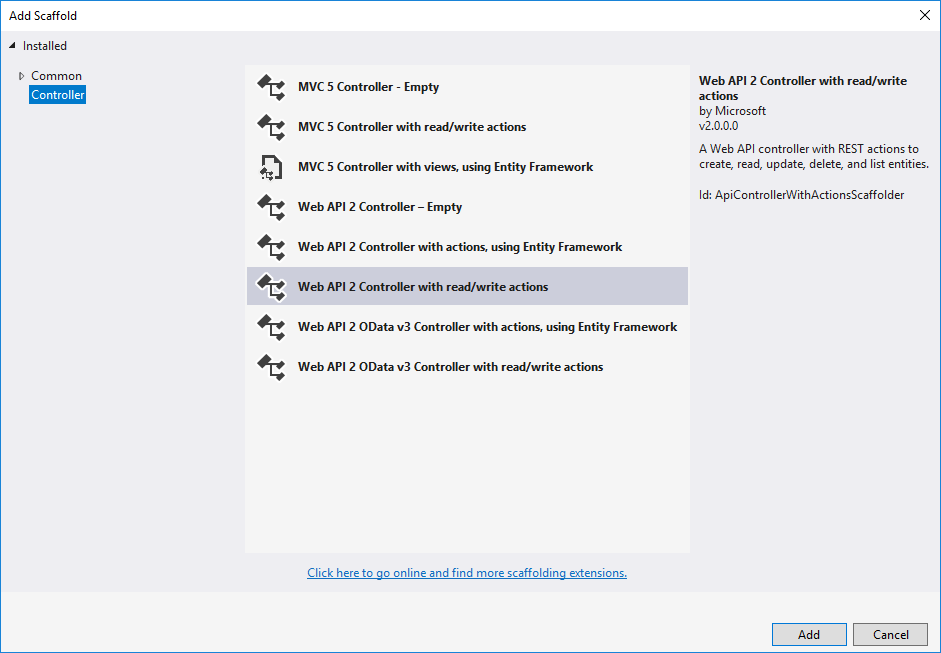
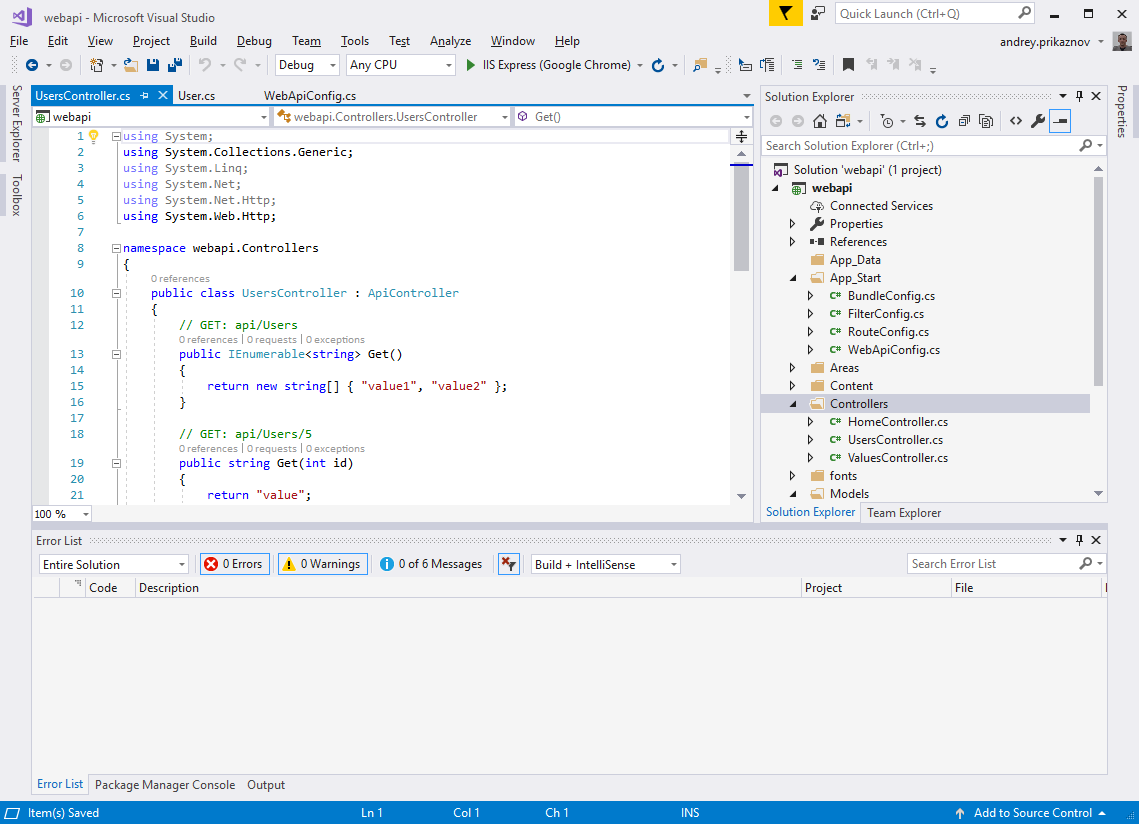
In the given dialog, select Web API 2 Controller with read/write actions. Name the controller – UsersController. It will prepare the controller with all CRUD actions.
In this article I prepared a basic example with dummy list of users:
public class UsersController : ApiController
{
    private User[] users = new User[]
    {
        new User { id = 1, name = "Haleemah Redfern", email = "[email protected]", phone = "01111111", role = 1},
        new User { id = 2, name = "Aya Bostock", email = "[email protected]", phone = "01111111", role = 1},
        new User { id = 3, name = "Sohail Perez", email = "[email protected]", phone = "01111111", role = 1},
        new User { id = 4, name = "Merryn Peck", email = "[email protected]", phone = "01111111", role = 2},
        new User { id = 5, name = "Cairon Reynolds", email = "[email protected]", phone = "01111111", role = 3}
    };
    // GET: api/Users
    [ResponseType(typeof(IEnumerable<User>))]
    public IEnumerable<User> Get()
    {
        return users;
    }
    // GET: api/Users/5
    public IHttpActionResult Get(int id)
    {
        var product = users.FirstOrDefault((p) => p.id == id);
        if (product == null)
        {
            return NotFound();
        }
        return Ok(product);
    }
    ...
Step 2 – Deployment
Now you can build your solution (Ctrl+Shift+B in Visual Studio), once the build is succeeded, you can run it. Click F5 and it will open in your browser automatically at your localhost in an available port (e.g. http://localhost:61024/). Most probably, you don’t want to keep it running in the Visual Studio all the time, and you prefer to keep it as service).
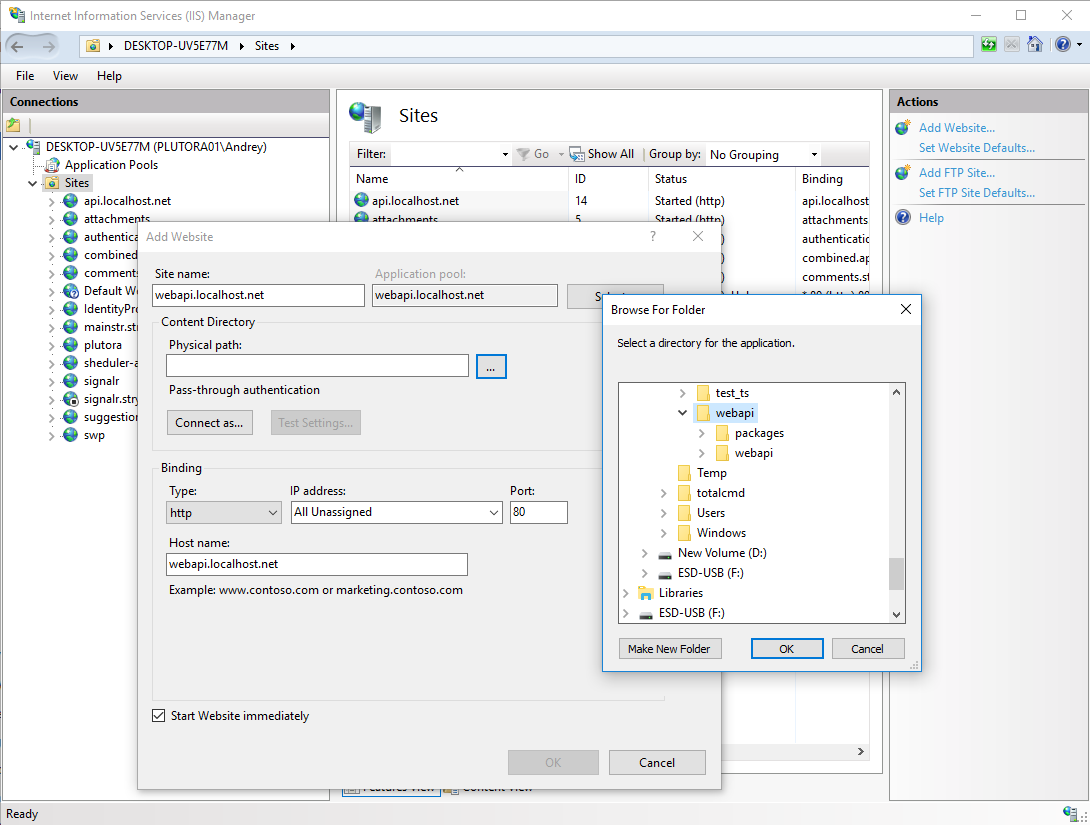
In this case, we can deploy it to a local dedicated server using IIS (Internet Information Services). It is pretty easy.
Firstly, open the IIS, on the left side under Sites – add a New Website (from the right panel or right-click on the Sites). Put the details: Site name “webapi.localhost.net”, Physical path “C:\projects\webapi” (where your solution is located), Binding – http or https, Host name is same – “webapi.localhost.net”. Click OK.
IIS should run the Web API service on webapi.localhost.net.
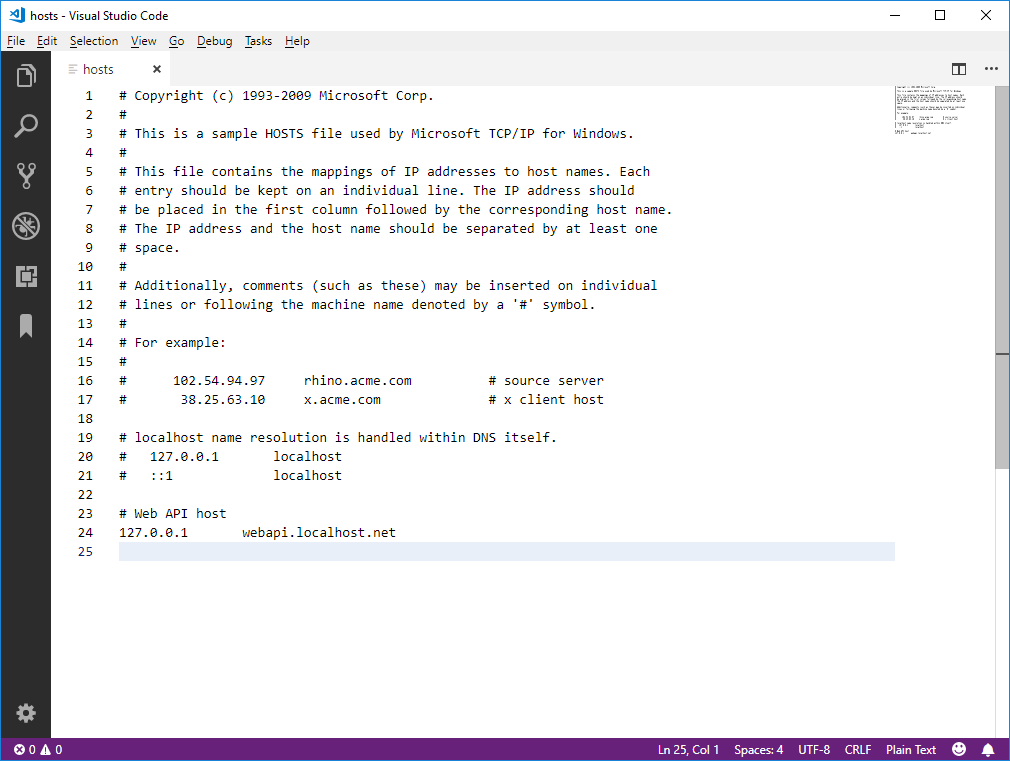
Now if you try to open webapi.localhost.net in your browser, it won’t open the result we created. It happens because browser tries to resolve this address webapi.localhost.net as global domain. In order to map this domain name with local server we need to modify the local hosts file. On Windows (v10) the hosts file exists at C:\Windows\system32\drivers\etc folder. The file doesn’t have own extension, it is “hosts” file.
Copy it to another location and open it in editor
You need to add the following in the end of this file:
# Web API host
127.0.0.1       webapi.localhost.net
Now you need to put the modified file back to C:\Windows\system32\drivers\etc folder. As this folder is protected by windows by default, you will get access denied warning message. So you need to copy the file “As Administrator”.
After the file is updated, the webapi.localhost.net should load from your localhost (C:\projects\webapi).
Testing API
It is time to test the API methods we created for our Web server: api/users and api/users/{id}. Open “http://webapi.localhost.net/api/users” in your browser. You should get the following output:
As we are creating the external API which should be accessible outside, we need to test our API from another page. The easiest way is to use a development toolbar (which exists in any modern browser). Usually it is activated when you press F12. Go to ‘Console’ tab. Below I prepared two small examples which you can use to test the APIs
var xhr = new XMLHttpRequest();
xhr.open('GET', 'https://webapi.localhost.net/api/users');
xhr.onload = function() {
    console.log(xhr.response);
};
xhr.send();
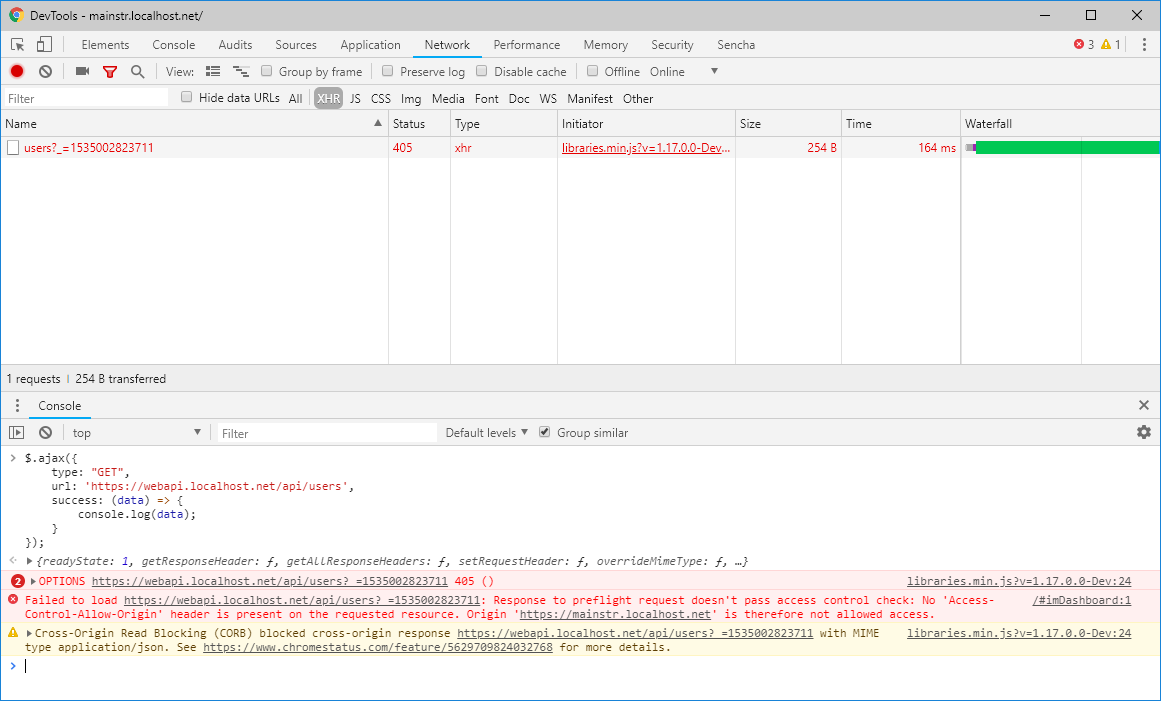
Very likely you will receive the following error
Response to preflight request doesn’t pass access control check: No ‘Access-Control-Allow-Origin’ header is present on the requested resource.
The reason is that regular web pages can use the XMLHttpRequest object to send and receive data from remote servers, but they’re limited by the same origin policy. Extensions aren’t so limited. An extension can talk to remote servers outside of its origin, as long as it first requests cross-origin permissions.
Cross-Origin Resource Sharing (CORS) is a mechanism that uses additional HTTP headers to tell a browser to let a web application running at one origin (domain) have permission to access selected resources from a server at a different origin.
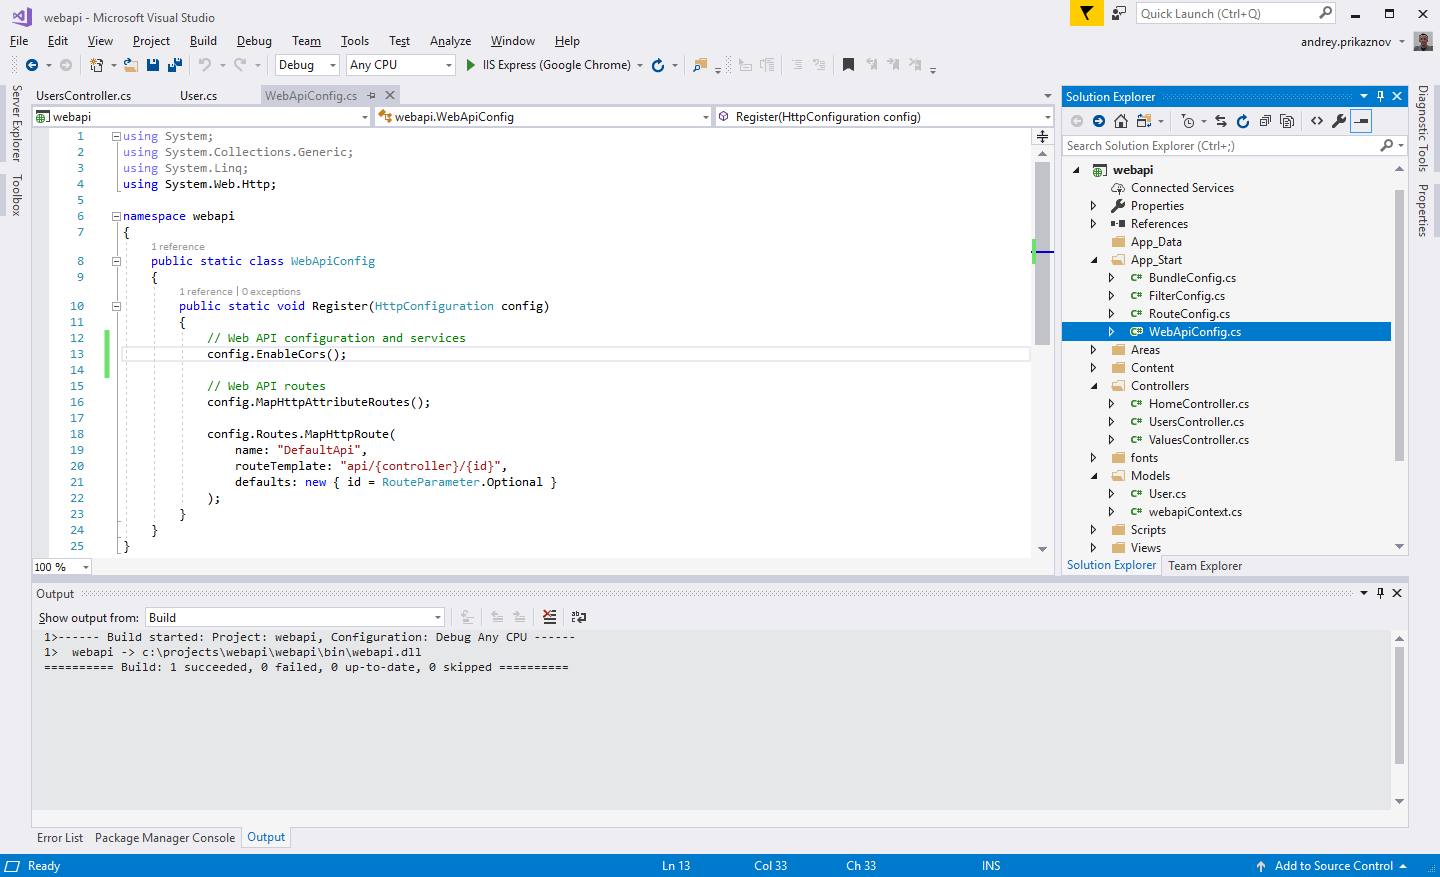
Adjust Cross-Origin Resource Sharing (CORS)
In order to solve this, we need to enable the CORS in our solution. In Visual Studio open Package Manage Console (available in bottom, between of Error List and Output). Run the following:
Install-Package Microsoft.AspNet.WebApi.Cors
It will install the WebApi.Cors reference. Then open “App_Start\WebApiConfig.cs” file. Add config.EnableCors(); before config.MapHttpAttributeRoutes();
Then go back to our UsersController.cs and add [EnableCors(origins: "*", headers: "*", methods: "*")] before the class definition
Finally – rebuild the project again. Then try to test the APIs again, now it should work
I hope you enjoyed our article and you found it useful.
Bootstrap tutorial / parallax scrolling tutorial. It is no secret that the bootstrap is used on many websites now. This allows to save time and create excellent results in a short period of time. In particular it concerns the markup and styles. Last time, when we wrote about the bootstrap, we received many positive comments, so I decided to prepare another lesson on using this framework today. In order to make it more interesting, we’ll create the demonstration with one of the interesting effects – Parallax. We will see the use of different backgrounds when scrolling the page. In order to understand what we intend to do – please have a look at the demo.
Our lessons on webgl continue. Today we review Threejs cameras. Threejs library provides two different cameras: orthographic camera (OrthographicCamera) and perspective camera (PerspectiveCamera). The best way to understand the difference between these cameras – try every one of them with your own eyes.
Our new tutorial tells us about creation of animated 3D Sphere (through direct access to pixels of canvas). The sphere itself is getting around the canvas continuously. This example should work in the most of modern browsers (like Firefox, Chrome, Safari and even in IE).
I am pretty sure that you understand the importance of website navigation menu and it’s correlation with on site engagement. Here are ten UX tips to make it more usable.
Polaroid – we did not talk about photo galleries for a while, however enough time has already passed and here could be new galleries. Not so long ago, I stumbled on a new jquery plugin gallery, which builds the photos in a stack of Polaroid pictures. It seemed to me it was fun and can please you, because gallery has a very user-friendly and intuitive interface. Implementing it for a ‘stack’ of your photos is not difficult. Today we look at the whole process.

")