WebGL With Three.js – Lesson 5
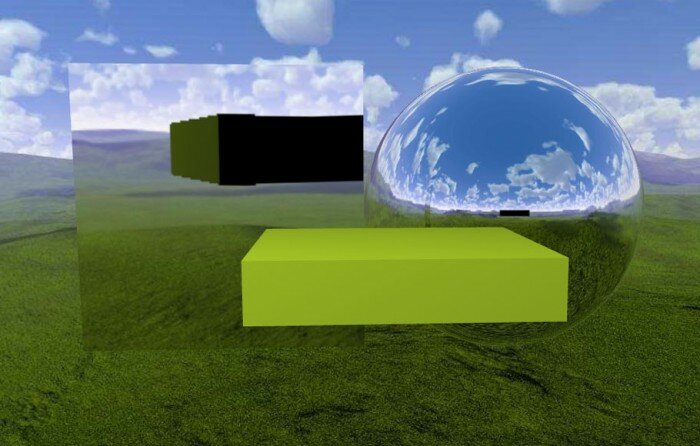
Today we continue our webgl (three.js) lessons for those who study this language, and today we will show you how to create a beautiful environment (sky box) for your scenes in three different ways: cubic skybox (with 6 textures for all sides), spherical skybox (with single surrounding texture) and spherical shader skybox (without textures). We will also consider how to create several special semi-transparent objects with the following properties: reflection, refraction and soapbubble-like object.
Live Demo 1
Live Demo 2
Live Demo 3
Now we can start, firstly, let’s define the general constructions of all our demos:
var lesson5 = {
    scene: null,
    camera: null,
    renderer: null,
    container: null,
    controls: null,
    clock: null,
    stats: null,
    init: function() { // Initialization
        // create main scene
        this.scene = new THREE.Scene();
        var SCREEN_WIDTH = window.innerWidth,
            SCREEN_HEIGHT = window.innerHeight;
        // prepare camera
        var VIEW_ANGLE = 45, ASPECT = SCREEN_WIDTH / SCREEN_HEIGHT, NEAR = 1, FAR = 1000;
        this.camera = new THREE.PerspectiveCamera( VIEW_ANGLE, ASPECT, NEAR, FAR);
        this.scene.add(this.camera);
        this.camera.position.set(0, 30, 150);
        this.camera.lookAt(new THREE.Vector3(0,0,0));
        // prepare renderer
        this.renderer = new THREE.WebGLRenderer({antialias:true, alpha: false});
        this.renderer.setSize(SCREEN_WIDTH, SCREEN_HEIGHT);
        this.renderer.setClearColor(0xffffff);
        this.renderer.shadowMapEnabled = true;
        this.renderer.shadowMapSoft = true;
        // prepare container
        this.container = document.createElement('div');
        document.body.appendChild(this.container);
        this.container.appendChild(this.renderer.domElement);
        // events
        THREEx.WindowResize(this.renderer, this.camera);
        // prepare controls (OrbitControls)
        this.controls = new THREE.OrbitControls(this.camera, this.renderer.domElement);
        this.controls.target = new THREE.Vector3(0, 0, 0);
        this.controls.maxDistance = 700;
        // prepare clock
        this.clock = new THREE.Clock();
        // prepare stats
        this.stats = new Stats();
        this.stats.domElement.style.position = 'absolute';
        this.stats.domElement.style.left = '50px';
        this.stats.domElement.style.bottom = '50px';
        this.stats.domElement.style.zIndex = 1;
        this.container.appendChild( this.stats.domElement );
        // add point light
        var spLight = new THREE.PointLight(0xffffff, 1.75, 1000);
        spLight.position.set(-100, 200, 200);
        this.scene.add(spLight);
        // add simple cube
        var cube = new THREE.Mesh( new THREE.CubeGeometry(50, 10, 50), new THREE.MeshLambertMaterial({color:0xffffff * Math.random()}) );
        cube.position.set(0, 0, 0);
        this.scene.add(cube);
        // add custom objects
        // .....
    }
};
// Animate the scene
function animate() {
    requestAnimationFrame(animate);
    render();
    update();
}
// Update controls and stats
function update() {
    lesson5.controls.update(lesson5.clock.getDelta());
    lesson5.stats.update();
}
// Render the scene
function render() {
    if (lesson5.renderer) {
        lesson5.renderer.render(lesson5.scene, lesson5.camera);
    }
}
// Initialize lesson on page load
function initializeLesson() {
    lesson5.init();
    animate();
}
if (window.addEventListener)
    window.addEventListener('load', initializeLesson, false);
else if (window.attachEvent)
    window.attachEvent('onload', initializeLesson);
else window.onload = initializeLesson;
This is very common structure that adds all the general elements like: scene itself, camera, renderer, controls, light and stats element. Now we are about to start describing each skybox type.
Part 1: Skyboxes
1. Cubic Skybox (textured)
drawSimpleSkybox: function() {
    // define path and box sides images
    var path = 'skybox/1/';
    var sides = [ path + 'sbox_px.jpg', path + 'sbox_nx.jpg', path + 'sbox_py.jpg', path + 'sbox_ny.jpg', path + 'sbox_pz.jpg', path + 'sbox_nz.jpg' ];
    // load images
    var scCube = THREE.ImageUtils.loadTextureCube(sides);
    scCube.format = THREE.RGBFormat;
    // prepare skybox material (shader)
    var skyShader = THREE.ShaderLib["cube"];
    skyShader.uniforms["tCube"].value = scCube;
    var skyMaterial = new THREE.ShaderMaterial( {
      fragmentShader: skyShader.fragmentShader, vertexShader: skyShader.vertexShader,
      uniforms: skyShader.uniforms, depthWrite: false, side: THREE.BackSide
    });
    // create Mesh with cube geometry and add to the scene
    var skyBox = new THREE.Mesh(new THREE.CubeGeometry(500, 500, 500), skyMaterial);
    skyMaterial.needsUpdate = true;
    this.scene.add(skyBox);
}
The simplest – is to create the basic cubic skybox. There is the special function in three.js’s utils to load the set of images: ImageUtils::loadTextureCube. Then, we use THREE.ShaderLib to create ShaderMaterial for our future cubic skybox (we used CubeGeometry for the geometry).
2. Spherical skybox (textured)
Besides the standard way, our skybox can be spherical and in this case we can use only one spherical texture for the sky:
drawSphericalSkybox: function() {
    // prepare ShaderMaterial
    var uniforms = {
        texture: { type: 't', value: THREE.ImageUtils.loadTexture('skybox/2/skybox.jpg') }
    };
    var skyMaterial = new THREE.ShaderMaterial( {
        uniforms: uniforms,
        vertexShader: document.getElementById('sky-vertex').textContent, fragmentShader: document.getElementById('sky-fragment').textContent
    });
    // create Mesh with sphere geometry and add to the scene
    var skyBox = new THREE.Mesh(new THREE.SphereGeometry(250, 60, 40), skyMaterial);
    skyBox.scale.set(-1, 1, 1);
    skyBox.eulerOrder = 'XZY';
    skyBox.renderDepth = 500.0;
    this.scene.add(skyBox);
}
Pay attention, that in order to build it, we used special shaders: sky-vertex and sky-fragment:
    <!-- skybox shaders -->
    <script type="application/x-glsl" id="sky-vertex">
    varying vec2 vUV;
    void main() {
      vUV = uv;
      vec4 pos = vec4(position, 1.0);
      gl_Position = projectionMatrix * modelViewMatrix * pos;
    }
    </script>
    <script type="application/x-glsl" id="sky-fragment">
    uniform sampler2D texture;
    varying vec2 vUV;
    void main() {
      vec4 sample = texture2D(texture, vUV);
      gl_FragColor = vec4(sample.xyz, sample.w);
    }
    </script>
    <!-- /skybox shaders -->
Thus, our spherical skybox has a similar structure, but we used another geometry (SphereGeometry) and new ShaderMaterial
3. Spherical skybox (non textured)
Sometimes, a clear sky is enough, in this case we don’t need to use additional images to build the skybox. Here you can find how we can avoid using textures to build nice-looking spherical skybox with gradient. First of all, we need to add two new shaders:
    <!-- skybox shaders -->
    <script type="x-shader/x-vertex" id="sky-vertex">
    varying vec3 vWorldPosition;
    void main() {
        vec4 worldPosition = modelMatrix * vec4( position, 1.0 );
        vWorldPosition = worldPosition.xyz;
        gl_Position = projectionMatrix * modelViewMatrix * vec4( position, 1.0 );
    }
    </script>
    <script type="x-shader/x-fragment" id="sky-fragment">
    uniform vec3 topColor;
    uniform vec3 bottomColor;
    uniform float offset;
    uniform float exponent;
    varying vec3 vWorldPosition;
    void main() {
        float h = normalize( vWorldPosition + offset ).y;
        gl_FragColor = vec4( mix( bottomColor, topColor, max( pow( h, exponent ), 0.0 ) ), 1.0 );
    }
    </script>
    <!-- /skybox shaders -->
And then, implement the gradient-based skybox:
drawShaderSkybox: function() {
    // prepare ShaderMaterial without textures
    var vertexShader = document.getElementById('sky-vertex').textContent, fragmentShader = document.getElementById('sky-fragment').textContent;
    var uniforms = {
        topColor: {type: "c", value: new THREE.Color(0x0055ff)}, bottomColor: {type: "c", value: new THREE.Color(0xffffff)},
        offset: {type: "f", value: 50}, exponent: {type: "f", value: 0.6}
    }
    var skyMaterial = new THREE.ShaderMaterial({vertexShader: vertexShader, fragmentShader: fragmentShader, uniforms: uniforms, side: THREE.BackSide, fog: false});
    // create Mesh with sphere geometry and add to the scene
    var skyBox = new THREE.Mesh( new THREE.SphereGeometry(250, 60, 40), skyMaterial);
    this.scene.add(skyBox);
}
In the third example – we didn’t use images, we only used two colors for the gradient: top and bottom colors.
Part 2: Additional objects
As you may have already noticed – we used various objects at our demos. They use various visual effects: reflection, refraction and bubble. In this section you will find how they were made.
1. Reflection
You can use this method (in fact – function) to build reflecting surfaces:
drawReflectingObjects: function() {
    // Object 1: rectangle
    // create additional camera
    this.mCubeCamera = new THREE.CubeCamera(0.1, 1000, 1000); // near, far, cubeResolution
    this.scene.add(this.mCubeCamera);
    // create mirror material and mesh
    var mirrorCubeMaterial = new THREE.MeshBasicMaterial( { envMap: this.mCubeCamera.renderTarget, side: THREE.DoubleSide } );
    this.mCube = new THREE.Mesh( new THREE.CubeGeometry(100, 100, 5, 1, 1, 1), mirrorCubeMaterial);
    this.mCube.position.set(-50, 0, -150);
    this.mCubeCamera.position = this.mCube.position;
    this.mCubeCamera.lookAt(new THREE.Vector3(0, 0, 0));
    this.scene.add(this.mCube);
    // Object 2: sphere
    // create additional camera
    this.mSphereCamera = new THREE.CubeCamera(0.1, 1000, 100);
    this.scene.add(this.mSphereCamera);
    // create mirror material and mesh
    var mirrorSphereMaterial = new THREE.MeshBasicMaterial( { envMap: this.mSphereCamera.renderTarget, side: THREE.DoubleSide } );
    this.mSphere = new THREE.Mesh( new THREE.SphereGeometry(50, 32, 32), mirrorSphereMaterial );
    this.mSphere.position.set(50, 0, -150);
    this.mSphereCamera.position = this.mSphere.position;
    this.mSphereCamera.lookAt(new THREE.Vector3(0, 0, 0));
    this.scene.add(this.mSphere);
}
In general – this is easy to achieve – we used two objects (rectangle and sphere) with basic material. But here is one little magic – we used envMap in our material. This property allows set environmental map for materials. Just above we created two cameras, and put it into the same position as our cube and sphere. This is why they reflect. However there is one moment – every time we move our main camera – we need to update our camera, thereby we need to add the following code into the ‘render’ function:
// Render the scene
function render() {
    if (lesson5.renderer) {
        // update reflecting objects
        lesson5.mCube.visible = false;
        lesson5.mCubeCamera.updateCubeMap(lesson5.renderer, lesson5.scene);
        lesson5.mCube.visible = true;
        lesson5.mSphere.visible = false;
        lesson5.mSphereCamera.updateCubeMap(lesson5.renderer, lesson5.scene);
        lesson5.mSphere.visible = true;
        lesson5.renderer.render(lesson5.scene, lesson5.camera);
    }
}
2. Refraction
You can use this method (in fact – function) to build refracting objects:
drawRefractingObject: function() {
    // create additional camera
    this.rSphereCamera = new THREE.CubeCamera(0.1, 1000, 1000);
    this.scene.add(this.rSphereCamera);
    this.rSphereCamera.renderTarget.mapping = new THREE.CubeRefractionMapping();
    // create refracting material and spherical mesh
    var rMaterial = new THREE.MeshBasicMaterial({
        color: 0xffffdd,
        envMap: this.rSphereCamera.renderTarget,
        refractionRatio: 0.995,
        reflectivity: 0.5
    });
    this.rSphere = new THREE.Mesh( new THREE.SphereGeometry(40, 32, 32), rMaterial);
    this.rSphere.position.set(0, 0, 100);
    this.rSphereCamera.position = this.rSphere.position;
    this.scene.add(this.rSphere);
}
We used nearly the same method as we used for reflection. We only added two new properties for our material: refractionRatio and reflectivity. The styles add refraction effect for our sphere, now ot looks like a magnifier. Please keep in mind, that we will need to update our camera in the ‘render’ function as well:
// Render the scene
function render() {
    if (lesson5.renderer) {
        // update refracting object
        lesson5.rSphere.visible = false;
        lesson5.rSphereCamera.updateCubeMap(lesson5.renderer, lesson5.scene);
        lesson5.rSphere.visible = true;
        lesson5.renderer.render(lesson5.scene, lesson5.camera);
    }
}
3. Bubble
To achieve this effect, we need to use two new custom shaders:
    <!-- bubble shaders -->
    <script type="x-shader/x-vertex" id="bubble-vertex">
    uniform float mRefractionRatio;
    uniform float mBias;
    uniform float mScale;
    uniform float mPower;
    varying vec3 vReflect;
    varying vec3 vRefract[3];
    varying float vReflectionFactor;
    void main() {
        vec4 mvPosition = modelViewMatrix * vec4( position, 1.0 );
        vec4 worldPosition = modelMatrix * vec4( position, 1.0 );
        vec3 worldNormal = normalize( mat3( modelMatrix[0].xyz, modelMatrix[1].xyz, modelMatrix[2].xyz ) * normal );
        vec3 I = worldPosition.xyz - cameraPosition;
        vReflect = reflect( I, worldNormal );
        vRefract[0] = refract( normalize( I ), worldNormal, mRefractionRatio );
        vRefract[1] = refract( normalize( I ), worldNormal, mRefractionRatio * 0.99 );
        vRefract[2] = refract( normalize( I ), worldNormal, mRefractionRatio * 0.98 );
        vReflectionFactor = mBias + mScale * pow( 1.0 + dot( normalize( I ), worldNormal ), mPower );
        gl_Position = projectionMatrix * mvPosition;
    }
    </script>
    <script type="x-shader/x-fragment" id="bubble-fragment">
    uniform samplerCube tCube;
    varying vec3 vReflect;
    varying vec3 vRefract[3];
    varying float vReflectionFactor;
    void main() {
        vec4 reflectedColor = textureCube( tCube, vec3( -vReflect.x, vReflect.yz ) );
        vec4 refractedColor = vec4( 1.0 );
        refractedColor.r = textureCube( tCube, vec3( -vRefract[0].x, vRefract[0].yz ) ).r;
        refractedColor.g = textureCube( tCube, vec3( -vRefract[1].x, vRefract[1].yz ) ).g;
        refractedColor.b = textureCube( tCube, vec3( -vRefract[2].x, vRefract[2].yz ) ).b;
        gl_FragColor = mix( refractedColor, reflectedColor, clamp( vReflectionFactor, 0.0, 1.0 ) );
    }
    </script>
    <!-- /bubble shaders -->
And here is new shader material with THREE.CubeCamera for our soap bubble object:
drawBubbleObject: function() {
    // create additional camera
    this.bSphereCamera = new THREE.CubeCamera(0.1, 1000, 1000);
    this.scene.add(this.bSphereCamera);
    // prepare custom ShaderMaterial
    var uniforms =  {
        "mRefractionRatio": { type: "f", value: 1.02 },
        "mBias":     { type: "f", value: 0.1 },
        "mPower":    { type: "f", value: 2.0 },
        "mScale":    { type: "f", value: 1.0 },
        "tCube":     { type: "t", value: this.bSphereCamera.renderTarget } //  textureCube }
    };
    // create custom material for the shader
    var customMaterial = new THREE.ShaderMaterial({
        uniforms:       uniforms,
        vertexShader:   document.getElementById('bubble-vertex').textContent,
        fragmentShader: document.getElementById('bubble-fragment').textContent
    });
    // create spherical mesh
    this.bSphere = new THREE.Mesh( new THREE.SphereGeometry(50, 32, 32), customMaterial);
    this.bSphere.position.set(-75, 0, 0);
    this.scene.add(this.bSphere);
    this.bSphereCamera.position = this.bSphere.position;
}
And again, we need to update our additional camera all the time:
// Render the scene
function render() {
    if (lesson5.renderer) {
        // update bubble object
        lesson5.bSphere.visible = false;
        lesson5.bSphereCamera.updateCubeMap(lesson5.renderer, lesson5.scene);
        lesson5.bSphere.visible = true;
        lesson5.renderer.render(lesson5.scene, lesson5.camera);
    }
}
Live Demo 1
Live Demo 2
Live Demo 3
[sociallocker]
download in package
[/sociallocker]
Conclusion
Stay tuned for new lessons and you are sure to find something new and interesting for yourself.


