
New SASS tutorial tells about many aspects of using SASS: installation, known facts, variables, mixins, nested rules, inline imports, and more. It certainly will be useful for beginners programmers and advanced guru.
SASS
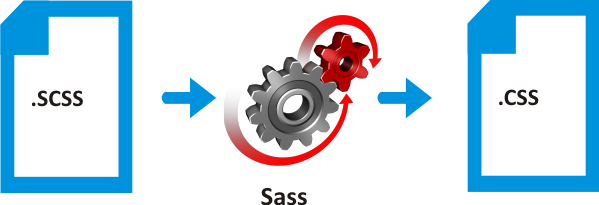
Sass is a CSS pre-processor: a good implement that any web builder needs in a finesse style design of a work.
BEFORE USING SASS
To use sass on your computer you must firstly install a ruby.
There are several ways to install Ruby based on the operating system you are using on your computer.
INSTALLING RUBY
Hint: Click on the any type of operating systems (OS) listed below to install ruby depending on the type of OS your computer is using.
LINUX
WINDOWS
MAC
WHAT YOU MUST KNOW ABOUT SASS
Sass does not alter your protocols in the way you work before rather it makes your life easier in web designing. So I write to convince you not to confuse you that sass can help you in your projects more optimized than css.
WHAT YOU DON’T HAVE TO CHANGE JUST BECAUSE YOU ARE USING SASS
- Basically to learn and use SASS you don’t need to be a command-line expert
(The commands for running Sass are few and uncomplicated.) - You have to change the way you writes css
(Your way of writing CSS will be an applied to use in SASS.) - You don’t have change the way you design
All you need is to learn sass, start sassing, and add to the knowledge you already have making your projects more professional when you combine your new learned sass with way you design and write css before.
NEEDS TO LEARNING AND USE SASS
Ever needed to change, say, a color in your stylesheet, and found that you had to find and replace the value multiple times? Don’t you wish CSS allowed you to do this?
Input (SASS)
$pink: #ea4c89
$font-size: 12px
p
  font-size: $font-size
  color: $pink
p strong
  text-transform: uppercase
Output Result (CSS)
p {
  font-size: 12px;
  color: #ea4c89;
}
p strong {
  text-transform: uppercase
}
Input (SASS)
@mixin colors($text, $background, $border)
  color: $text
  background-color: $background
  border-color: $border
$values: #ff0000, #00ff00, #0000ff
.primary
  @include colors($values...)
$value-map: (text: #00ff00, background: #0000ff, border: #ff0000);
.secondary {
  @include colors($value-map...)
}
Output Result (CSS)
.primary {
  color: #ff0000;
  background-color: #00ff00;
  border-color: #0000ff;
}
.secondary {
  color: #00ff00;
  background-color: #0000ff;
  border-color: #ff0000;
}
What if you could change that value in one place and the entire stylesheet reflected that change? You can with Sass!
Or how about repeated blocks of styles that are used in various locations throughout the stylesheet?
Wouldn’t it be fantastic to roll those shared rules into a reusable block? Again, defined only once but included wherever you needed them.
Input (SASS)
@mixin large-text
  font:
    family: Arial
    size: 20px
    weight: bold
  color: #ff0000
.page-title
  @include large-text
  padding: 4px
  margin-top: 10px
Output Result (CSS)
.page-title {
  font-family: Arial;
  font-size: 20px;
  font-weight: bold;
  color: #ff0000;
  padding: 4px;
  margin-top: 10px;
}
That’s also Sass! And those two extremely simple examples barely scratch the surface as to how Sass implement writing stylesheets faster, easier, and more flexible observing a professional protocol “Don’t repeat yourself” (DRY) principle of programming Coined and defined by Andy Hunt and Dave Thomas in their book, The Pragmatic Programmer. It’s a welcome helper in the world of web design, because anyone that’s created a website knows.
DRY declares:
Every piece of knowledge must have a single, unambiguous, authoritative representation within a system.
WHAT IS SASS
Sass (short for Syntactically Awesome Stylesheets) is an extension of CSS that adds power and elegance to the basic language. It allows you to use variables, nested rules, mixins, inline imports, and more, all with a fully CSS-compatible syntax. Sass helps keep large stylesheets well-organized, and get small stylesheets up and running quickly, particularly with the help of sass compilers.
INSTALLING SASS ON WINDOWS
Unlike Mac OS X, Windows doesn’t come with Ruby pre-installed. The official Sass website recommends RubyInstaller for Windows to get things running on your PC.
Once Ruby is installed, you’ll be able to follow the rest of the commands discussed in this tutorial.
INSTALLING SASS ON A MAC
Mac OS X comes preinstalled with Ruby, and Sass is packaged as a Ruby “gem”, which is a clever programmer term for a Ruby application.
Simply fire up Terminal.app (don’t panic!), and at the prompt type the following and hit enter:
$ gem install sass
That wasn’t so bad, right? After you hit enter, you’ll see the following results stream by in Terminal:
Fetching: sass-3.2.10.gem (100%)
Successfully installed sass-3.2.10
1 gem installed
Installing ri documentation for sass-3.2.10...
Installing RDoc documentation for sass-3.2.10...
Congratulations! You’ve just installed Sass.
TO GET THE LATEST AND GREATEST, TYPE THIS IN THE TERMINAL PROMPT AND HIT ENTER:
$ gem install sass --pre
You’ll see the results stream by once again, this time confirming the 3.3.0 alpha has been installed.
Fetching: sass-
3.3.0.alpha.3
.gem (100%)
Successfully installed sass-3.3.0.alpha.3
1 gem installed
Installing ri documentation for sass-3.3.0.alpha.3...
Installing RDoc documentation for sass-3.3.0.alpha.3...
TO SETUP SASS WORKFLOW
TELLING SASS WHICH FILES TO WATCH
Okay. We’ve installed Sass, so now what? We need to tell Sass which files to “watch”. Meaning, while we’re editing a stylesheet, we want Sass to monitor that file and convert the .sass file with all our nifty Sass syntax to the browser-ready .css file every time we make changes.
There are a few ways to do this:
• A simple command via the command line.
• A desktop app (there are several) that will help you manage your Sass files and their output.
USING COMMAND-LINE TO SASS WHICH FILE TO WATCH
Essentially the command tells Sass to watch a specified .sass file, and convert it to a target .css file.
For example:
$ sass --watch screen.scss:screen.css
After you run the above command, Sass will start monitoring any changes made to screen.scss.
You’ll see this message in the terminal after hitting return:
>>> Sass is watching for changes. Press Ctrl-C to stop.
If the file is updated, Sass will convert and overwrite screen.css automatically. In other words, every time you save changes in your Sass document, the CSS file will update instantaneously.
The file names don’t have to match. For instance, this would work just as well (though it might be confusing):
$ sass --watch crookcodes.scss:brooklyn.css
Furthermore, the files don’t have to be in the same directory.
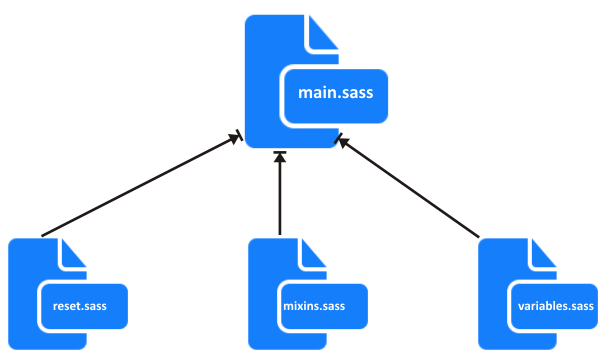
In fact, I find it useful to separate my .sass files from my .css files. This isn’t a requirement, but it helps keep things organized.
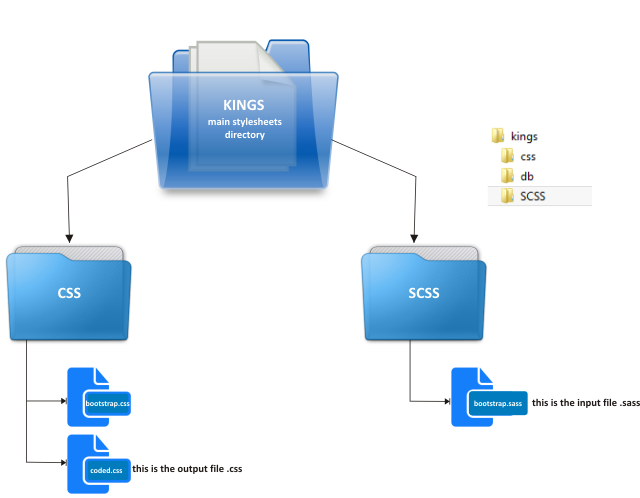
Sass File Organization Shows a typical setup, with a main stylesheets directory, which contains the Sass-generated .css files and a sass directory that contains all the .sass that I’m working with.
You can also tell Sass to watch an entire directory, rather than just a single stylesheet. So using the above file structure, I could use the following watch command to monitor changes on any of the .sass files in my project (provided I’m currently in the -/ directory that holds my stylesheets and images in the terminal):
$ sass --watch stylesheets/sass:stylesheets
USING APPS INSTEAD OF THE COMMAND LINE
The commands we’ve gone over so far are extremely simple, and I have faith that you, astute front-end crafter that you are, wouldn’t find it difficult to add those bits of typing to your workflow. That said, there are desktop applications that make it even easier to manage the monitoring and output of Sass files.
They’re worth a look regardless of your comfort level with the command line.
Scout
Scout is a free desktop app for both Mac and Windows that provides “a self-contained Ruby environment, letting you effortlessly manage all of your Sass projects with a handful of clicks.” In other words, Scout gives you a nice, visual interface to set up your watched directories and files rather than using the command line.
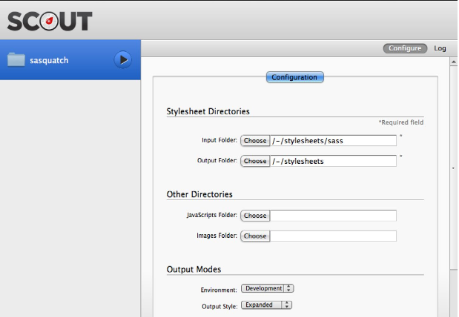
Fig 2.3: Scout’s dead simple setup-configuration screen.
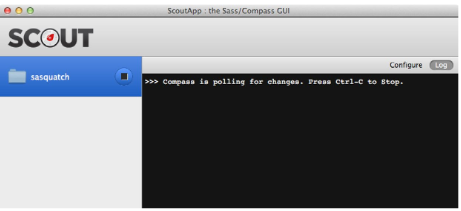
Fig 2.4: as Scout watches your Sass files, the “log” keeps you updated with its compiling status.
Once you’ve chosen input and output folders, simply click the play button for your project and Scout will start monitoring files.
CodeKit
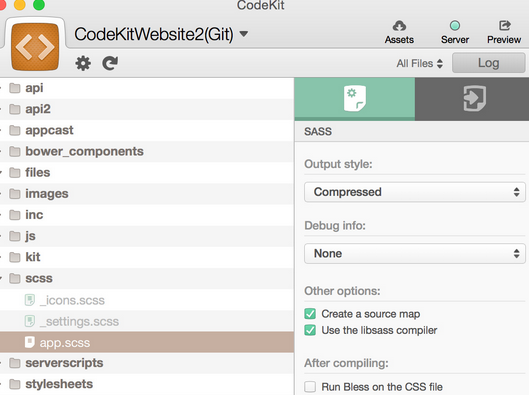
Like Scout, CodeKit (for Mac OS only) compiles your Sass files with a simple GUI. But it also compiles LESS, Stylus, Haml, CoffeeScript, JavaScript, and others.
Additionally, CodeKit has other bells and whistles that optimize files and images and automatically reload your browser as you develop (Fig 2.5).
LiveReload
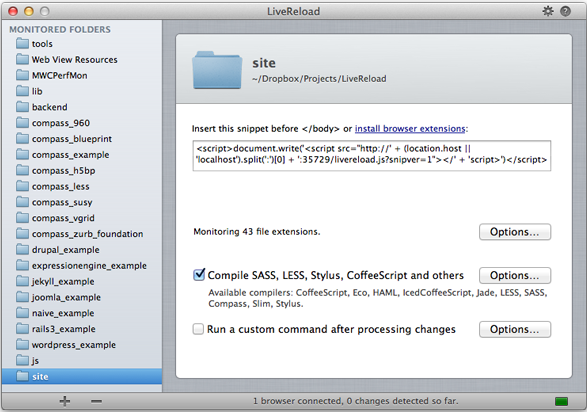
LiveReload monitors any file changes, including Sass compiling, as you work and automatically reloads the browser. It’s available for both Mac and Windows (Fig 2.6).
Koala
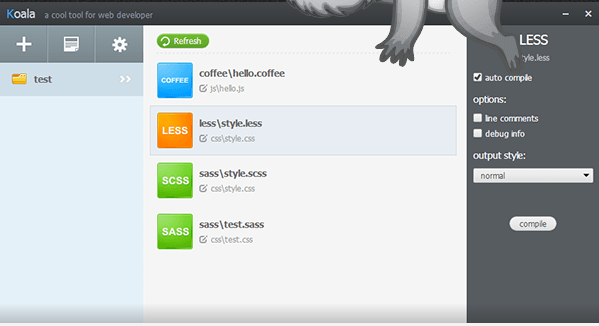
Koala is a GUI application for Less, Sass, Compass and CoffeeScript compilation, to help web developers to use them more efficiently. Koala can run in windows, linux and mac.
CHOOSING AN SASS OUTPUT STYLE
SassScript provides the following mechanisms of compiling script in css. The output styles are as follow.
1. Nested
Nested (the default). The default style that Sass outputs is nested, which indents each rule to reflect the structure of the HTML it’s styling. Here’s an example of the nested style:
Nested Input (sass script)
$border: 1px solid #EFC6F3
.post
  border-radius: 3px
  background: #FFF8FF
  border: $border
  padding: 15px
  color: #333333
.title
  color: #000000
  font-size: 20px
.alt-title
  @extend .title
  border-bottom: $border
Output result
.post {
  border-radius: 3px;
  background: #FFF8FF;
  border: 1px solid #EFC6F3;
  padding: 15px;
  color: #333333;
}
.title {
  color: #000000;
  font-size: 20px;
}
.alt-title {
  border: 1px solid #EFC6F3;
}
Below Command line outputs sass in nested style
[sass –watch scss:css –style nested]
2. Expanded
The expanded style is a more typical format similar to stylesheets that are crafted by hand.
Expanded Input (sass script)
$script-tutorial-font-size: 3em
$script-tutorials: 1px #f00
$script-tutorials-color2: #fdd
$script-tutorials-color1: #ff0
$script-tutorials-border: 3px
.error
  border: $script-tutorials
  background-color: $script-tutorials-color2
.attention
  font-size: $script-tutorial-font-size
  background-color: $script-tutorials-color1
.seriousError
  @extend .error
  @extend .attention
  border-width: $script-tutorials-border
Output result (CSS)
.error {
  border: 1px #f00;
  background-color: #fdd;
}
.attention {
  font-size: 3em;
  background-color: #ff0;
}
.seriousError {
  @extend .error
  @extend .attention
  border-width: 3px;
}
Below Command line outputs sass in nested style
[sass –watch scss:css –style expanded]
$sass –watch –style expanded screen.scss:screen.css
3. Compact
The compact style puts each declaration on one line, emphasizing the selectors. The idea is you can easily scan the left side to find visually grouped rules, with line breaks between.
Input (sass script)
@mixin firefox-message($selector)
  body.firefox #{$selector}:before
    content: "Hi, Firefox users!"
@include firefox-message(".header")
p
  font: 10px/8px                    // Plain CSS, no division
  $width: 1000px
  width: $width/2                   // Uses a variable, does division
  width: round(1.5)/2               // Uses a function, does division
  height: (500px/2)                 // Uses parentheses, does division
  margin-left: 5px + 8px/2px        // Uses +, does division
  font: (italic bold 10px/8px)      // In a list, parentheses don't count
  $gbl-script-tutorials: 5em !global
#main
  width: $gbl-script-tutorials
#sidebar
  $height-script-tutor: 5em
  height: $height-script-tutor
Output result (CSS)
body.firefox .header:before {
  content: "Hi, Firefox users!"
}
p {
  font: 10px/8px
  width: 500px;
  width: 1;
  height: 250px;
  margin-left: 9px;
  font: italic bold 1.25;
}
Below Command line outputs sass in nested style
[sass –watch scss:css –style compact]
$sass –watch –style compact screen.scss:screen.css
4. Compress
Compress Minifies our CSS output by stripping out comments and unnecessary spaces. It compresses CSS to one line. The most optimized output style – use before uploading your CSS to the server.
The fourth and final style is compressed, which removes all spaces and line breaks to reduce the stylesheet’s file size.
Input (sass script)
$type: monster
p
  @if $type == ocean
    color: blue
  @else if $type == matador
    color: red
  @else if $type == monster
    color: green
  @else
    color: black
$primary-color: #3bbfce
$margin: 16px
.content-navigation
  border-color: $primary-color
  color: darken($primary-color, 10%)
.border
  padding: $margin/2
  margin:  $margin/2
  border-color: $primary-color
.widget-social
  text-align: right
.widget-social a,  .widget-social a:visited
  padding: 0 3px
  color: #222222
  color: rgba(34, 34, 34, 0.77)
.widget-social a:hover
  color: #B00909
Output result (CSS)
p {
  color: green;
}
.content-navigation {
  border-color: #3bbfce;
  color: #2b9eab;
}
.border {
  padding: 8px;
  border-color: #3bbfce;
}
.widget-social  {
  text-align: right;
}
.widget-social a,  .widget-social a:visited {
  padding: 0 3px;
  color: #222222;
  color: rgba(34, 34, 34, 0.77);
}
.widget-social a:hover {
  color: #B00909;
}
Below Command line outputs sass in nested style
[sass –watch scss:css –style compressed]
$ sass –watch –style compressed screen.scss:screen.css
WHAT YOU MUST NOT DO WHILE USING SASS
Do not alter the output css script the reason being, any changes you make to the .css file will eventually get overridden as soon as you update the .sass file the sass compiler compiles the output. So stick to the .sass and blissfully ignore its output.
When you’re using Sass, you’ll no longer be editing any .css files.
WORKING WITH SASS
FEATURES OF SASS WITH EXAMPLES
NESTING
Nesting in Sass means less typing, using indentation to reflect the selector (and property) formation. With Sass, you can nest CSS rules inside each other instead of repeating selectors in separate declarations. The nesting also reflects the markup structure.
SASS SCRIPT (INPUT)
script-tutorials[play="slide"]
  margin: 20px 0 30px 0
  border-bottom: 4px solid #333
  #company-icon
    float: left
    margin: 0 20px 0 0
    img
      display: block
      opacity: .95
  h2
    padding: 15px 0
    font-size: 54px
    line-height: 1
    font-family: Jubilat, Georgia, serif
    font-weight: bold
CSS SCRIPT OUTPUT (result)
script-tutorials[play="slide"] {
  margin: 20px 0 30px 0;
  border-bottom: 4px solid #333;
}
script-tutorials[play="slide"] #company-icon {
  float: left;
  margin: 0 20px 0 0;
}
script-tutorials[play="slide"] #company-icon img {
  display: block;
  opacity: 0.95;
}
script-tutorials[play="slide"] h2 {
  padding: 15px 0;
  font-size: 54px;
  line-height: 1;
  font-family: Jubilat, Georgia, serif;
  font-weight: bold;
}
Nesting namespaced properties
In addition to nesting rules, you can nest properties such as text properties, font properties and background properties that share a namespace in Sass.
SASS SCRIPT (INPUT)
script-tutorials[play="slide"] h2
  padding: 15px 0
  font:
    size: 54px
    family: Jubilat, Georgia, serif
    weight: bold
  line-height: 1
  text:
    transform: uppercase
    decoration: underline
    align: center
  background:
    color: #ea4c89
    size: 16px 16px
    image: url(script_tutorial.png)
    repeat: no-repeat
    position: top left
CSS SCRIPT COMPILED (result)
script-tutorials[play="slide"] h2 {
  padding: 15px 0;
  font-size: 54px;
  font-family: Jubilat, Georgia, serif;
  font-weight: bold;
  line-height: 1;
  text-transform: uppercase;
  text-decoration: underline;
  text-align: center;
  background-color: #ea4c89;
  background-size: 16px 16px;
  background-image: url(script_tutorial.png);
  background-repeat: no-repeat;
  background-position: top left;
}
Referencing Parent Selectors With &
Sass adds the ability to reference the current parent selector using the ampersand as a special placeholder.
SASS SCRIPT (INPUT)
a
  font-weight: bold
  text-decoration: none
  &:link
    color: #0093dd
  &:visited
    color: #45a5d6
  &:hover, &:active, &:focus
    color: #02608f
    text-decoration: underline
nav.sub p
  margin: 0 0 20px 0
  font-size: 18px
  line-height: 1.5
  body.catalogue &
    font-size: 16px
    line-height: 1.4
CSS SCRIPT COMPILED (result)
a {
  font-weight: bold;
  text-decoration: none;
}
a:link {
  color: #0093dd;
}
a:visited {
  color: #45a5d6;
}
a:hover, a:active, a:focus {
  color: #02608f;
  text-decoration: underline;
}
nav.sub p {
  margin: 0 0 20px 0;
  font-size: 18px;
  line-height: 1.5;
}
body.catalogue nav.sub p {
  font-size: 16px;
  line-height: 1.4;
}
HOW TO COMMENT IN SASS
To comment in css using sass we have two kinds of comments in stylesheet multi-line comments and single-line comments.
MULTI-LINE COMMENTS
for multi-line comments in .sass that will appear in .css
SASS COMMENT SCRIPT (INPUT)
/* This is a multi-line comment that will appear in the output file.css */
CSS COMMENT (OUTPUT) RESULT
/* This is a multi-line comment that will appear in the output file.css */
You can ensure important comments (copyright info, attribution, notes on hacks, etc.) appear in the compressed style output by inserting an ! as the first character of the comment:
/*! This is a multi-line comment that will appear in the final .css file. Even in compressed style.*/
SINGLE-LINE COMMENTS
for single-line comments in .sass that will not appear in .css use //
this comments aren’t included in the final output .css file, so you can safely implement them for private comments in .sass file:
// This is a single-line comment.
// Single-line comments are removed from the .css file.
// So you can say whatever you'd like here.
// Confession: I genuinely enjoy developing and design with sass.
// And Less.
VARIABLES
Variables in Sass are defined regularly using the $.
SASS SCRIPT
//      VARIABLES IN SASS
$paint-main: #333
$paint-light: #999
$paint-accent: #ea4c89
$font-sans: "Proxima Nova", "Helvetica Neue", » Helvetica, Arial, sans-serif
$font-serif: Jubilat, Georgia, serif
body
  padding: 0 8%
  font-family: $font-sans
  font-size: 100%
  paint: $paint-main
  background: #fff url(../img/bg.jpg) repeat-x -80% 0
COMPILED .css SCRIPT
@charset "UTF-8";
body {
  padding: 0 8%;
  font-family: "Proxima Nova", "Helvetica Neue", T¬ Helvetica, Arial, sans-serif;
  font-size: 100%;
  paint: #333;
  background: #fff url(../img/bg.jpg) repeat-x -80% 0;
}
MIXINS
Mixin is another feature of sass which make craft styling in web design sweet and professional it is usually defined @mixin directive at the top of the .sass file and summon up in the same .sass file using @include .
SIMPLE MIXINS SASS SCRIPT
$font-serif: san serif
@mixin article-titles
  margin: 0 0 20px 0
  font-family: $font-serif
  font-size: 20px
  font-weight: bold
  text-transform: uppercase
div.main h2
  @include article-titles
  color: #999
COMPILED .css SCRIPT
div.main h2 {
  margin: 0 0 20px 0;
  font-family: san serif;
  font-size: 20px;
  font-weight: bold;
  text-transform: uppercase;
  color: #999;
}
MIXIN ARGUMENTS
SINGLE ARGUMENT SASS SCRIPT
@mixin wrap-ping($paint-wrapper)
  width: 100%
  min-width: 740px
  max-width: 1000px
  margin:
    left: auto
    right: auto
  background-color: $paint-wrapper
#wrapper
  @include wrap-ping(#FFFFFF)
COMPILED .css SCRIPT
#wrapper {
  width: 100%;
  min-width: 740px;
  max-width: 1000px;
  margin-left: auto;
  margin-right: auto;
  background-color: #FFFFFF;
}
MULTIPLE ARGUMENT SASS SCRIPT
@mixin article-heads($color, $background)
  margin: 0 0 20px 0
  font-family: Helvetica, san serif
  font-size: 20px
  font-weight: bold
  text-transform: uppercase
  color: $color
  background: $background
div.emph h2
  @include article-heads(#f00, #000)
COMPILED .css SCRIPT
div.emph h2 {
  margin: 0 0 20px 0;
  font-family: Helvetica, san serif;
  font-size: 20px;
  font-weight: bold;
  text-transform: uppercase;
  color: #f00;
  background: #000;
}
SASS USER DEFINED MIXINS DEFAULT ARGUMENTS
SASS SCRIPT
@mixin article-heads($paint, $back-color: #FF0)
  margin: 0 0 20px 0
  font-family: Helvetica, san serif
  font-size: 20px
  font-weight: bold
  text-transform: uppercase
  color: $paint
  background: $back-color
div.emph h2
  @include article-heads(#24A)
div.readmore p
  @include article-heads(#f201b1,#01c2f2)
COMPILED .css SCRIPT
div.emph h2 {
  margin: 0 0 20px 0;
  font-family: Helvetica, san serif;
  font-size: 20px;
  font-weight: bold;
  text-transform: uppercase;
  color: #24A;
  background: #FF0;
}
div.readmore p {
  margin: 0 0 20px 0;
  font-family: Helvetica, san serif;
  font-size: 20px;
  font-weight: bold;
  text-transform: uppercase;
  color: #f201b1;
  background: #01c2f2;
}
MIXIN LIBRARY
@import
Import is defined in sass using @
SASS SCRIPT IN RESET.SASS
@mixin linear-gradient($from, $to)
  /* Fallback for sad browsers */
  background-color: $to
  /* Mozilla Firefox */
  background-image:    -moz-linear-gradient($from, $to)
  /* Opera */
  background-image:      -o-linear-gradient($from, $to)
  /* WebKit (Safari 4+, Chrome 1+) */
  background-image:        -webkit-gradient(linear, »left top, left bottom, color-stop(0, $from), »color-stop(1, $to))
  /* WebKit (Chrome 11+) */
  background-image: -webkit-linear-gradient($from, $to)
  /* IE10 */
  background-image:     -ms-linear-gradient($from, $to)
  /* W3C */
  background-image:         linear-gradient($from, $to)
SASS SCRIPT IN MIXINS.SASS
@mixin rounded($radius)
  -webkit-border-radius: $radius
  -moz-border-radius: $radius
  border-radius: $radius
@mixin shadow($x, $y, $blur, $color)
  -webkit-box-shadow: $x $y $blur $color
  -moz-box-shadow: $x $y $blur $color
  box-shadow: $x $y $blur $color
@mixin shadow-inset($x, $y, $blur, $color)
  -webkit-box-shadow: inset $x $y $blur $color
  -moz-box-shadow: inset $x $y $blur $color
  box-shadow: inset $x $y $blur $color
@mixin transition($property)
  -webkit-transition: $property .2s ease
  -moz-transition: $property .2s ease
  -o-transition: $property .2s ease
  transition: $property .2s ease
@mixin box-sizing
  -webkit-box-sizing: border-box
  -moz-box-sizing: border-box
  box-sizing: border-box
SASS SCRIPT IN VARIABLES.SASS
$color-accent: #FF0
To import the variable and mixins in reset, mixins and variables sass file into main.sass we define import using @.
SASS SCRIPT IN MAIN.SASS
SASS SCRIPT
// Import other files
@import "mixins.sass"
@import "reset.sass"
@import "variables.sass"
// Site-specific styles
.alert
  padding: 15px
  font-size: 1.2em
  font-weight: normal
  text-transform: uppercase
  line-height: 1
  letter-spacing: 3px
  text-align: center
  color: #fff
  @include shadow(0, 1px, 2px, rgba(0,0,0,.5))
  @include rounded(10px)
.alert-positive
  background: #9c3
COMPILED .css SCRIPT
.alert {
  padding: 15px;
  font-size: 1.2em;
  font-weight: normal;
  text-transform: uppercase;
  line-height: 1;
  letter-spacing: 3px;
  text-align: center;
  color: #fff;
  -webkit-box-shadow: 0 1px 2px rgba(0, 0, 0, 0.5);
  -moz-box-shadow: 0 1px 2px rgba(0, 0, 0, 0.5);
  box-shadow: 0 1px 2px rgba(0, 0, 0, 0.5);
  -webkit-border-radius: 10px;
  -moz-border-radius: 10px;
  border-radius: 10px;
}
.alert-positive {
  background: #9c3;
}
@EXTEND
Using @extend function in sass Instead of littering the markup with extra classes to handle those small exceptions, to “chain together” styles that are shared amongst multiple selectors.
SASS SCRIPT
// Import other files
@import "mixins.sass"
@import "reset.sass"
@import "variables.sass"
// Site-specific styles
.alert
  padding: 15px
  font-size: 1.2em
  font-weight: normal
  text-transform: uppercase
  line-height: 1
  letter-spacing: 3px
  text-align: center
  color: #fff
  @include shadow(0, 1px, 2px, rgba(0,0,0,.5))
  @include rounded(10px)
.alert-positive
  @extend .alert
  background: #9c3
COMPILED .css SCRIPT
.alert, .alert-positive {
  padding: 15px;
  font-size: 1.2em;
  font-weight: normal;
  text-transform: uppercase;
  line-height: 1;
  letter-spacing: 3px;
  text-align: center;
  color: #fff;
  -webkit-box-shadow: 0 1px 2px rgba(0, 0, 0, 0.5);
  -moz-box-shadow: 0 1px 2px rgba(0, 0, 0, 0.5);
  box-shadow: 0 1px 2px rgba(0, 0, 0, 0.5);
  -webkit-border-radius: 10px;
  -moz-border-radius: 10px;
  border-radius: 10px;
}
.alert-positive {
  background: #9c3;
}
Multiple @extends
SASS SCRIPT
// Import other files
@import "mixins.sass"
@import "reset.sass"
@import "variables.sass"
// Site-specific styles
.alert
  padding: 15px
  font-size: 1.2em
  text-align: center
  background: $color-accent
.important
  font-size: 4em
.alert-positive
  @extend .alert
  @extend .important
  background: #9c3
COMPILED .css SCRIPT
.alert, .alert-positive {
  padding: 15px;
  font-size: 1.2em;
  text-align: center;
  background: #FF0;
}
.important, .alert-positive {
  font-size: 4em;
}
.alert-positive {
  background: #9c3;
}
Using placeholder selectors with @extend
Placeholder is define using %
SASS SCRIPT
// Import other files
@import "mixins.sass"
@import "reset.sass"
@import "variables.sass"
// Site-specific styles
// Using placeholder selectors defINED USING % with @extend
%button
  padding: 10px
  font-weight: bold
  background: blue
  border-radius: 6px
.buy
  @extend %button
.submit
  @extend %button
  background: green
COMPILED .css SCRIPT
.buy, .submit {
  padding: 10px;
  font-weight: bold;
  background: blue;
  border-radius: 6px;
}
.submit {
  background: green;
}
Thanks for reading see you in the next tutorials
Live Demo
[sociallocker]
download in package
[/sociallocker]


comment test