404 Error - page not found
We're sorry, but the page you are looking for doesn't exist.
You can go to the homepage

OUR LATEST POSTS

0 790
Developing menu for restaurant

The menu is one of the most important marketing elements. It is the last stage before the customer decides to spend his / her money. Therefore, you need to try to create a truly selling menu that can make new visitors interested and ensure repeated sales.

How to Start Developing a Menu for a Restaurant or Café   

The main and universal criteria are quality and affordability. Indeed, only a well-composed menu can increase sales by more than 15%. This marketing element will help you balance the costs of ingredients and the sums in guests’ receipts. To experience all the advantages of a quality menu, you need to follow these simple points when creating it:

  • Analyse the basic principles of your business. Make sure that every item in the menu corresponds to the general concept of your place.
  • Divide assortment into separate sections. For the convenience of using the menu, divide the assortment into next sections: soups, main dishes, drinks.
  • Design a restaurant or café menu. Organize good navigation and menu accessibility.
  • Use programs and graphic editors to create your own menu.
  • Use the logo to design the menu. This helps visitors remember your corporate style.
  • Download your layout in vector or psd-format and send the result for printing.

What do You Need to Consider while Developing a Menu?

Even the most attractive type of menu loses its advantages if it is isolated from the general corporate style. Here are a few aspects that we recommend to consider when developing:

Target Audience

Most likely, you have already determined the main criteria of your target audience: age, gender, nationality, financial condition, etc. Obviously, these indicators are different for visitors of  children’s cafes, pubs, specialized bars and gourmet restaurants. When designing, it is also worth considering the tastes of your target audience. Children will be glad to see a lot of different colors and pictures. At the same time, craft beer lovers would prefer a country-style design with a minimal number of colorful shades. Study your visitors and offer them a list of dishes in the menu that is best to make your customers order.

Cuisine Specification

Well-developed menu should support the concept of your cuisine. This is especially true if you own a restaurant with a specific national cuisine. It is best to emphasize the specifics of the cuisine with the help of national symbols or associative objects and colors. For example, Japanese cuisine welcomes fonts in the hieroglyphic style, fans and geishas, so you can use them in the names of dishes, and the menu of Indian cuisine looks harmoniously in warm colors with mantras and silhouettes of animals, especially elephants.

The Format of the Place 

Single-page or wall-mounted menus look very organic in fast foods, as they usually do not offer a wide selection and focus on fast customer service. Menus of several pages are studied by visitors longer, which means customer service in such establishments requires more time, and, according to these factors, the amount of sales is smaller. But thanks to the extra charge, restaurants can allow themselves to pay more attention to each visitor. Also, the format of your place has to correspond to all other components of the menu.

Cost of the Dish

Customer understands the real cost of the dish very well. Margin can become proper in several ways. First, include an exotic, expensive ingredient in the dish. Secondly, indicate the dish as “branded” or “prepared by the chef”. Keep in mind that the description and the name of the dish on your menu should not radically differ from the result. If the usual vegetable salad in the menu is described as something unique and has a high margin set, then visitors will consider this trick as a fraud and will no longer trust you.

Designers’ Advice on Developing a Menu 

If you already know what your ideal menu should be, do not rush to implement this idea. First of all, make sure that it complies with the rules for creating a truly selling design and analyze how good your idea is:

Simplicity

Some tips on how to create a cafe menu:

Do not make your customers rack their brains, they have sudoku and crosswords for this purpose. A selling menu should be simple and affordable. The main reasons of complexity are: an overabundance of photos and texts, the lack of structure of the list and too large amount of dishes. Put prices in one column so that it is easier for the customer to navigate your pricing policy. But do not set the price in gradation order; give the visitor the opportunity to explore all the items from the menu. In multi-page menus, the main thing is not to overdo it with the number of dishes. Large assortment scares and frustrates. It is enough to place only 4 positions in the first courses section and 5-6 in the main courses, etc.

The Rule of “A Golden Triangle”

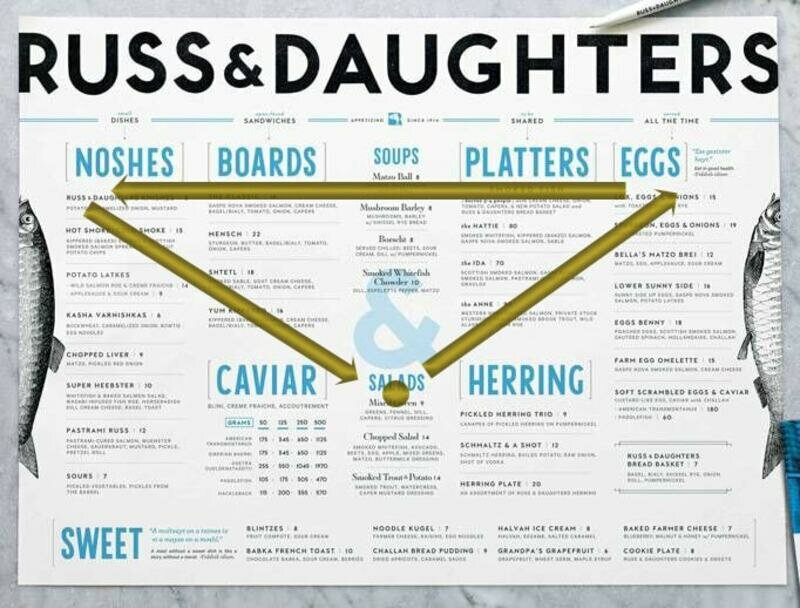
In order to find out what sequence is the most profitable in terms of placing an assortment,use the Golden Triangle rule, according to which:

1. middle: first of all, visitors look at the middle part of the page, therefore they often place special offers there;
2. upper right corner: next customers look at the area in the upper right corner, therefore it is a great place for the main courses;
3. upper left corner: in the end, the visitors’ gazes move to the upper left corner of the sheet, it is best to place light snacks here.

This rule is indispensable if you plan to make the menu on one sheet.

Choosing the Font

When choosing a font, focus on the general style of your place. You can also use branded fonts if you have already had one. If not, we recommend you to buy the logo and the entire corporate identity, which is appropriate to use on the menu pages. The service offers a wide selection of icons, colors and typography options for every taste. When you have decided on the style of suitable fonts, make sure they are readable. A menu that cannot be read is useless. You should also not overload it with the number of various fonts: 2-3 combined fonts are quite enough. Use spaces, italics, bold, and colorful text only where they are appropriate and do not spoil the page view.

The Description of the Dishes

The description of the dishes is necessary not only to inform the visitor about the composition of the dish, but also to make them more attractive. A boring list of ingredients is not able to convince a customer to make an order. But if you add a little imagination and creativity, then  you can make a real advertisement for your dishes of the usual description. It is also important to take into account the particular length of the text in the description. If you do not want to make unnecessary accents, then use the same text length for each description.

Currency Signs are not Recommended

Show your friendliness to the client and do not focus on prices. Naturally, it is necessary to attach a price to each unit in the menu, but avoid the currency signs “€”, “£”, “$”, etc. Tell the client what he can get in a colorful way and briefly point to what he must give for it. So you can build trust and attract loyal customers

Ways to Develop a Menu for the Restaurant

No man is an island. Therefore, it is very cool that you are not alone in the struggle to develop a selling design. There are many ways to help you with this:

Online Designers  

This way of creating a layout for the menu requires a use of special services that provide design services. They can be either expensive or completely free. It all depends on the amount of funds available to you.

Advantages:

• The quick process of creating a menu layout.
• Availability of free offers.
• A large selection of online designers, such as: Canva, Menugo, iMenuPro, MustHave Menus, etc.
• You can use the simple Logaster online service to create a logo and design the menu in a single corporate style.

Disadvantages:

• Designs are limited to the assortment of the designer.
• Usually you need to pay for creative tools.
• Tools are free to access, which means they are not unique.

Graphic Editors

This is about Photoshop. If you have the skills of work in a graphic editor, then it will not be difficult for you to create a design for the menu that will captivate your customers. Some of the innovations can be learned by watching online lessons. But to start work in the editor from scratch means to postpone the creation of a high-quality layout for the menu for a long time.

Advantages:

• You can create your own unique restaurant menu design
• There are many free tools for Photoshop.
• You manage the menu development process yourself.

Disadvantages:

• Without certain skills, it’s difficult to understand the editor.
• More interesting Photoshop tools are expensive.
• The process can take a lot of time.

Designers

This method means that you hire a person or a whole company so that they will develop a layout for your menu design. There are many ways to find a contractor, but experienced designers usually take a considerable amount of money for their work. If you decide to save on a designer by ordering work from a newbie, the result may upset you.

Advantages:

• you do not need to do the work yourself;
• a large amount of designers for any budget;
• you can find an inexpensive designer;

Disadvantages:

• it is necessary to draw up a clear statement of work;
• the initial idea of ??the restaurant menu and the final result of the contractor may be too different;
• designers who are able to offer a quality layout are expensive.

 Templates

The method requires using ready-made menu templates from Pinterest, Shutterstock, etc., so you can overlay your own text and images. The quality of the result is often not the best. You still need to use graphic editors, trying to save the appearance of the background during conversion.

Advantages:

• you can find free templates;
• a bunch of the work has been done, you just have to slightly modify the menu for yourself;
• a large selection of creative ready-made templates.

Disadvantages:

• there is no way to edit the finished template;
• after all the improvements, the quality of the final layout is often severely distorted;
• if you do not have a designer feeling, your work may stylistically not correspond to the original layout.

Developing a selling menu is not a big deal. The main thing is to follow the advice of leading designers and study the trends in the restaurant business. Make your own unique menu and let customers easily make their orders.

0 850
Understanding Closures

If you already know the main concept, the closures are not hard to understand. But it is difficult to understand by reading only theoretical explanations. Our article is for programmers with any experience. For easier understanding, the examples are in javascript.

Closures Explanation

  • When a function (foo) declares other functions (bar and baz), the family of local variables created in foo is not destroyed when the function exits. The variables merely become invisible to the outside world. foo can therefore cunningly return the unctions bar and baz, and they can continue to read, write and communicate with each other through this closed-off family of variables (“the closure”) that nobody else can meddle with, not even someone who calls foo again in future.
  • A closure is one way of supporting first-class functions; it is an expression that can reference variables within its scope (when it was first declared), be assigned to a variable, be passed as an argument to a function, or be returned as a function result.

Closure example 1

The following code returns a reference to a function:

function sayHelloWorld(name) {
  var text = 'Hello World ' + name; // Local variable
  var sayClosure = function() { console.log(text); }
  return sayClosure;
}
var sayMyClosure = sayHelloWorld('one');
sayMyClosure(); // writes "Hello World one"

Most javascript developers understand how a reference to a function is returned to a variable (sayMyClosure) in the above code. If you don’t understand, then you need to look at that before you can learn closures. A programmer using C would think of the function as returning a pointer to a function, and that the variables sayClosure and sayMyClosure were each a pointer to a function.

There is a critical difference between a C pointer to a function and a JavaScript reference to a function. In JavaScript, you can think of a function reference variable as having both a pointer to a function as well as a hidden pointer to a closure.

The above code has a closure because the anonymous function function() { console.log(text); } is declared inside another function, sayHelloWorld() in this example. In JavaScript, if you use the function keyword inside another function, you are creating a closure.

In C and most other common languages, after a function returns, all the local variables are no longer accessible because the stack-frame is destroyed.

In JavaScript, if you declare a function within another function, then the local variables of the outer function can remain accessible after returning from it. This is demonstrated above, because we call the function sayMyClosure() after we have returned from sayHelloWorld(). Notice that the code that we call references the variable text, which was a local variable of the function sayHelloWorld().

function() { console.log(text); } // Output of say2.toString();

Looking at the output of sayMyClosure.toString(), we can see that the code refers to the variable text. The anonymous function can reference text which holds the value 'Hello World one' because the local variables of sayHelloWorld() have been secretly kept alive in a closure.

The genius is that in JavaScript a function reference also has a secret reference to the closure it was created in – similar to how delegates are a method pointer plus a secret reference to an object.

More examples

Maybe closures seem hard to understand when you read about them, but when you see some examples it becomes clear how they work. Usually I recommend working through the examples carefully until you understand how they work. If you start using closures without fully understanding how they work, you would soon create some very weird bugs!

Example 2

This example shows that the local variables are not copied – they are kept by reference. It is as though the stack-frame stays alive in memory even after the outer function exits!

function someFunction() {
  // Local variable that ends up within closure
  var value = 100;
  var callbackFunction = function() {
    console.log(value);
  }
  value++;
  return callbackFunction();
}
someFunction(); // logs 101

Example 3

All three global functions have a common reference to the same closure because they are all declared within a single call to setupSomeGlobals().

var gLogNumber, gIncreaseNumber, gSetNumber;
function setupSomeGlobals() {
  // Local variable that ends up within closure
  var _num = 50;
  // Store some references to functions as global variables
  gLogNumber = function() {
    console.log(_num);
  };
  gIncreaseNumber = function() {
    _num++;
  };
  gSetNumber = function(x) {
    _num = x;
  };
}
setupSomeGlobals();
gIncreaseNumber();
gLogNumber(); // 51
gSetNumber(10);
gLogNumber(); // 10
var oldLog = gLogNumber;
setupSomeGlobals();
gLogNumber(); // 50
oldLog() // 10

The three functions have shared access to the same closure – the local variables of setupSomeGlobals() when the three functions were defined.

Note that in the above example, if you call setupSomeGlobals() again, then a new closure (stack-frame!) is created. The old gLogNumbergIncreaseNumbergSetNumber variables are overwritten with new functions that have the new closure. (In JavaScript, whenever you declare a function inside another function, the inside function(s) is/are recreated again each time the outside function is called.)

Example 4

This example shows that the closure contains any local variables that were declared inside the outer function before it exited. Note that the variable alice is actually declared after the anonymous function. The anonymous function is declared first and when that function is called it can access the alice variable because alice is in the same scope (JavaScript does variable hoisting). Also sayAlice()() just directly calls the function reference returned from sayAlice() — it is exactly the same as what was done previously but without the temporary variable.

function closureTest4() {
  var closure = function() {
    console.log(_variable);
  };
  // Local variable that ends up within closure
  var _variable = 'Initial Value';
  return closure;
}
closureTest4()();// logs "Initial Value"

Tricky: note the closure variable is also inside the closure and could be accessed by any other function that might be declared within closureTest4(), or it could be accessed recursively within the inside function.

Example 5

This one is a real gotcha for many people, so you need to understand it. Be very careful if you are defining a function within a loop: the local variables from the closure may not act as you might first think.

You need to understand the “variable hoisting” feature in Javascript in order to understand this example.

function buildList(list) {
  var result = [];
  for (var i = 0; i < list.length; i++) {
    var item = 'item' + i;
    result.push( function() {
      console.log(item + ' ' + list[i]);
    } );
  }
  return result;
}
function testList() {
  var fnlist = buildList([1,2,3,4]);
  // Using j only to help prevent confusion -- could use i.
  for (var j = 0; j < fnlist.length; j++) {
    fnlist[j]();
  }
}
testList(); //logs "item3 undefined" 4 times

The line result.push( function() {console.log(item + ' ' + list[i])} adds a reference to an anonymous function four times to the result array. If you are not so familiar with anonymous functions think of it like:

pointer = function() {console.log(item + ' ' + list[i])};
result.push(pointer);

Note that when you run the example, "item3 undefined" is logged four times! This is because just like previous examples, there is only one closure for the local variables for buildList (which are resultilist and item). When the anonymous functions are called on the line fnlist[j](); they all use the same single closure, and they use the current value for i and item within that one closure (where i has a value of 4 because the loop had completed, and item has a value of 'item3'). Note we are indexing from 0 hence item has a value of item3. And the i++ will increment i to the value 4.

It may be helpful to see what happens when a block-level declaration of the variable item is used (via the let keyword) instead of a function-scoped variable declaration via the var keyword. If that change is made, then each anonymous function in the array result has its own closure; when the example is run the output is as follows:

item0 undefined
item1 undefined
item2 undefined
item3 undefined

If the variable i is also defined using let instead of var, then the output is:

item0 1
item1 2
item2 3
item3 4

Example 6

In this final example, each call to the main function creates a separate closure.

function newClosure(someNum, someRef) {
    // Local variables that end up within closure
    var num = someNum;
    var anArray = [1,2,3];
    var ref = someRef;
    return function(x) {
        num += x;
        anArray.push(num);
        console.log('num: ' + num +
            '; anArray: ' + anArray.toString() +
            '; ref.someVar: ' + ref.someVar + ';');
      }
}
obj = {someVar: 4};
fn1 = newClosure(4, obj);
fn2 = newClosure(5, obj);
fn1(1); // num: 5; anArray: 1,2,3,5; ref.someVar: 4;
fn2(1); // num: 6; anArray: 1,2,3,6; ref.someVar: 4;
obj.someVar++;
fn1(2); // num: 7; anArray: 1,2,3,5,7; ref.someVar: 5;
fn2(2); // num: 8; anArray: 1,2,3,6,8; ref.someVar: 5;

Summary

If everything seems completely unclear, then the best thing to do is to play with the examples. Reading an explanation is much harder than understanding examples. My explanations of closures and stack-frames, etc. are not technically correct – they are gross simplifications intended to help to understand. Once the basic idea is grokked, you can pick up the details later.

Final points:

  • Whenever you use function inside another function, a closure is used.
  • Whenever you use eval() inside a function, a closure is used. The text you eval can reference local variables of the function, and within eval you can even create new local variables by using eval('var foo = …')
  • When you use new Function(…) (the Function constructor) inside a function, it does not create a closure. (The new function cannot reference the local variables of the outer function.)
  • A closure in JavaScript is like keeping a copy of all the local variables, just as they were when a function exited.
  • It is probably best to think that a closure is always created just an entry to a function, and the local variables are added to that closure.
  • A new set of local variables is kept every time a function with a closure is called (given that the function contains a function declaration inside it, and a reference to that inside function is either returned or an external reference is kept for it in some way).
  • Two functions might look like they have the same source text, but have completely different behavior because of their ‘hidden’ closure. I don’t think JavaScript code can actually find out if a function reference has a closure or not.
  • If you are trying to do any dynamic source code modifications (for example: myFunction = Function(myFunction.toString().replace(/Hello/,'Hola'));), it won’t work if myFunction is a closure (of course, you would never even think of doing source code string substitution at runtime, but…).
  • It is possible to get function declarations within function declarations within functions… and you can get closures at more than one level.
  • I think normally a closure is a term for both the function along with the variables that are captured. Note that I do not use that definition in this article!
  • I suspect that closures in JavaScript differ from those normally found in functional languages.


0 1035
Best Tools for Facilitating Project Management

Project management rings the bell with the majority of business owners. It allows planning, arranging, and coordinating activities aimed at accomplishing a number of objectives or a certain task. As a result, there is a great need for tools that can assist in coping with everyday workload in the most convenient and efficient way.

The present-day project management (PM) is first of all represented by software solutions of different complexity levels. In fact, the majority of these solutions are not created from scratch. The reason for this is the existence of long-established approaches to PM.  Among a large number of different techniques and innovative attempts to bring something new to PM, we can distinguish two main tools for project and task management – Kanban and Gantt Chart. The well-deserved popularity of these techniques has led to the fact that we can find elements of Kanban and Gantt Chart in many business applications, even not directly related to PM.

Demand breeds supply. Today, developers of business solutions don’t need to design and test custom Kanban/Gantt Chart tools, but can choose ready-made widgets from a variety of libraries and frameworks. Thanks to the explosive growth of web apps popularity, we have at our disposal a large number of professional JavaScript UI libraries with ready-to-use feature-packed components.

Let’s have a closer look at the most popular project management tools offered by JS libraries.

Gantt Chart

JavaScript/HTML5 Gantt Chart is an efficient project management tool offered by the Dhtmlx library. It’s a feature-rich component that can be used for cross-browser and cross-platform app development.

Advantages

  • Effective resource management. Gantt Chart widget alleviates the estimation of each project participant’s workload thanks to resources management functionality. Thanks to the resource diagram, you can visualize the capacity of your projects and resources.
  • Intuitive user interface. The dhtmlxGantt interface is very convenient as it allows editing tasks, modifying start/finish time and duration of tasks, set the completion of tasks and link them with each other. With Gantt Chart, it’s possible to display such types of tasks as project, task, split task, and milestone.
  • Robust performance. Gantt Chart is a powerful widget that is sure to perform assignments smoothly and quickly regardless of the number of tasks that you load into it.

Disadvantages

  • Gantt Chart is not mobile-friendly.
  • It requires strict compliance with business workflow.

It requires strict compliance with business workflow.

Kanban Board

Kanban Board is a complex widget that makes part of Webix JS library. It allows creating high-performance web apps for project management.  Kanban represents a high-level project management system that focuses mainly on task visualization and business workflow design.

With Kanban, you can view work in progress and control it. Moreover, each employee can stay aware of what other teammates are working at and what tasks are assigned to them. The most prominent characteristics of the widget are its flexibility and the possibility to customize it using HTML templates.

Webix Kanban component has the following cutting edge features:

  • Drag and drop of cards
  • The ability to expand / collapse columns
  • Filtering
  • Swimlanes
  • Single or multiple card selection
  • Custom card arrangement

Advantages

  • Ease of use. Webix Kanban widget is not hard to use. Besides, it’s designed to solve simple tasks.
  • High speed. The widget allows performing tasks quickly and efficiently.
  • Attractive and responsive design.
  • The ability to integrate with other platforms.
  • Flexibility. You can adjust the widget to any project management needs and easily customize the UI configuration. In general, Kanban is a more flexible tool in comparison with Gannt Chart as it allows you to adapt to the project changes on the go and modify the structure of tasks.
  • Informative and laconic design. Kanban helps compactly visualize the whole workflow process.
  • Efficient task management. The component allows creating, changing, reorganizing and deleting tasks.
  • Easy integration with a number of third-party libraries such as Angularjs, jQuery, React, Vue.js, etc.

Disadvantages

  • Lack of ability to organize strict deadline management and tight control over the working process.

Project management application on the base of Kanban Board

There are many application fields for Kanban Board. Actually, it is a ready-to-use solution that can be integrated into a business workflow.  For example, you can implement Kanban into project management apps. Let’s consider one of such solutions in greater detail.

The application was created by an experienced developer Jochen Funk. The distinctive feature of this solution is that it runs inside SharePoint. And undoubtedly, Webix Kanban widget is a key part of the app as it provides many important functions for managing projects.

The application is integrated with OneNote and therefore users can edit and add data on projects when it’s convenient for them. The app immediately saves all the changes and makes them available to everybody. The solution also includes/has filters and an activity log.

 This Kanban-based software solution ensures solving day-to-day tasks in an easy and convenient way. As you see, thanks to its flexibility, Kanban Board can be successfully integrated with different programs and platforms which allows building even more efficient and performant solutions.

Conclusion The easiest and fastest way to create top-notch project management solutions is to use ready-made components offered by JavaScript UI libraries. Gantt Chart and Kanban Board are mighty UI widgets that can help efficiently establish and maintain project management processes.

0 2190
Semantic HTML5

Look at the graph given above, and you can quickly see how extensively HTML 5 is growing popularity. The Semantic HTML 5 has almost replaced the HTML. Now, we are going to discuss Semantic HTML 5 and how it is used for structuring the document

If you have the basic idea about HTML language that you probably know HTML (Hypertext Markup Language) is the standard markup language for web pages. We use HTML tags to format the content of the web pages as these tags instruct the browser how to display the content on the page. It’s a basic and simple thing that we all know. But, do HTML tags let the browser know what type of content they have, or the roles played by the different types of content? No, they don’t. This is precisely where Semantic HTML 5 plays the crucial role as it uses the particular tags to let the browser clearly understand what type of content those tags have.

Semantic HTML tags provide the precise information to the web crawler/robot like Google and Bing to clearly understand which content is crucial, which is a subsidiary, which is given for navigation and many other things. It is imperative to make Google and Bing understand what roles the different parts of your web page is playing, and by adding Semantic HTML tags to your pages, you can do it.

HTML Semantic HTML 5
HTML tags tell browsers how the content should be presented. Semantic HTML 5 tags clearly tells browsers what type of content these tag contain and the roles played by the content

For example, a tag like <p> is both semantic and presentational. Why? Well, it indicates that the enclosed text or content is a paragraph, so it serves both the purposes- it tells browsers that it’s a paragraph and how to display it.

On the other hands, tags like <b> and <i> are non-semantic as they only define the appearance of the text – bold and italic, but they don’t say anything about the type of content or which role the content is playing.

Ideal examples of Semantic HTML tags include the header tags – from <h1> to <h6>, <code>, <blockquote> and < em>. There are so many HTML tags that you can use to build a standard-compliant website.

Now, you should know why one should use Semantic HTML 5?

We, the human users, can easily see and understand the different parts of the web page at a single glance. The header, menu, main content, footer – all are visually apparent to us but, what about the non-human bots like Google or Bing? They don’t see and understand the different parts of a page. So, you need to establish the communication with the bots and make them know about the different types of content and which roles they are playing – what part of your content is header, the main content, navigation, footer and so on. Furthermore, you can tell Google or Bing bots that which part of your content is essential and so that they can prioritize the content based on your information.

Structure

Semantic tags make the meaning of your content and page entirely apparent to the browser. This clarity is also communicated with the search engines so that they can deliver the right pages for the correct queries.

Semantic tags give you a lot of styling options for your content. Maybe now you prefer your content displayed in the default browser style, but a few days later, you may decide to add a grey background and then, you want to define monospaced font family for your samples. You can quickly implement all these things with Semantic HTML markup which can be successfully applied to CSS.

Calling code

How Does Semantic HTML look like?

Basic examples of Semantic HTML include <nav>, <footer> and <section>. There are so many Semantic tags that can be used, such as <blockquote>, <em>, <code> , etcetera. But in this section of the article, we are going to talk about the semantic tags that you will require the break the page content into its basic parts.

Instead of using an old HTML tag like <div>, using the following Semantic HTML tags can be a perfect decision to break the page content into identified parts each of which has a specific roles to play:
<header>
<nav>
<main>
<article>
<section>
<aside>
<footer>

One of the best advantages of attributing a clear role of each part of the content is that that it enables Google and Bing to index the page correctly and promptly.

Know how to make the correct use of Semantic HTML tags

When it comes to using Semantic tags, you must ensure they convey the meaning, instead of using it for the presentational purposes.
A lot of web designing solutions make a mistake at the time of using these semantic tags :

Blockquote: a lot of people use blockquote to indenting text, which is not a quotation. The reason is blockquotes are indented by default. The smart way to use the benefit of indentation without using the blockquote is using CSS margin instead.

<p>: some people use <p>abcd</p> for adding space between page elements, but it is supposed to be used for defining the actual paragraph for the text of the page. Just like the indenting example given above, using padding style property or margin would be the right idea to use space.

<ul>: just like blockquotes, some people use <ul> to indent the text for most browsers. It is a semantically incorrect and invalid HTML as only <li> tags work with the <ul> tag. Using the margin or padding style to indent the text is the best idea.

Which HTML tags are Semantic?


While nearly all the HTML 4 and five tags have semantic meaning but, some of them are primarily semantic

Semantic HTML tags :

<abbr> Abbreviation
<acronym> Acronym
<blockquote> Long quotation
<dfn> Definition
<address> Address for author(s) of the document
<cite> Citation
<code> Code reference
<tt> Teletype text
<div> Logical division
<span> Generic inline style container
<del> Deleted text
<ins> Inserted text
<em> Emphasis
<strong> Strong emphasis
<h1> First-level headline
<h2> Second-level headline
<h3> Third-level headline
<h4> Fourth-level headline
<h5> Fifth-level headline
<h6> Sixth-level headline
<hr> Thematic break
<kbd> Text to be entered by the user
<pre> Pre-formatted text
<q> Short inline quotation
<samp> Sample output
<sub> Subscript
<sup> Superscript
<var> Variable or user defined text

An example of using Semantic HTML 5 tags is given below

Code example
Author Bio: Payal is a Content Consultant at Enuke Software, a pioneering Blockchain and iPhone app development company in the USA. Payal is passionate about the start-up ecosystem, Crypto world, entrepreneurship, latest tech innovations, and all that makes this digital world.

0 30015
Bootstrap 3 slider

Bootstrap slider. Twitter Bootstrap 3 is one of the best CSS frameworks to develop and design content management systems. With Bootstrap you can easily create blogs or pages of the portfolio using a system of grids Twitter Bootstrap (grid layout). At the heart of many CMS systems we usually have a base component “Slider” (Carousel), basically – it auto-sequential display of images, but it can be whatever you like: it can display the latest completed projects, reviews of your customers, description of special offers, links to news or latest articles from your blog. In this article, we will explore how to create a slider using Twitter Bootstrap 3 Carousel component.

0 80705
Design Patterns in PHP

Patterns in PHP. Today we will discuss design patterns in web development, more precisely – in PHP. Experienced developers are probably already familiar with many of them, but our article would be extremely useful for all developers. So, what is it – design patterns? Design Patterns aren’t analysis patterns, they are not descriptions of common structures like linked lists, nor are they particular application or framework designs. In fact, design patterns are “descriptions of communicating objects and classes that are customized to solve a general design problem in a particular context.” In other words, Design patterns provide a generic reusable solution to the programming problems that we encounter every day. Design patterns are not ready classes or libraries, that can be simply applied to your system, this is not a concrete solution that can be converted in to source code, design patterns are much more than that. They are patterns, or templates, that can be implemented to solve a problem in different particular situations.
Design patterns help to speed up the development, as the templates are proven and from the developer’s position, only implementation is required. Design patterns not only make software development faster, but also encapsulate big ideas in a simpler way. Also, be careful not to use them in wrong places in order to avoid unpleasant situations. In addition to the theory, we also give you the most abstract and simple examples of design patterns.