
How to start developing own applications for Android
Several of our readers asked us what they begin to write even a simple application for android. So today I decided to write an introductory article for them. This material provides practical introduction to developing applications for Android.
0. Requirements
Here are list of supported operation systems: Windows XP (32-bit), Vista (32 or 64 bit), or Windows 7 (32 or 64 bit), Mac OS X 10.5.8 or later (x86 only), Linux. About hardware requirements – you can work quite at any normal computer. Just make sure that you have 300-500mb of disk space at least. For software – we will have to install SDK, Eclipse, JDK, but, lets step by step.
1. SDK
First, we have to download and install Android SDK. Android SDK (software development kit) includes a variety of fully functioning sample applications (for your future).
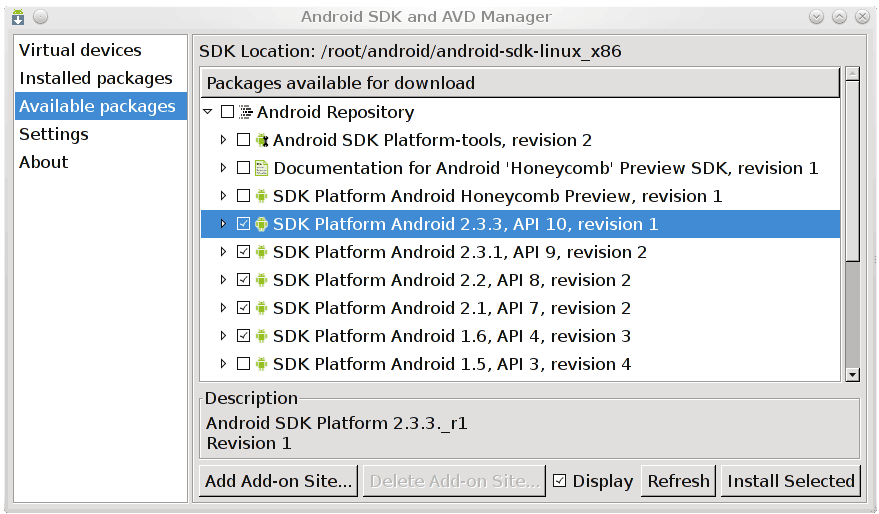
When we have selected list of libraries which we will install – installator will download and install all selected libraries.
2. Eclipse
Now, lets install Eclipse IDE. You can download this IDE here. You can select Eclipse for your favorite OS. As example – first one ‘Eclipse IDE for Java Developers’ (128mb).
3. ADT
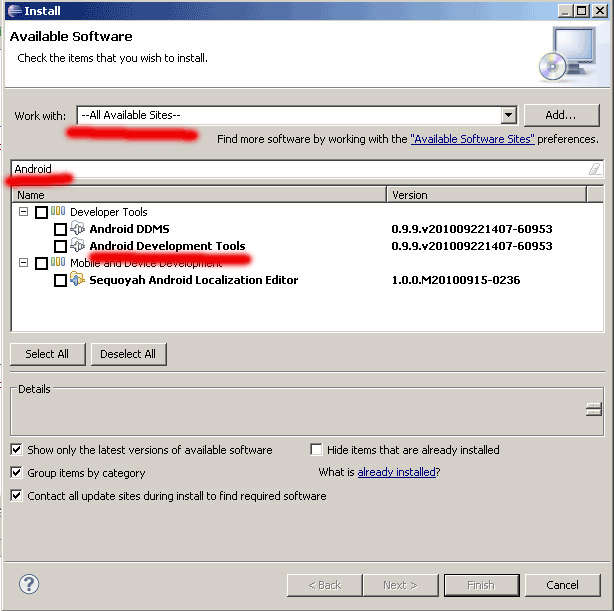
Now, we need to install ADT (Android Development Tools). Run the Eclipse, goto Help -> Install New Software.
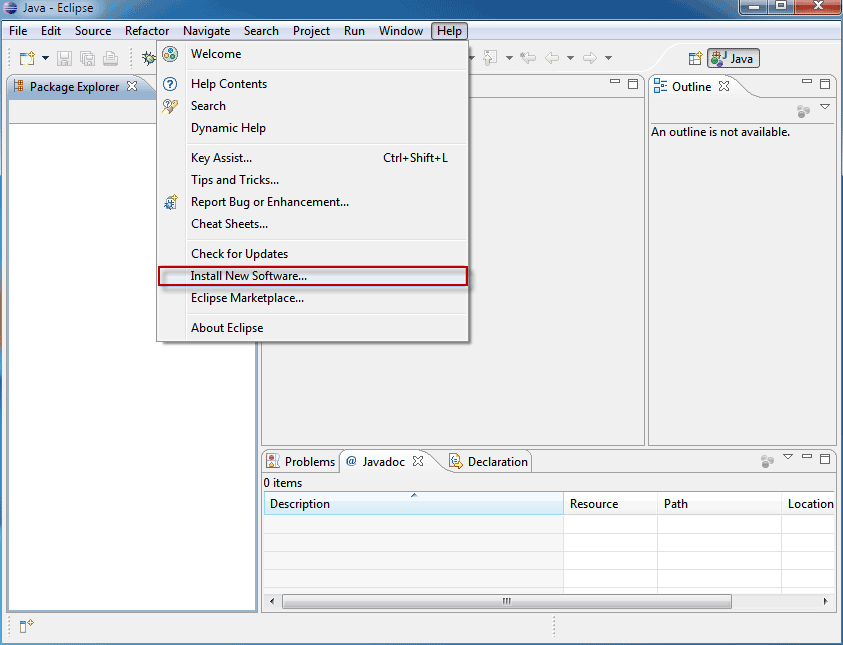
Now, look at my image, you have to do same, then, select ‘Android Development Tools’ here and install this extra plugin.
4. Eclipse + SDK
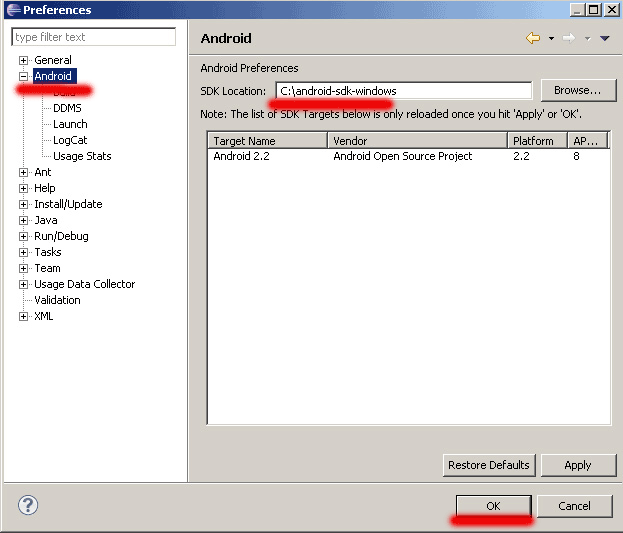
Now, we have to link our installed Android SDK to with our Eclipse IDE. Goto Windows -> Preferences.

Now, select ‘Android’ at left side, and locate where we installed SDK:
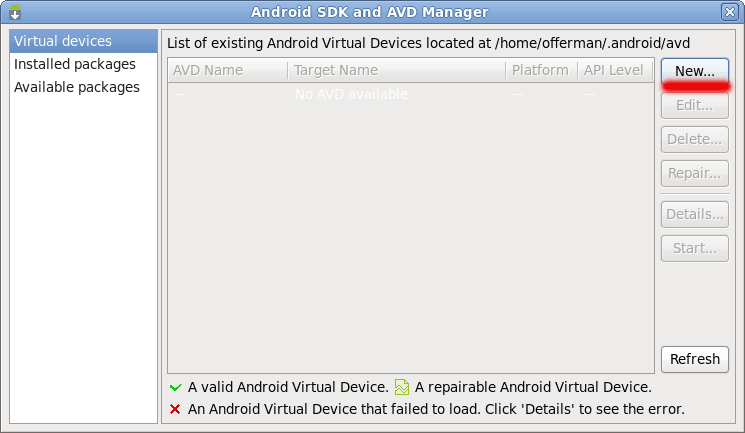
5. AVD
So, we have finished here. Now, we can create Android Virtual Device (to test our applications). Run Eclipse, goto Windows -> Android SDK and AVD Manager. Click ‘New’ here (at right side).
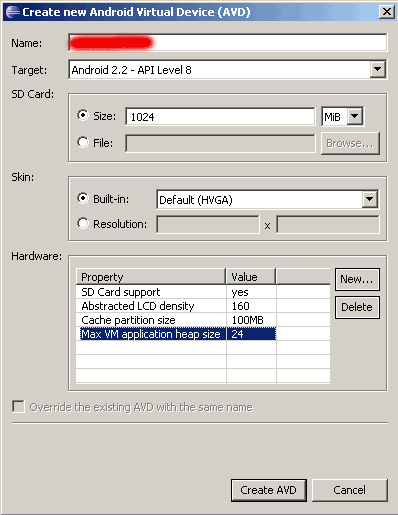
And, we will fill necessary fields here: Name – custom name of our AVD, Target – supported SDK version, all rest params is easy for understanding.
6. First Test Project
Huh, we have finished with adjusting of softwares. Now we can start to write some code.
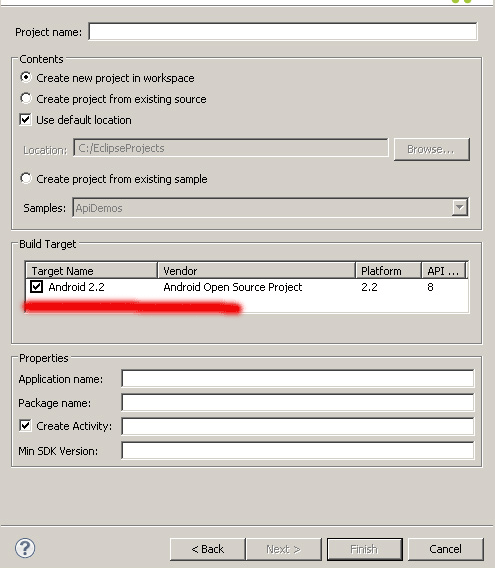
6.1 In Eclipse, select New -> Project -> Android -> Android Project.
As example, lets create simple ‘HelloWorld’ application. At ‘New Android Dialog’ we can fill: Project name = HelloWorldProject, Build Target = lets select our created AVD (step 5), Application Name = title of your application (Hello World), Package name = name of result package (keep it unique to avoid future conflicts).
6.2 Coding, Finalization.
Click Finish at our Dialog. The new project appears in the Package Explorer. Now we have the basic structure of a test application with name HelloWorldProject. Our project should be visible in the Package Explorer on the left. Now, lets open HelloWorld.java file, located inside HelloWorld > src > our.examples.helloworld). It should look like this:
package our.examples.helloworld;
import android.app.Activity;
import android.os.Bundle;
public class HelloWorld extends Activity {
    /** Called when the activity is first created. */
    @Override
    public void onCreate(Bundle savedInstanceState) {
        super.onCreate(savedInstanceState);
        setContentView(R.layout.main);
    }
}
By default – this code don`t draw anything. Lets modify this code and draw any text as example.
package our.examples.helloworld;
import android.app.Activity;
import android.os.Bundle;
import android.widget.TextView;
public class HelloWorld extends Activity {
    /** Called when the activity is first created. */
    @Override
    public void onCreate(Bundle savedInstanceState) {
        super.onCreate(savedInstanceState);
        TextView oTV = new TextView(this);
        oTV.setText("Hello World!");
        setContentView(oTV);
        //setContentView(R.layout.main);
    }
}
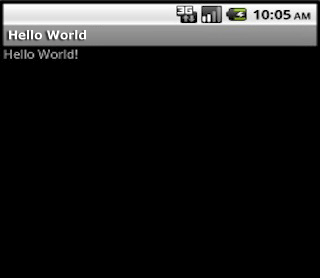
In these changes we created new TextView object, then we set text with ‘setText’ function, and finally – display result with ‘setContentView’. Now, this is time to run our result. In Eclipse select Run -> Run. We should get something like that:
Conclusion
Our Android tutorial is complete. Don`t forget to say thanks for us :-) Welcome back. Good luck!


Nice article for setting the android development environment.
Here you have more articles/Tutorials with the description and code: http://www.technotalkative.com/
Greetings! This is my 1st comment here so I just wanted
to give a quick shout out and say I really enjoy reading
your posts. Can you recommend any other blogs/websites/forums
that go over the same subjects? Many thanks!