Facebook like menu (responsive)
Without a doubt, the responsive technology is becoming more and more popular. This allows us to save time when we develop design intended for use on a variety of devices: from mobile devices to widescreen computers. There is no need to develop a special version of the site for each format (devices). Today we will create a new responsive menu that looks like facebook menu. To create this menu, we do not need javascript, everything is implemented using only CSS3 (for IE7-IE10, Firefox, Opera, Safari, Chrome and iPad/iPod/iPhone).
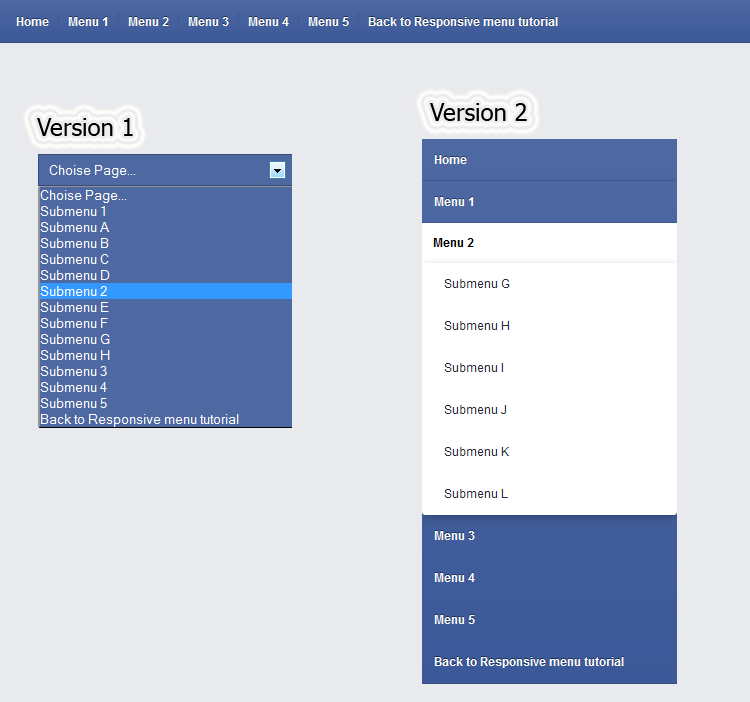
For today’s lesson, we have prepared two demonstrations (different responsive results). For the first menu, it turns into a selector, for the second one it turns into a vertical menu (you can use your touchscreen to open submenus):
Live Demo 1
Live Demo 2
Step 1. HTML
The base of the menu – the usual UL-LI based menu:
index.html
<ul id="nav">
    <li><a href="#">Home</a></li>
    <li class="subs"><a href="#s1">Menu 1</a>
        <ul>
            <li><a href="#">Submenu A</a></li>
            <li><a href="#">Submenu B</a></li>
            <li><a href="#">Submenu C</a></li>
            <li><a href="#">Submenu D</a></li>
        </ul>
    </li>
    <li class="subs"><a href="#s2">Menu 2</a>
        <ul>
            <li><a href="#">Submenu E</a></li>
            <li><a href="#">Submenu F</a></li>
            <li><a href="#">Submenu G</a></li>
            <li><a href="#">Submenu H</a></li>
        </ul>
    </li>
    <li><a href="#">Menu 3</a></li>
    <li><a href="#">Menu 4</a></li>
    <li><a href="#">Menu 5</a></li>
    <li><a href="https://www.script-tutorials.com/facebook-like-menu-responsive/">Back to Responsive menu tutorial</a></li>
</ul>
Everything should be clear at this stage. To create the first version (with using the selector) we have to add this element (below the menu):
<select id="nav_v2" onchange="window.location.href = this.options[this.selectedIndex].value">
    <option selected="selected" value="">Choise Page...</option>
    <option value="#">Submenu 1</option>
    <option value="#">Submenu A</option>
    <option value="#">Submenu B</option>
    <option value="#">Submenu C</option>
    <option value="#">Submenu D</option>
    <option value="#">Submenu 2</option>
    <option value="#">Submenu E</option>
    <option value="#">Submenu F</option>
    <option value="#">Submenu G</option>
    <option value="#">Submenu H</option>
    <option value="#">Submenu 3</option>
    <option value="#">Submenu 4</option>
    <option value="#">Submenu 5</option>
    <option value="https://www.script-tutorials.com/facebook-like-menu-responsive/">Back to Responsive menu tutorial</option>
</select>
By default, this selector is hidden. It is visible only for small devices (due its responsive rules)
Step 2. CSS
In this section we start decorating the navigation menu. First of all, we have to define general styles:
css/main.css
* {
    margin: 0;
    padding: 0;
}
html {
    background-color: #E9EAED;
    height: 100%;
}
body {
    color: #333333;
    font-family: 'Helvetica Neue',Helvetica,Arial,'lucida grande',tahoma,verdana,arial,sans-serif;
}
/* other elements */
#nav_v2 {
    display: none;
}
Now, we can prepare styles for the top level elements:
/* top level elements */
#nav, #nav ul {
    list-style: none outside none;
    margin: 0;
    padding: 0;
}
#nav {
    background-color: rgb(78,105,162);
    background: -moz-linear-gradient(top, rgba(78,105,162,1) 0%, rgba(59,88,152,1) 100%);
    background: -webkit-gradient(left top, left bottom, color-stop(0%, rgba(78,105,162,1)), color-stop(100%, rgba(59,88,152,1)));
    background: -webkit-linear-gradient(top, rgba(78,105,162,1) 0%, rgba(59,88,152,1) 100%);
    background: -o-linear-gradient(top, rgba(78,105,162,1) 0%, rgba(59,88,152,1) 100%);
    background: -ms-linear-gradient(top, rgba(78,105,162,1) 0%, rgba(59,88,152,1) 100%);
    background: linear-gradient(to bottom, rgba(78,105,162,1) 0%, rgba(59,88,152,1) 100%);
    border-bottom: 1px solid #3A4B7B;
    height: 22px;
    padding: 10px 0 10px 5px;
    position: relative;
}
#nav > li {
    float: left;
    height: 22px;
    padding-right: 6px;
    position: relative;
    text-align: left;
}
#nav > li > a {
    border: 1px solid transparent;
    color: #FFFFFF;
    display: block;
    font-size: 12px;
    font-weight: bold;
    height: 27px;
    line-height: 27px;
    margin: -3px 0 0 -1px;
    padding: 0 1px 0 11px;
    text-decoration: none;
    text-shadow: 0 -1px rgba(0, 0, 0, 0.5);
}
#nav > li:hover > a, #nav > a:hover {
    background-color: #425691;
    border-radius: 2px 2px 2px 2px;
    color: #FFFFFF;
    margin-right: -8px;
    padding: 0 9px 0 11px;
    position: relative;
    z-index: 1;
}
#nav > li.subs:hover > a {
    background-color: #FFFFFF;
    border: 1px solid rgba(100, 100, 100, 0.4);
    border-bottom-width: 0;
    border-radius: 2px 2px 0 0;
    color: #000000;
    text-shadow: 0 0 transparent;
    z-index: 2;
}
The menu has blue gradient line, all the elements are float:left aligned (horizontally side by side). Next element is a separator between menu elements:
/* top items separator */
#nav > li:after {
    background-color: #405791;
    content: "";
    height: 17px;
    left: 1px;
    position: absolute;
    top: 2px;
    width: 1px;
}
#nav > li:first-child:after {
    background-color: transparent;
}
To complete the menu, we need to add styles for the submenu (drop down):
/* submenu */
#nav ul {
    background-color: #FFFFFF;
    border: 1px solid rgba(100, 100, 100, 0.4);
    *border: 1px solid rgb(100, 100, 100);
    border-radius: 0 0 3px 3px;
    box-shadow: 0 3px 8px rgba(0, 0, 0, 0.25);
    display: none;
    left: -1px;
    margin-top: 2px;
    min-width: 200px;
    padding: 6px 0;
    position: absolute;
    top: 100%;
    z-index: 1;
}
#nav li:hover ul {
    display: block;
}
#nav ul li a {
    border-bottom: 1px solid transparent;
    border-top: 1px solid transparent;
    color: #232B37;
    display: block;
    font-size: 12px;
    line-height: 20px;
    padding: 0 22px;
    text-decoration: none;
    text-overflow: ellipsis;
    white-space: nowrap;
}
#nav ul li a:hover {
    background-color: #6D84B4;
    border-bottom: 1px solid #3B5998;
    border-top: 1px solid #3B5998;
    color: #FFFFFF;
}
That’s it. The menu is ready, and we are ready to start adding responsive styles (using media queries). The CSS3 media queries are used to define how the styles will shift in some certain breakpoints(or specifically the device screen sizes). As you remember, for the first demo we prepared the selector, let’s customize its styles:
/* responsive rules */
@media all and (max-width : 980px) {
    #nav {
        display: none;
    }
    #nav_v2 {
        background-color: rgb(78,105,162);
        border: 1px solid #3A4B7B;
        color: #FFFFFF;
        cursor: pointer;
        display: block;
        margin-bottom: 30px;
        padding: 6px;
        width: 100%;
    }
    #nav_v2 select {
        color: #FFFFFF;
        cursor: pointer;
    }
}
The first menu is finally ready, it has received its responsive styles.
Version 2 – Vertical menu
In order to give an opportunity to use a touchpad to handle with menu we can use an easy trick – using :target pseudo element. First of all, we have to modify our HTML layout (add few hidden span elements):
index2.html
<ul id="nav">
    <li><a href="#">Home</a></li>
    <span id="s1"></span>
    <li class="subs"><a href="#s1">Menu 1</a>
        <ul>
            <li><a href="#">Submenu A</a></li>
            <li><a href="#">Submenu B</a></li>
            <li><a href="#">Submenu C</a></li>
            <li><a href="#">Submenu D</a></li>
            <li><a href="#">Submenu E</a></li>
            <li><a href="#">Submenu F</a></li>
        </ul>
    </li>
    <span id="s2"></span>
    <li class="subs"><a href="#s2">Menu 2</a>
        <ul>
            <li><a href="#">Submenu G</a></li>
            <li><a href="#">Submenu H</a></li>
            <li><a href="#">Submenu I</a></li>
            <li><a href="#">Submenu J</a></li>
            <li><a href="#">Submenu K</a></li>
            <li><a href="#">Submenu L</a></li>
        </ul>
    </li>
    <li><a href="#">Menu 3</a></li>
    <li><a href="#">Menu 4</a></li>
    <li><a href="#">Menu 5</a></li>
    <li><a href="https://www.script-tutorials.com/facebook-like-menu-responsive/">Back to Responsive menu tutorial</a></li>
</ul>
The logic of a click-action is described in the following styles:
/* other elements */
#nav span {
    display: none;
}
/* responsive rules */
@media all and (max-width : 980px) {
    /* top level elements */
    #nav  {
        height: auto;
        margin: 0;
        overflow: hidden;
        padding: 0;
        width: 100%;
    }
    #nav li {
        display: inline;
        float: left;
        height: auto;
        line-height: 40px;
        margin: 0;
        padding: 0;
        position: relative;
        width: 100%;
    }
    #nav > li:after {
        display: none;
    }
    #nav > li > a {
        border-bottom: 1px solid #3B5998;
        height: 40px;
        line-height: 40px;
        margin: 0;
    }
    #nav > li:hover > a, #nav > a:hover {
        margin: 0;
        border-width: 1px;
    }
    #nav > li.subs:hover > a {
        border-radius: 0;
        border-width: 1px;
    }
    /* submenu */
    #nav ul {
        border: 0;
        left: 0;
        margin: 0;
        overflow: hidden;
        padding: 0;
        position: relative;
        top: 0;
    }
    #nav li:hover ul {
        display: none;
    }
    #nav ul li a {
        height: 40px;
        line-height: 40px;
    }
    #nav #s1:target + li > a,
    #nav #s2:target + li > a{
        background-color: #FFFFFF;
        border: 0;
        color: #000000;
        text-shadow: 0 0 transparent;
    }
    #nav #s1:target + li ul,
    #nav #s2:target + li ul {
        display: block;
    }
}
It means, than when our screen is small enough, it converts the menu into the vertical menu, with possibility to open submenus by clicking on its parents.
The second menu is finally ready too.
Live Demo 1
Live Demo 2
[sociallocker]
download the sources
[/sociallocker]
Conclusion
We have just created two different (by logic) responsive menus that look like facebook menu (the same blue colors and styles). I’m sure that it will be very useful for you. Good luck and welcome back


thanks 4 the menu, but How to center text
Hi Joe,
What text exactly?