
The question of choosing a language for server backend logic is one of the most important question for almost every developer, especially for a beginner.
At the moment there are already a lot of different languages : java, .net (c#, vb), ruby, python, perl, javascript (node.js), go, c++.
So the question of choice is very actual.
As besides to the syntax features of languages, there are also many other problems / questions. Such as the possibility of expansion, the use of different types of databases, a high entry threshold into language, the requirements for fault tolerance, huge amounts of data and so on.
Which languages are the most popular? Which one should you use? Maybe someone will suggest php, with rich enough features and a low entry threshold in the language. However, the fact remains, and most used languages nowaday are Java and .Net.
This tutorial explains how you can build your own web server (Web API) using C# (ASP.Net). It is important to note that to host your server you will need to have windows-based hosting.
Prerequisites
I think we can begin. First of all, as we are working with C#, you need to use Microsoft Visual Studio (you can get it at official microsoft website).
Also you will need to enable IIS (Internet Information Services). It is pretty easy to enable it in windows:
Open Control Panel in Windows 10, click Programs, then find the “Programs and Features” section and click “Turn Windows features on or off“.
Here, find the Internet Information Services. Click the + icon in front of it to expand all available options under it. You can find FTP Server, Web Management Tools and World Wide Web Services. Now enable the Web Management Tools. Click OK button and the selected feature (or features) will be added and applied to your Windows.
Step 1 – Create new project
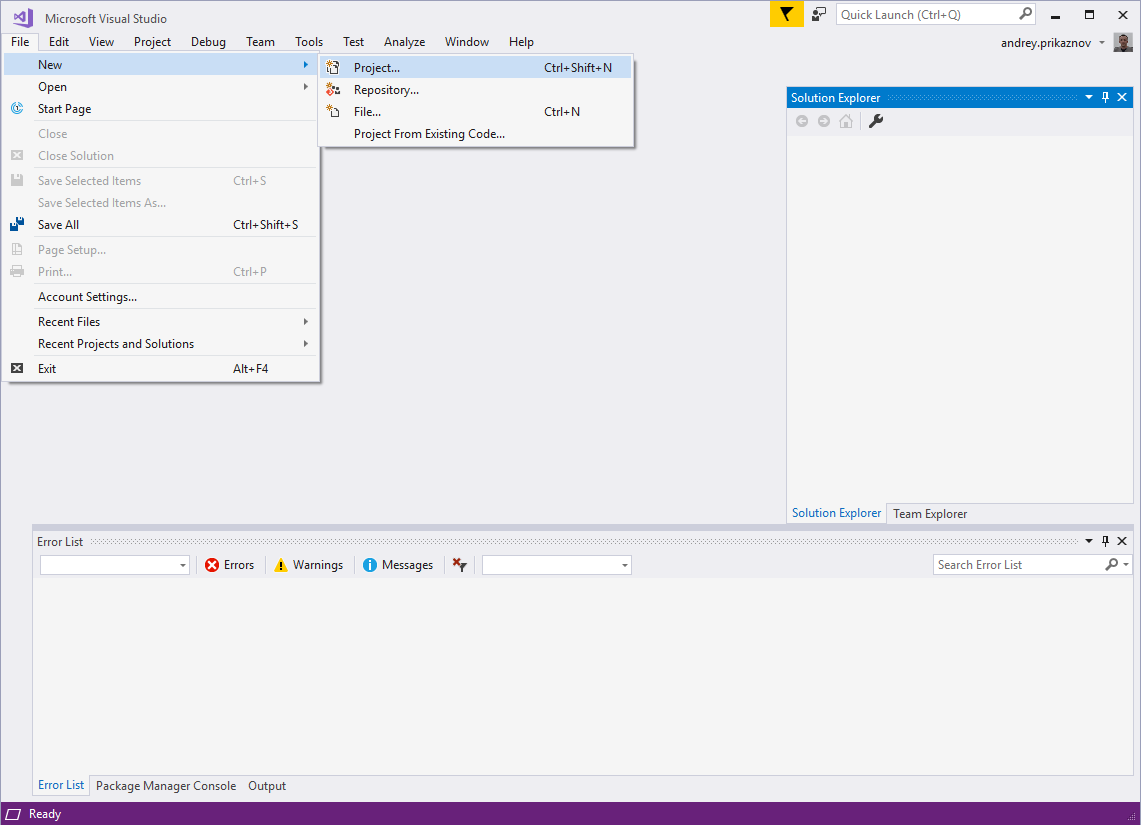
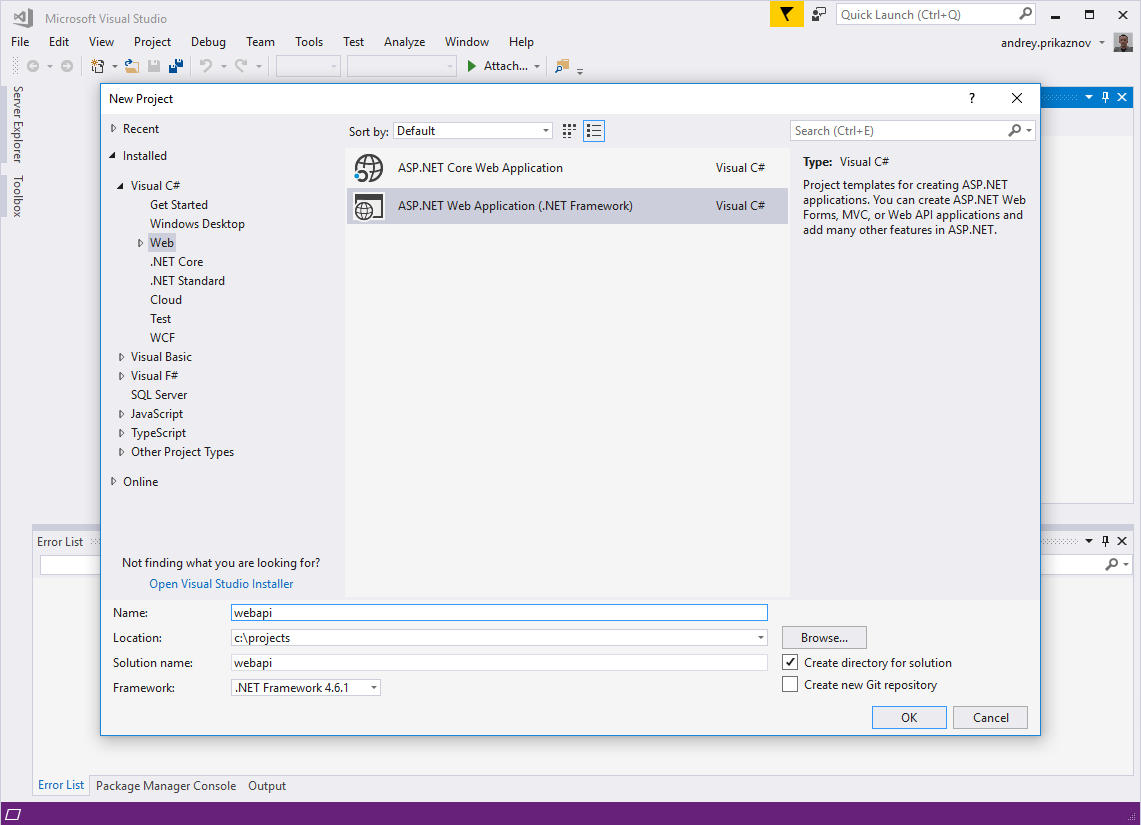
Open Microsoft Visual Studio and create a new project (File -> New -> Project). Select “Installed” Templates, select Visual C#. then select Web. In the list of available templates, select ASP.NET Web Application (.NET Framework). Give a name for your project, for my demo, I put “webapi”, click OK.
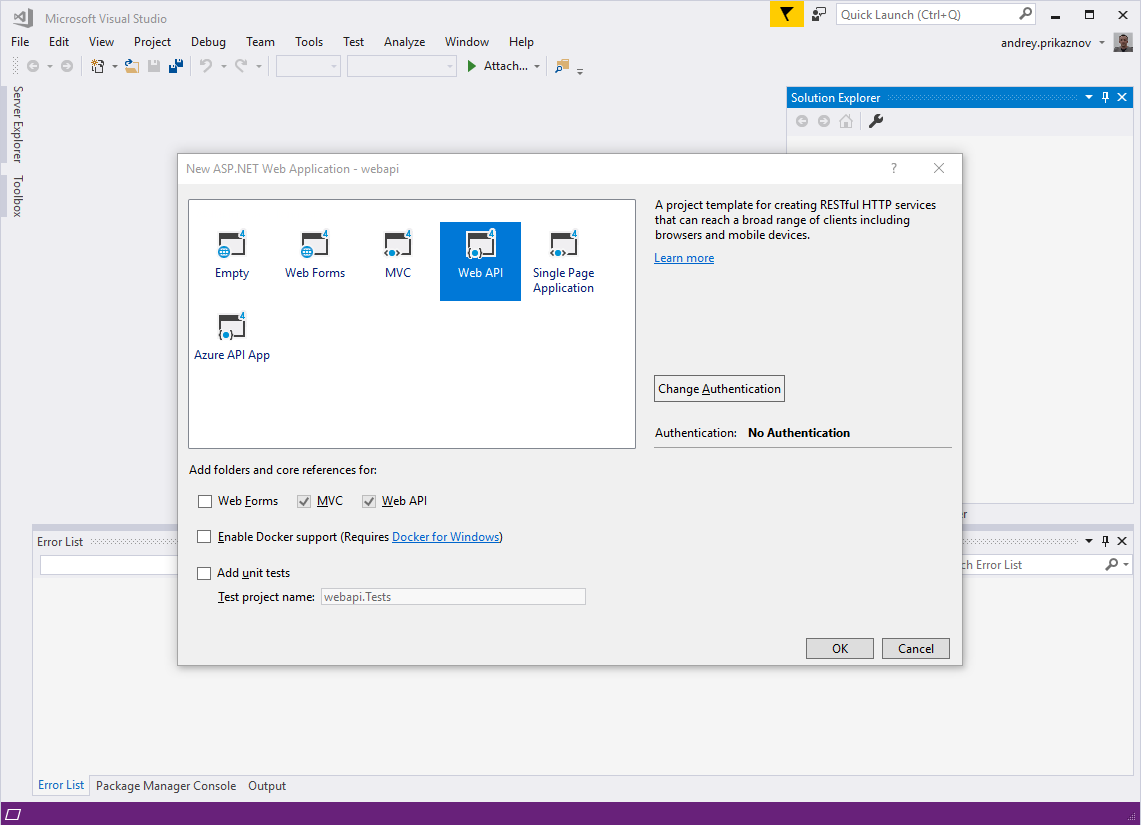
In the next modal dialog, you may choose any suitable template. Let’s select Web API, so it will prepare all basic initial files for the project. Click OK.
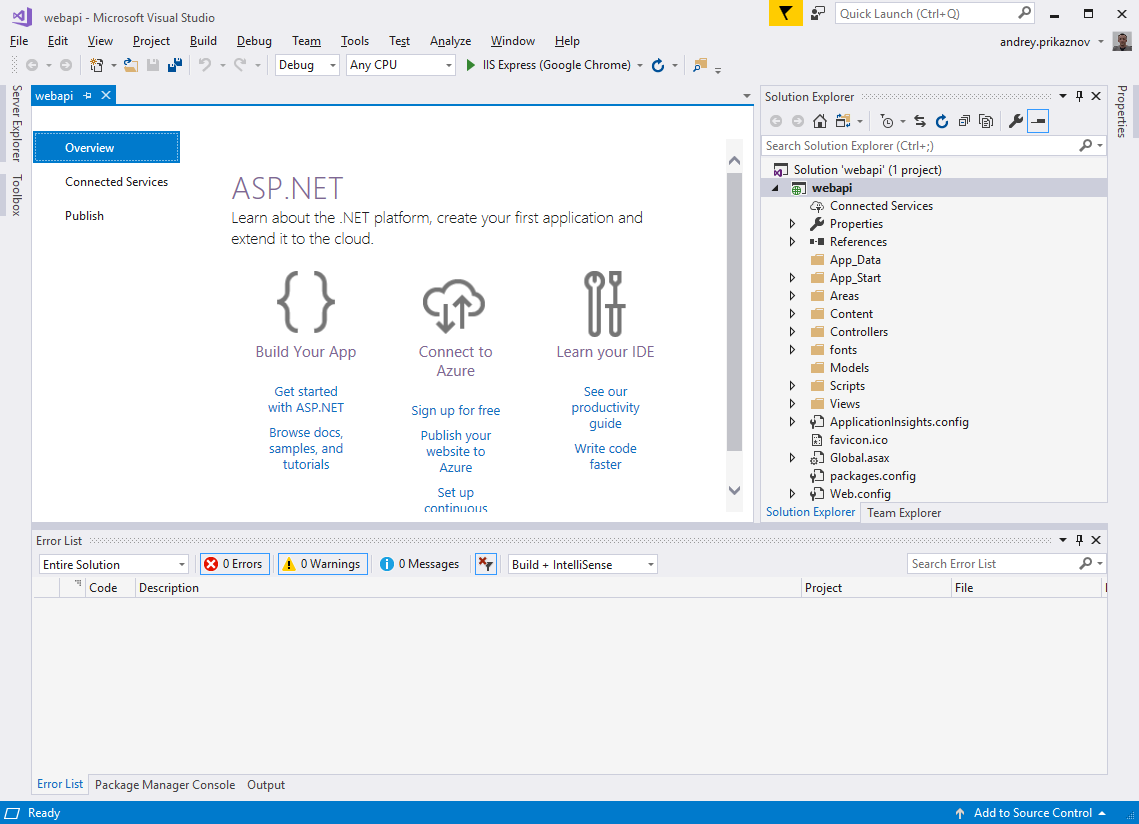
Done. Now you can browse the generated folders and files in the Solution Explorer. There are application configs, help page data, few controllers, fonts, css and js files.
Routing Table
By default, the server uses the Routing Table located in App_Start/WebApiConfig.cs.
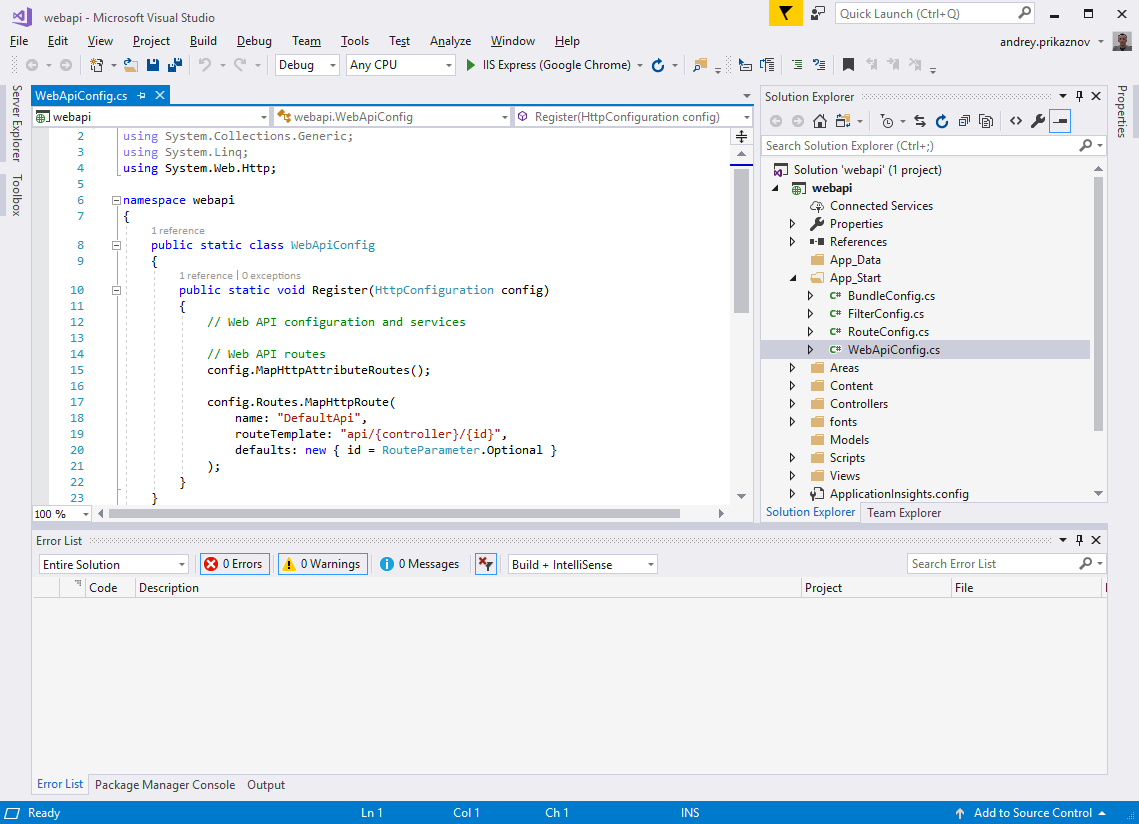
Pay attention to routeTemplate: "api/{controller}/{id}", it explains the api routing.
Now, let’s make a basic example. In this tutorial we will prepare API for Users, which is pretty general entity/object of every system.
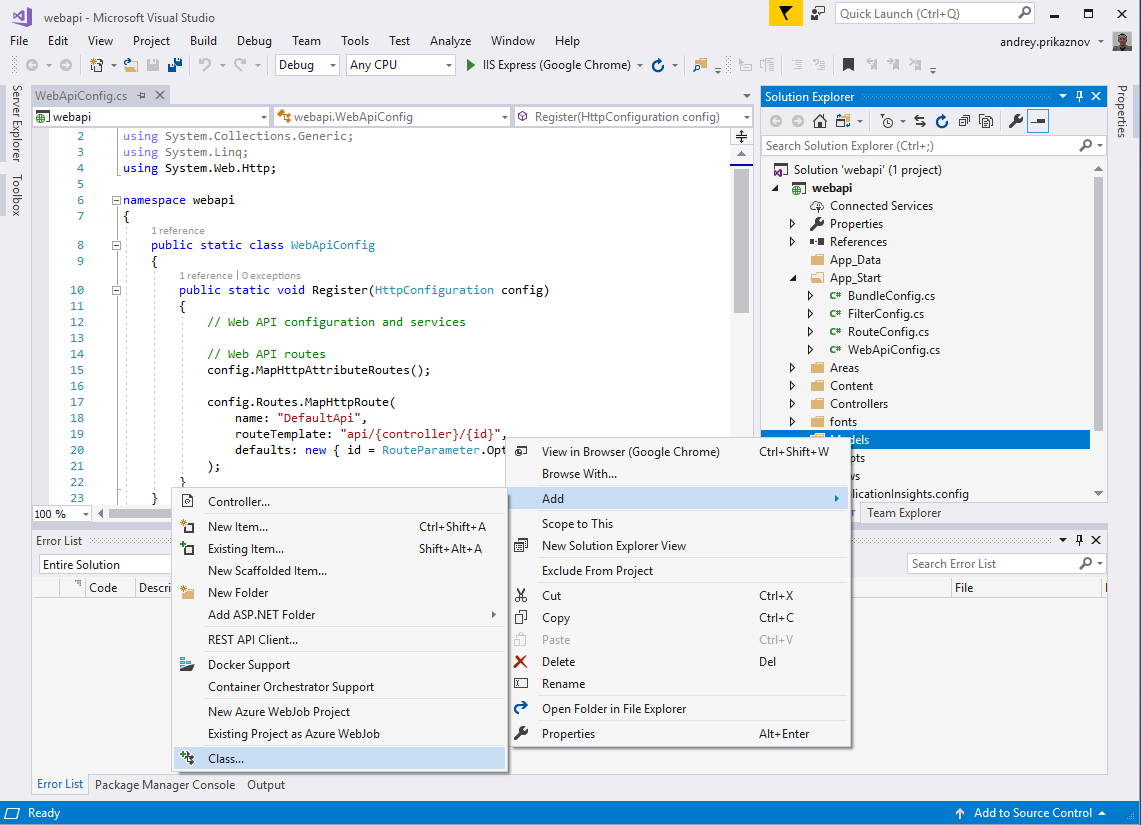
Adding a User model
The model represents the user, we will include various fields like id, name, email, phone and role.
In Solution Explorer, right-click in the Models folder, select Add then select Class. Then provide class name: User. The model class is ready.
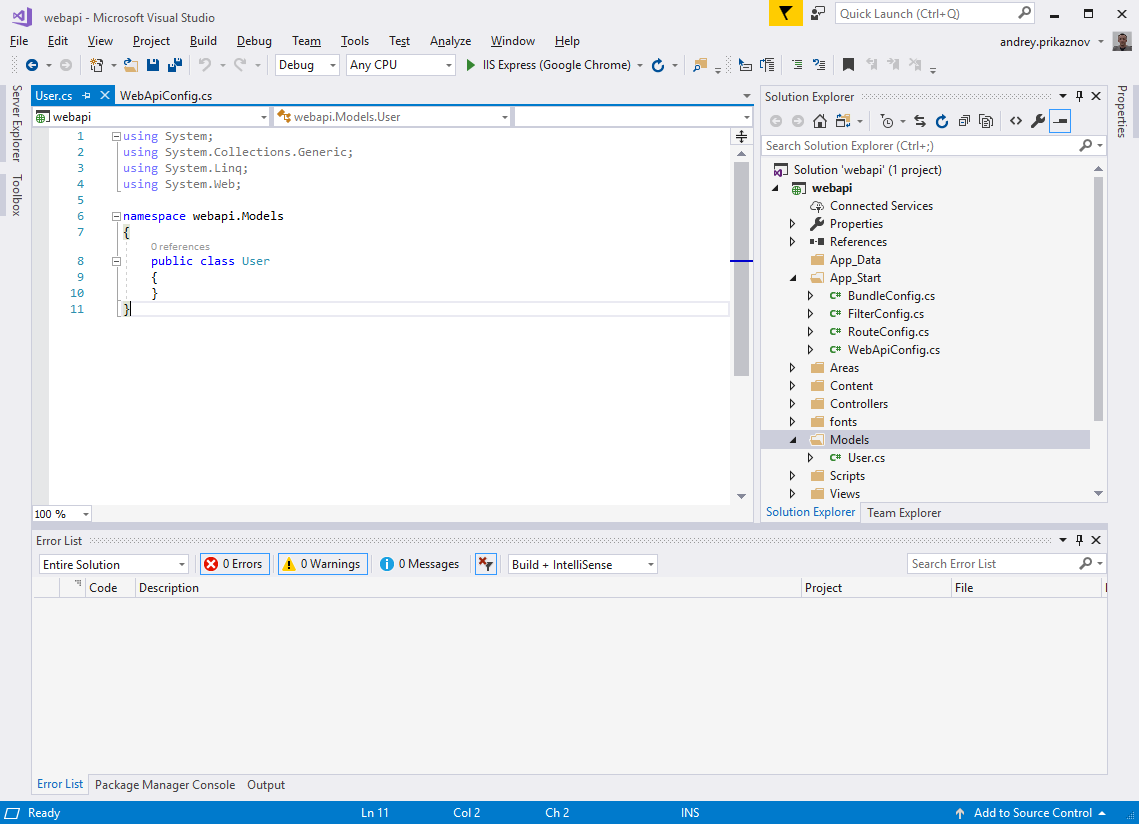
Now we just add all the fields we decided to add:
public class User
{
    public int id { get; set; }
    public string name { get; set; }
    public string email { get; set; }
    public string phone { get; set; }
    public int role { get; set; }
}
Add a User controller
In Web API, the controller is an object that handles all HTTP requests. In Solution Explorer, right-click the Controllers. Select Add, then select Controller.
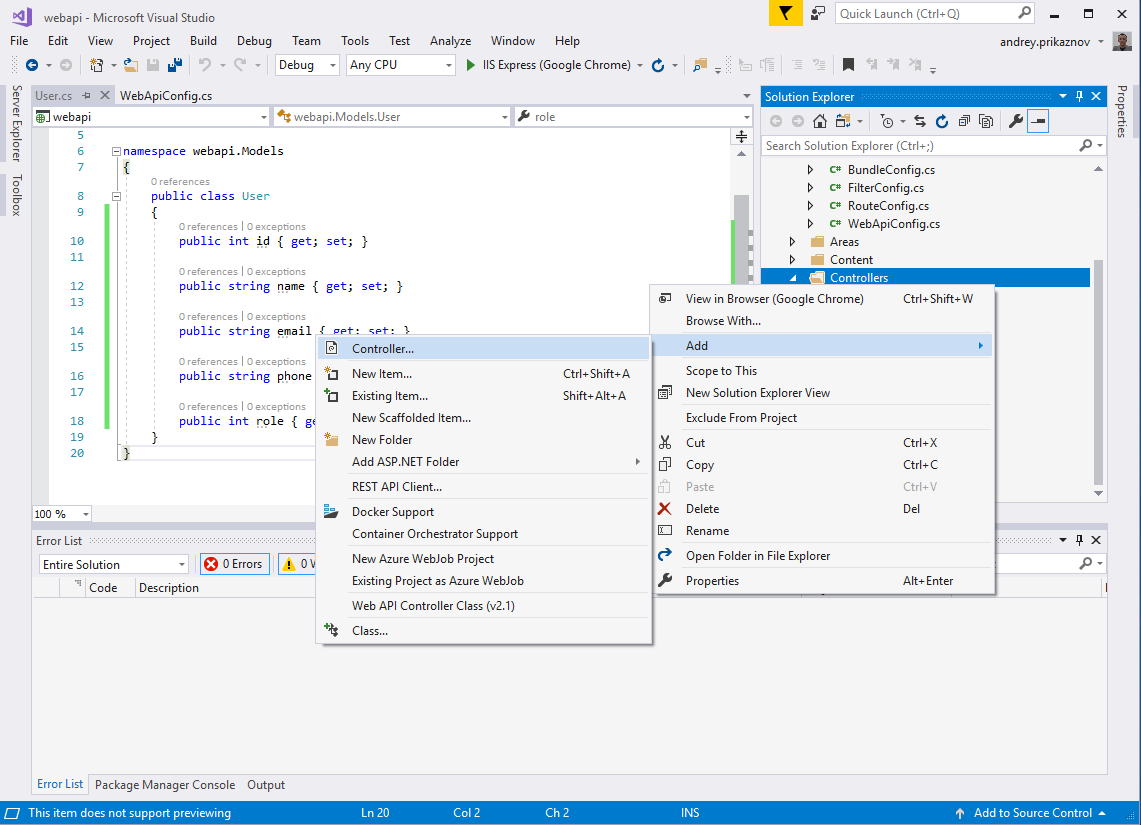
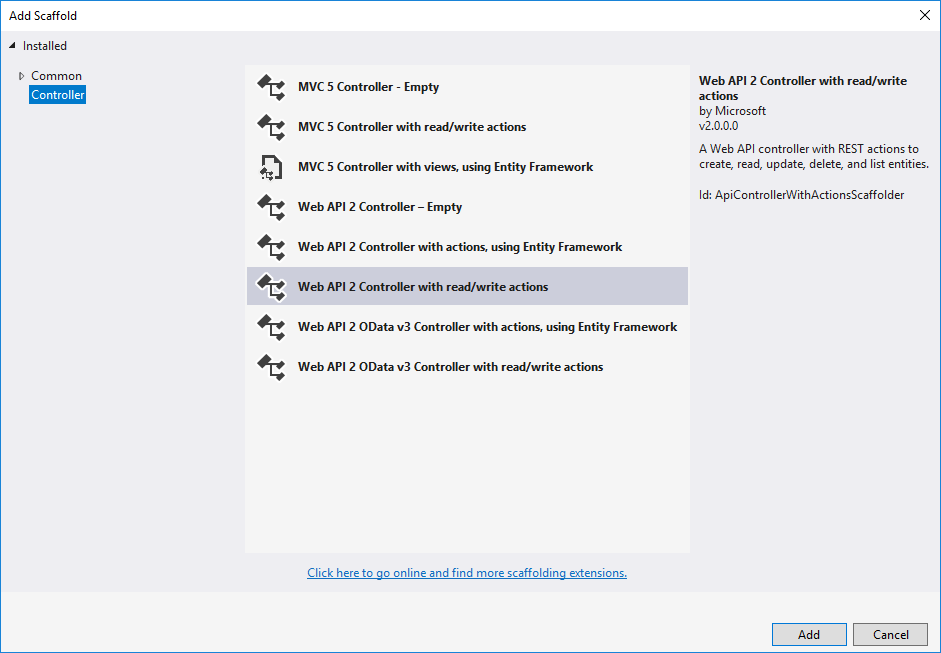
In the given dialog, select Web API 2 Controller with read/write actions. Name the controller – UsersController. It will prepare the controller with all CRUD actions.
In this article I prepared a basic example with dummy list of users:
public class UsersController : ApiController
{
private User[] users = new User[]
{
new User { id = 1, name = "Haleemah Redfern", email = "[email protected]", phone = "01111111", role = 1},
new User { id = 2, name = "Aya Bostock", email = "[email protected]", phone = "01111111", role = 1},
new User { id = 3, name = "Sohail Perez", email = "[email protected]", phone = "01111111", role = 1},
new User { id = 4, name = "Merryn Peck", email = "[email protected]", phone = "01111111", role = 2},
new User { id = 5, name = "Cairon Reynolds", email = "[email protected]", phone = "01111111", role = 3}
};
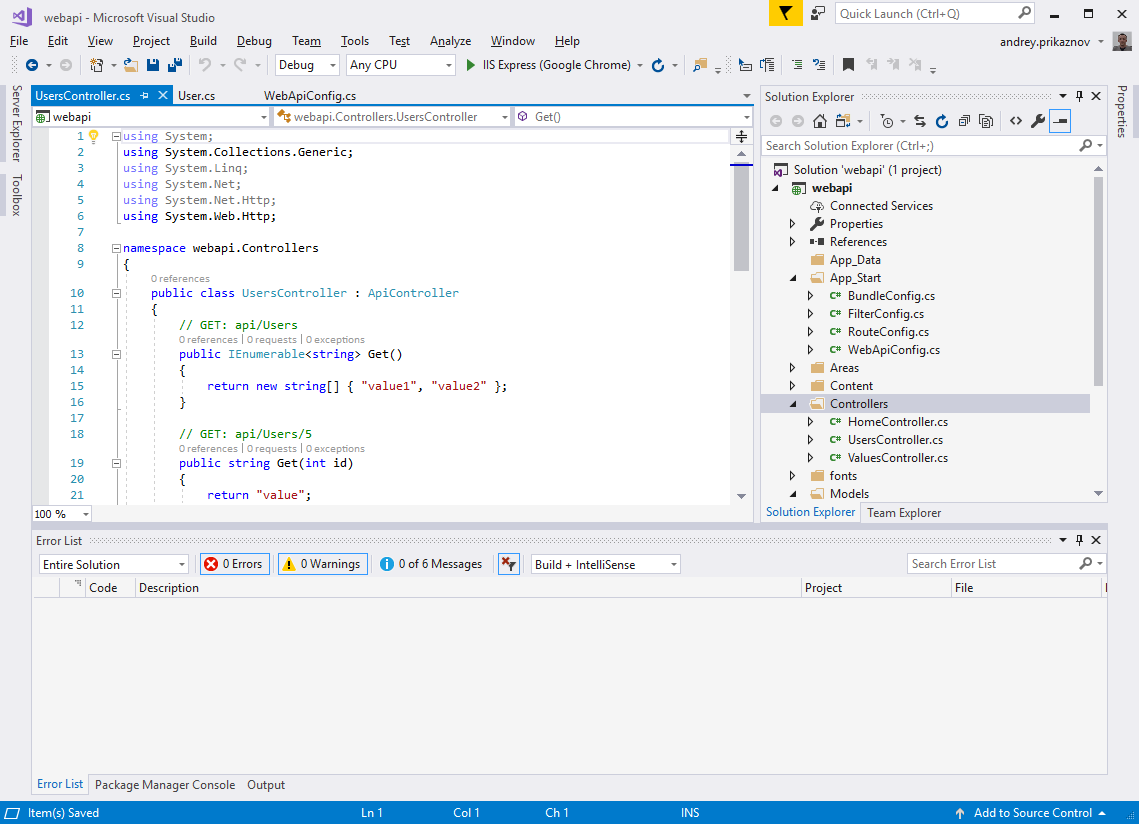
// GET: api/Users
[ResponseType(typeof(IEnumerable<User>))]
public IEnumerable<User> Get()
{
return users;
}
// GET: api/Users/5
public IHttpActionResult Get(int id)
{
var product = users.FirstOrDefault((p) => p.id == id);
if (product == null)
{
return NotFound();
}
return Ok(product);
}
...
Step 2 – Deployment
Now you can build your solution (Ctrl+Shift+B in Visual Studio), once the build is succeeded, you can run it. Click F5 and it will open in your browser automatically at your localhost in an available port (e.g. http://localhost:61024/). Most probably, you don’t want to keep it running in the Visual Studio all the time, and you prefer to keep it as service).
In this case, we can deploy it to a local dedicated server using IIS (Internet Information Services). It is pretty easy.
Firstly, open the IIS, on the left side under Sites – add a New Website (from the right panel or right-click on the Sites). Put the details: Site name “webapi.localhost.net”, Physical path “C:\projects\webapi” (where your solution is located), Binding – http or https, Host name is same – “webapi.localhost.net”. Click OK.
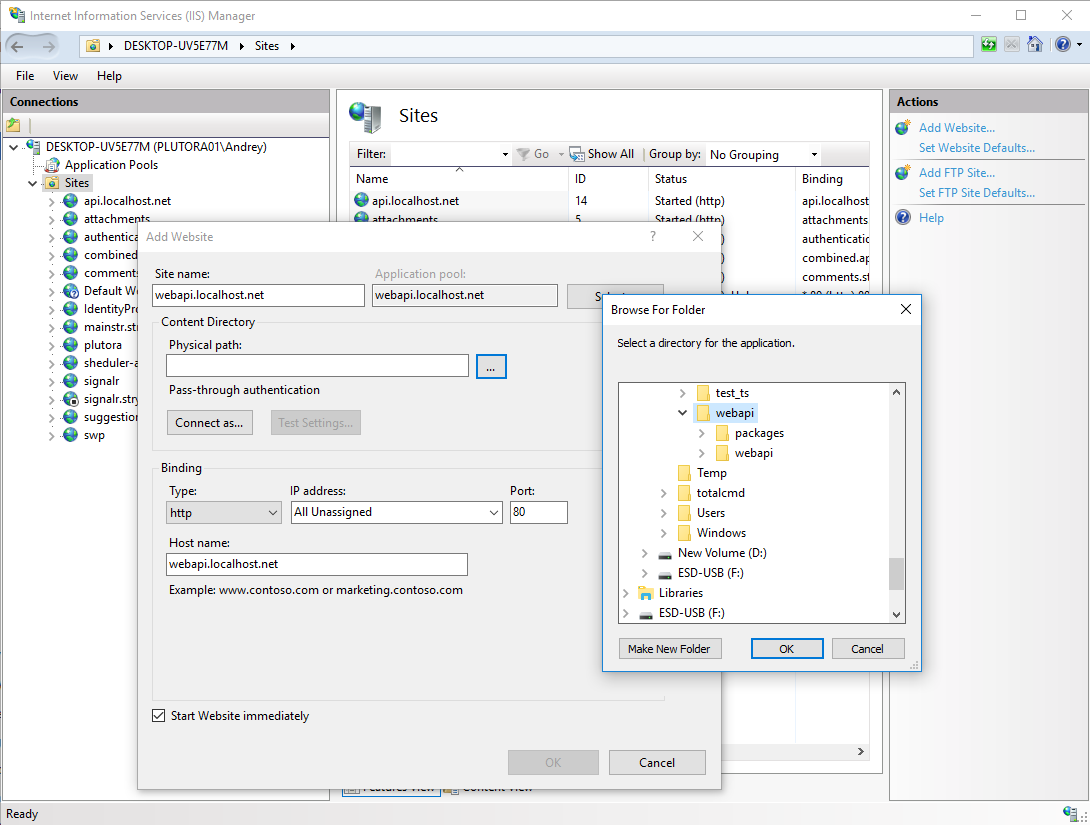
IIS should run the Web API service on webapi.localhost.net.
Now if you try to open webapi.localhost.net in your browser, it won’t open the result we created. It happens because browser tries to resolve this address webapi.localhost.net as global domain. In order to map this domain name with local server we need to modify the local hosts file. On Windows (v10) the hosts file exists at C:\Windows\system32\drivers\etc folder. The file doesn’t have own extension, it is “hosts” file.
Copy it to another location and open it in editor
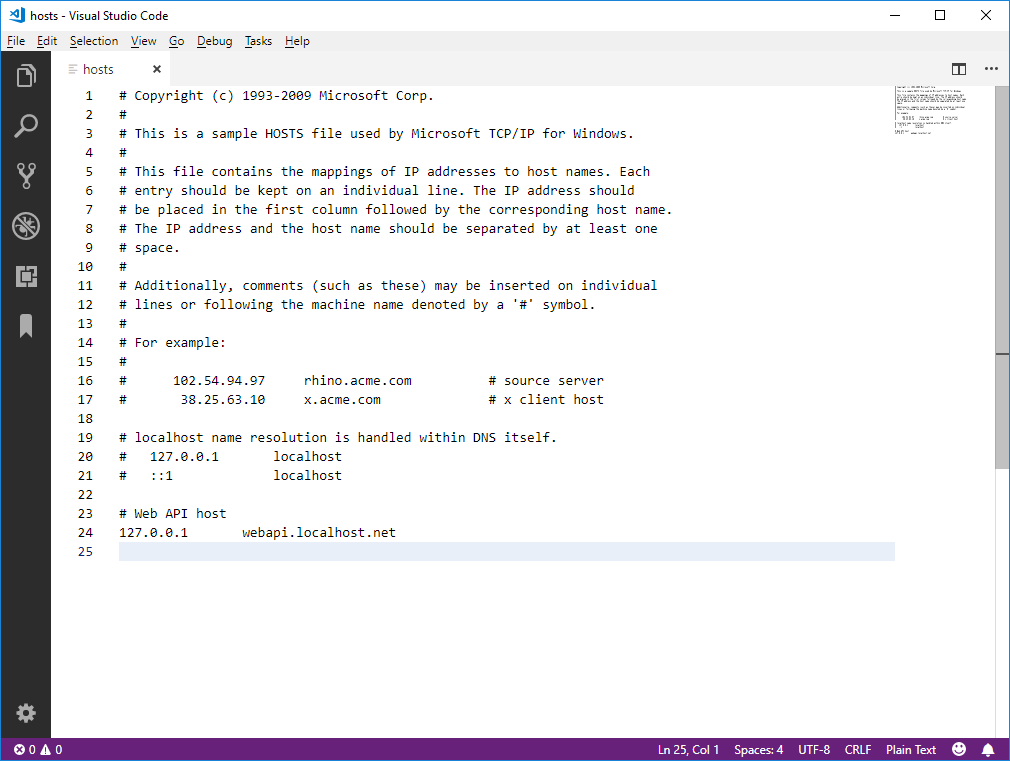
You need to add the following in the end of this file:
# Web API host
127.0.0.1       webapi.localhost.net
Now you need to put the modified file back to C:\Windows\system32\drivers\etc folder. As this folder is protected by windows by default, you will get access denied warning message. So you need to copy the file “As Administrator”.
After the file is updated, the webapi.localhost.net should load from your localhost (C:\projects\webapi).
Testing API
It is time to test the API methods we created for our Web server: api/users and api/users/{id}. Open “http://webapi.localhost.net/api/users” in your browser. You should get the following output:

As we are creating the external API which should be accessible outside, we need to test our API from another page. The easiest way is to use a development toolbar (which exists in any modern browser). Usually it is activated when you press F12. Go to ‘Console’ tab. Below I prepared two small examples which you can use to test the APIs
In case if jQuery is available, you can use:
$.ajax({
    type: "GET",
    url: 'http://webapi.localhost.net/api/users',
    success: (data) => {
        console.log(data);
    }
});
Otherwise, using native javascript, you can use:
var xhr = new XMLHttpRequest();
xhr.open('GET', 'https://webapi.localhost.net/api/users');
xhr.onload = function() {
    console.log(xhr.response);
};
xhr.send();
Very likely you will receive the following error
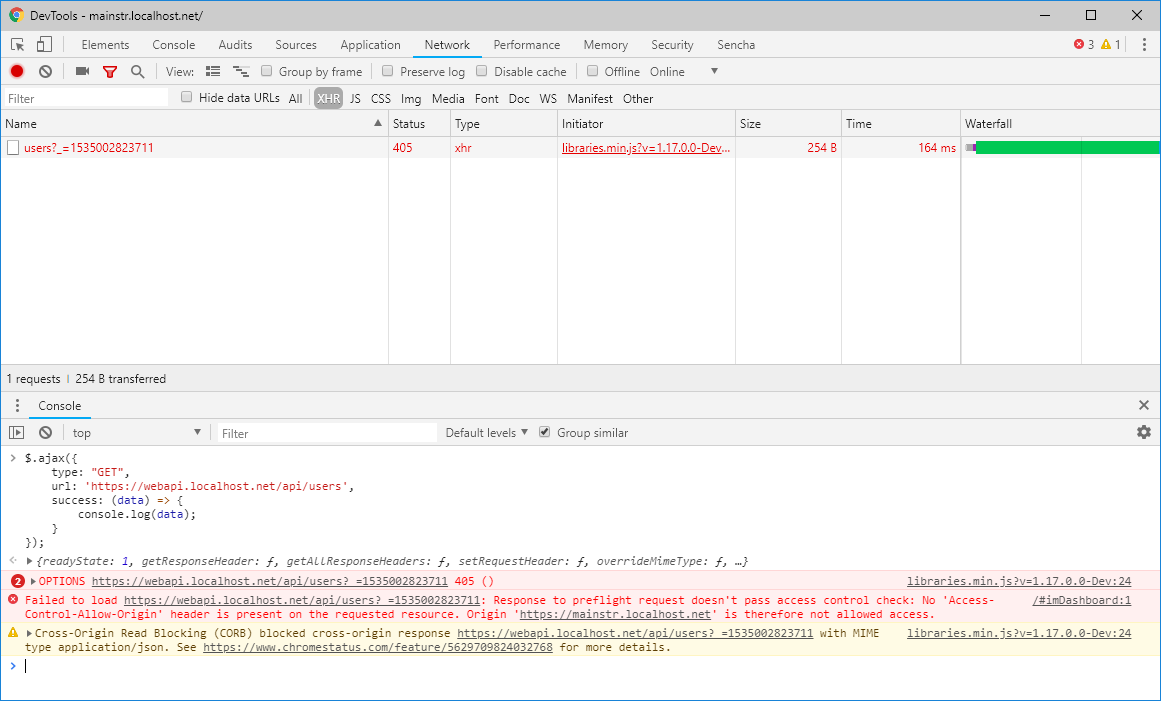
Response to preflight request doesn’t pass access control check: No ‘Access-Control-Allow-Origin’ header is present on the requested resource.
The reason is that regular web pages can use the XMLHttpRequest object to send and receive data from remote servers, but they’re limited by the same origin policy. Extensions aren’t so limited. An extension can talk to remote servers outside of its origin, as long as it first requests cross-origin permissions.
Cross-Origin Resource Sharing (CORS) is a mechanism that uses additional HTTP headers to tell a browser to let a web application running at one origin (domain) have permission to access selected resources from a server at a different origin.
Adjust Cross-Origin Resource Sharing (CORS)
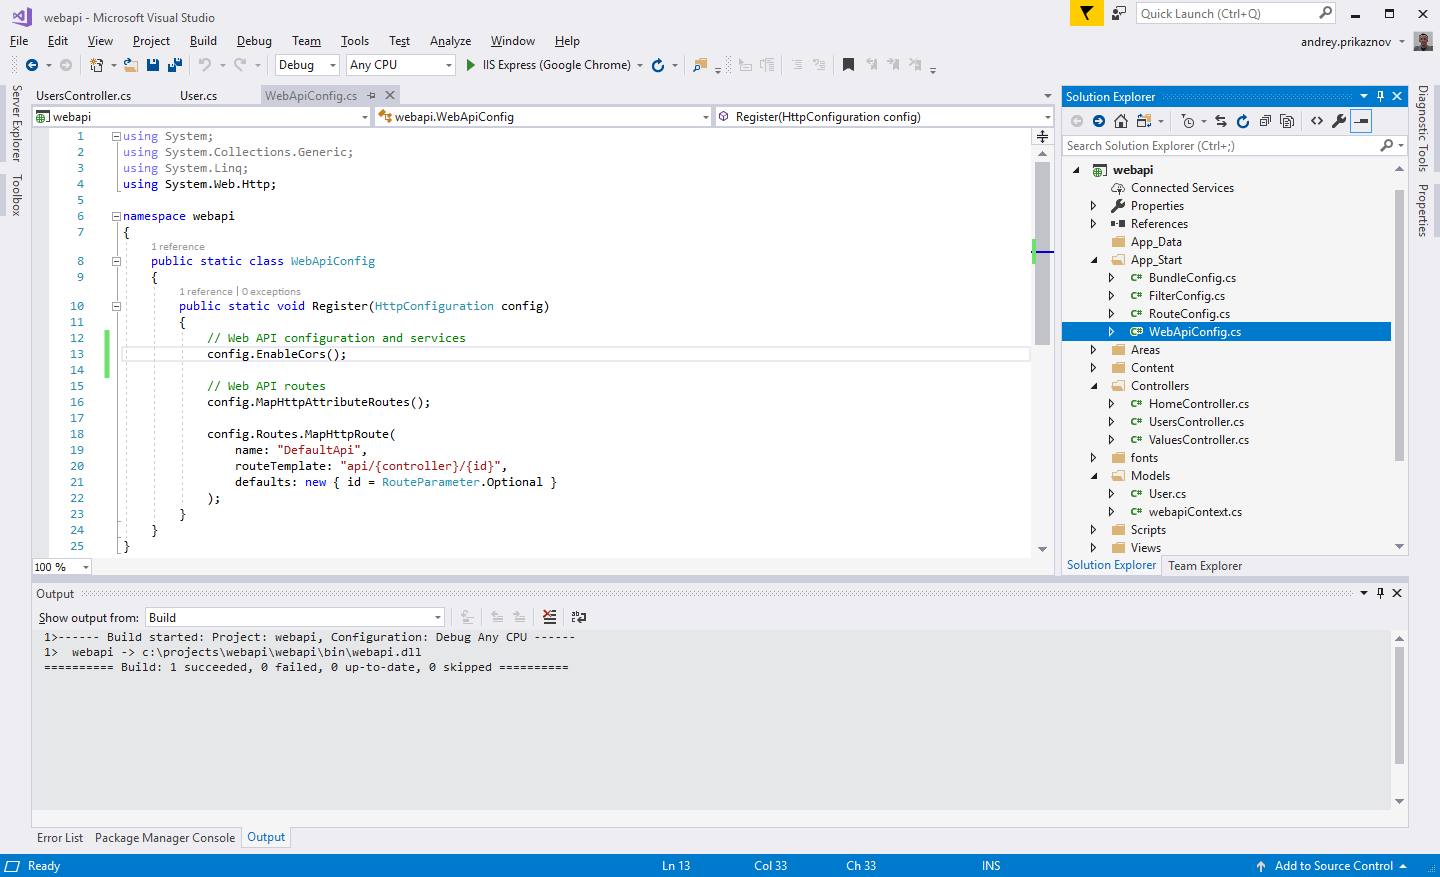
In order to solve this, we need to enable the CORS in our solution. In Visual Studio open Package Manage Console (available in bottom, between of Error List and Output). Run the following:
Install-Package Microsoft.AspNet.WebApi.Cors
It will install the WebApi.Cors reference. Then open “App_Start\WebApiConfig.cs” file. Add config.EnableCors(); before config.MapHttpAttributeRoutes();
Then go back to our UsersController.cs and add [EnableCors(origins: "*", headers: "*", methods: "*")] before the class definition
Finally – rebuild the project again. Then try to test the APIs again, now it should work
I hope you enjoyed our article and you found it useful.


