WebGL With Three.js – Lesson 2
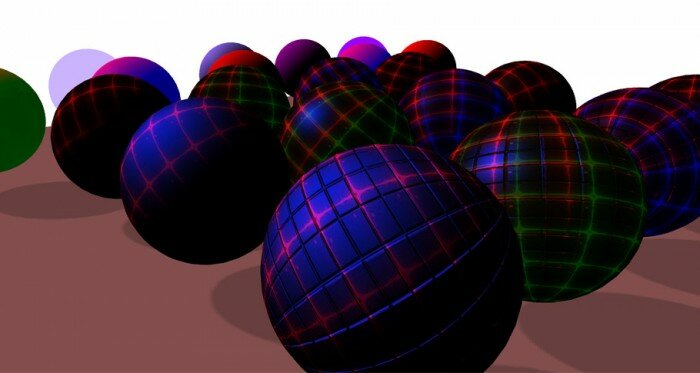
We continue our lessons on Webgl (using the three.js library). Today we will be working with different materials (such as MeshBasicMaterial, MeshLambertMaterial and MeshPhongMaterial), using all the possible parameters (color, opacity, ambient, emissive, specular). I will also describe how to apply textures on the material, and also, we will speak about the use of bump maping. With materials we can decorate any scene.
Live Demo
HTML
If you already done our first lesson, there is nothing new here – we use the same html markup:
<!DOCTYPE html>
<html lang="en" >
    <head>
        <meta charset="utf-8" />
        <meta name="author" content="Script Tutorials" />
        <title>WebGL With Three.js - Lesson 2 | Script Tutorials</title>
        <meta name="viewport" content="width=device-width, initial-scale=1.0, maximum-scale=1.0, user-scalable=no">
        <link href="css/main.css" rel="stylesheet" type="text/css" />
    </head>
    <body>
        <script src="js/three.min.js"></script>
        <script src="js/THREEx.WindowResize.js"></script>
        <script src="js/OrbitControls.js"></script>
        <script src="js/stats.min.js"></script>
        <script src="js/script.js"></script>
    </body>
</html>
Javascript
Main scene
By and large, the basis (the backbone) our application was borrowed with the previous tutorial:
var particleLight;
var lesson2 = {
    scene: null,
    camera: null,
    renderer: null,
    container: null,
    controls: null,
    clock: null,
    stats: null,
    init: function() { // Initialization
        // create main scene
        this.scene = new THREE.Scene();
        var SCREEN_WIDTH = window.innerWidth,
            SCREEN_HEIGHT = window.innerHeight;
        // prepare camera
        var VIEW_ANGLE = 45, ASPECT = SCREEN_WIDTH / SCREEN_HEIGHT, NEAR = 1, FAR = 5000;
        this.camera = new THREE.PerspectiveCamera( VIEW_ANGLE, ASPECT, NEAR, FAR);
        this.scene.add(this.camera);
        this.camera.position.set(100, 1000, 1000);
        this.camera.lookAt(new THREE.Vector3(0,0,0));
        // prepare renderer
        this.renderer = new THREE.WebGLRenderer({antialias:true, alpha: false});
        this.renderer.setSize(SCREEN_WIDTH, SCREEN_HEIGHT);
        this.renderer.setClearColor(0xffffff);
        this.renderer.shadowMapEnabled = true;
        this.renderer.shadowMapSoft = true;
        // prepare container
        this.container = document.createElement('div');
        document.body.appendChild(this.container);
        this.container.appendChild(this.renderer.domElement);
        // events
        THREEx.WindowResize(this.renderer, this.camera);
        // prepare controls (OrbitControls)
        this.controls = new THREE.OrbitControls(this.camera, this.renderer.domElement);
        this.controls.target = new THREE.Vector3(0, 0, 0);
        // prepare clock
        this.clock = new THREE.Clock();
        // prepare stats
        this.stats = new Stats();
        this.stats.domElement.style.position = 'absolute';
        this.stats.domElement.style.bottom = '0px';
        this.stats.domElement.style.zIndex = 10;
        this.container.appendChild( this.stats.domElement );
        // add directional light
        var dLight = new THREE.DirectionalLight(0xffffff);
        dLight.position.set(1, 300, 1);
        dLight.castShadow = true;
        // dLight.shadowCameraVisible = true;
        dLight.shadowDarkness = 0.2;
        dLight.shadowMapWidth = dLight.shadowMapHeight = 1000;
        this.scene.add(dLight);
        // add particle of light
        particleLight = new THREE.Mesh( new THREE.SphereGeometry(10, 10, 10), new THREE.MeshBasicMaterial({ color: 0xffffaa }));
        particleLight.position = dLight.position;
        this.scene.add(particleLight);
        // add simple ground
        var groundGeometry = new THREE.PlaneGeometry(1200, 1200, 1, 1);
        ground = new THREE.Mesh(groundGeometry, new THREE.MeshLambertMaterial({
            color: 0xFF62B0
        }));
        ground.position.y = 0;
        ground.rotation.x = - Math.PI / 2;
        ground.receiveShadow = true;
        this.scene.add(ground);
    }
};
// Animate the scene
function animate() {
    requestAnimationFrame(animate);
    render();
    update();
}
// Update controls and stats
function update() {
    lesson2.controls.update(lesson2.clock.getDelta());
    lesson2.stats.update();
    // smoothly move the particleLight
    var timer = Date.now() * 0.000025;
    particleLight.position.x = Math.sin(timer * 5) * 300;
    particleLight.position.z = Math.cos(timer * 5) * 300;
}
// Render the scene
function render() {
    if (lesson2.renderer) {
        lesson2.renderer.render(lesson2.scene, lesson2.camera);
    }
}
// Initialize lesson on page load
function initializeLesson() {
    lesson2.init();
    animate();
}
if (window.addEventListener)
    window.addEventListener('load', initializeLesson, false);
else if (window.attachEvent)
    window.attachEvent('onload', initializeLesson);
else window.onload = initializeLesson;
Colors
Now, as in the previous lesson, let’s add a function to generate a random color (of course, this is not entirely random color, but the random color from array of predefined colors):
var colors = [
    0xFF62B0,
    0x9A03FE,
    0x62D0FF,
    0x48FB0D,
    0xDFA800,
    0xC27E3A,
    0x990099,
    0x9669FE,
    0x23819C,
    0x01F33E,
    0xB6BA18,
    0xFF800D,
    0xB96F6F,
    0x4A9586
];
function getRandColor() {
    return colors[Math.floor(Math.random() * colors.length)];
}
In order to draw a sphere – we create the Mesh using SphereGeometry, this is easy:
drawSphere: function(x, z, material) {
    var cube = new THREE.Mesh(new THREE.SphereGeometry(70, 70, 20), material);
    cube.rotation.x = cube.rotation.z = Math.PI * Math.random();
    cube.position.x = x;
    cube.position.y = 100;
    cube.position.z = z;
    cube.castShadow = cube.receiveShadow = true;
    this.scene.add(cube);
}
Materials
Now we should start with materials. If you’ve watched the demo, then you have seen that it is visually divided objects into several sections: from the simple to the complex.
First three spheres (from left to right, from the beginning to the end) are the most simple: we used three possible material (MeshBasicMaterial, MeshLambertMaterial and MeshPhongMaterial) with indicating only one option: ‘color’. Next three spheres are nearly the same, but we made them semi-transparent (opacity = 0.5). In the second row we used different combinations of the following attributes: ambient, emissive, specular and shininess. On the last three lines – we repeat experiments, but using texture and bumpmap (back row):
var mlib = {
  '1':   new THREE.MeshBasicMaterial({ color: getRandColor() }),
  '2':   new THREE.MeshLambertMaterial({ color: getRandColor() }),
  '3':   new THREE.MeshPhongMaterial({ color: getRandColor() }),
  '4':   new THREE.MeshBasicMaterial({ color: getRandColor(), opacity: 0.5, transparent: true }),
  '5':   new THREE.MeshLambertMaterial({ color: getRandColor(), opacity: 0.5, transparent: true }),
  '6':   new THREE.MeshPhongMaterial({ color: getRandColor(), opacity: 0.5, transparent: true }),
  '7':   new THREE.MeshLambertMaterial({ color: 0xff0000, ambient: 0xffffff }),
  '8':   new THREE.MeshLambertMaterial({ color: 0xff0000, emissive: 0x000088 }),
  '9':   new THREE.MeshPhongMaterial({ color: 0xff0000, ambient: 0x3ffc33 }),
  '10':  new THREE.MeshPhongMaterial({ color: 0xff0000, emissive: 0x000088 }),
  '11':  new THREE.MeshPhongMaterial({ color: 0xff0000, emissive: 0x004000, specular: 0x0022ff }),
  '12':  new THREE.MeshPhongMaterial({ color: 0xff0000, specular: 0x0022ff, shininess: 3 }),
  '13':  new THREE.MeshLambertMaterial({ map: texture, color: 0xff0000, ambient: 0x3ffc33 }),
  '14':  new THREE.MeshLambertMaterial({ map: texture, color: 0xff0000, emissive: 0x000088 }),
  '15':  new THREE.MeshLambertMaterial({ map: texture, color: 0xff0000, emissive: 0x004000, specular: 0x0022ff }),
  '16':  new THREE.MeshLambertMaterial({ map: texture, color: 0xff0000, specular: 0x0022ff, shininess: 3 }),
  '17':  new THREE.MeshPhongMaterial({ map: texture, color: 0xff0000, ambient: 0x3ffc33 }),
  '18':  new THREE.MeshPhongMaterial({ map: texture, color: 0xff0000, emissive: 0x000088 }),
  '19':  new THREE.MeshPhongMaterial({ map: texture, color: 0xff0000, emissive: 0x004000, specular: 0x0022ff }),
  '20':  new THREE.MeshPhongMaterial({ map: texture, color: 0xff0000, specular: 0x0022ff, shininess: 3 }),
  '21':  new THREE.MeshPhongMaterial({ map: texture, bumpMap: textureBump, color: 0xff0000, ambient: 0x3ffc33 }),
  '22':  new THREE.MeshPhongMaterial({ map: texture, bumpMap: textureBump, color: 0xff0000, emissive: 0x000088 }),
  '23':  new THREE.MeshPhongMaterial({ map: texture, bumpMap: textureBump, color: 0xff0000, emissive: 0x004000, specular: 0x0022ff }),
  '24':  new THREE.MeshPhongMaterial({ map: texture, bumpMap: textureBump, color: 0xff0000, specular: 0x0022ff, shininess: 3 }),
}
All these materials we added to the array for later use. As you can see, we used two textures, the first is for ‘map’, the second is for ‘bumpMap’. We loaded them with the following code:
var texture = THREE.ImageUtils.loadTexture('texture.png');
texture.repeat.set(10, 10);
texture.wrapS = texture.wrapT = THREE.RepeatWrapping;
texture.anisotropy = 16;
texture.needsUpdate = true;
var textureBump = THREE.ImageUtils.loadTexture('bump.png');
textureBump.repeat.set(10, 10);
textureBump.wrapS = textureBump.wrapT = THREE.RepeatWrapping;
textureBump.anisotropy = 16;
textureBump.needsUpdate = true;
Now we only need to draw our spheres (in different positions) using different materials:
// add spheres with different materials
this.drawSphere(-550, 400, mlib['1']);
this.drawSphere(-350, 400, mlib['2']);
this.drawSphere(-150, 400, mlib['3']);
this.drawSphere( 150, 400, mlib['4']);
this.drawSphere( 350, 400, mlib['5']);
this.drawSphere( 550, 400, mlib['6']);
this.drawSphere(-550, 200, mlib['7']);
this.drawSphere(-350, 200, mlib['8']);
this.drawSphere( -50, 200, mlib['9']);
this.drawSphere( 150, 200, mlib['10']);
this.drawSphere( 350, 200, mlib['11']);
this.drawSphere( 550, 200, mlib['12']);
this.drawSphere(-250, 0, mlib['13']);
this.drawSphere( -90, 0, mlib['14']);
this.drawSphere(  90, 0, mlib['15']);
this.drawSphere( 250, 0, mlib['16']);
this.drawSphere(-250, -200, mlib['17']);
this.drawSphere( -90, -200, mlib['18']);
this.drawSphere(  90, -200, mlib['19']);
this.drawSphere( 250, -200, mlib['20']);
this.drawSphere(-250, -400, mlib['21']);
this.drawSphere( -90, -400, mlib['22']);
this.drawSphere(  90, -400, mlib['23']);
this.drawSphere( 250, -400, mlib['24']);
So we finished up our today’s lesson.
Additional information (documentation)
In the process of creating materials, we specify various desired settings (in array). Depending on the type of material, parameters are slightly different. Now we will list these parameters for each of the materials used in our lesson. Default values will be given in brackets.
MeshBasicMaterial
This material is for drawing geometries in a simple shaded (flat or wireframe) way.
- color — geometry color in hexadecimal (0xffffff)
- wireframe — render geometry as wireframe (false)
- wireframeLinewidth — line thickness (1)
- wireframeLinecap — define appearance of line ends (’round’)
- wireframeLinejoin — define appearance of line joints (’round’)
- shading — define shading type (THREE.SmoothShading)
- vertexColors — define how the vertices gets colored (THREE.NoColors)
- fog — define whether the material color is affected by global fog settings (true)
- lightMap — set light map (null)
- specularMap — set specular map (null)
- envMap — set env map (null)
- skinning — define whether the material uses skinning (false)
- morphTargets — define whether the material uses morphTargets (false)
MeshLambertMaterial
This material is for non-shiny (Lambertian) surfaces, evaluated per vertex.
- color — geometry color in hexadecimal (0xffffff)
- ambient — ambient color of the material, multiplied by the color of the AmbientLight (0xffffff)
- emissive — emissive (light) color of the material, essentially a solid color unaffected by other lighting (0x000000)
- shading — define shading type (THREE.SmoothShading)
- wireframe — render geometry as wireframe (false)
- wireframeLinewidth — line thickness (1)
- wireframeLinecap — define appearance of line ends (’round’)
- wireframeLinejoin — define appearance of line joints (’round’)
- vertexColors — define how the vertices gets colored (THREE.NoColors)
- fog — define whether the material color is affected by global fog settings (true)
- map — set color texture map (null)
- lightMap — set light map (null)
- specularMap — set specular map (null)
- envMap — set env map (null)
- reflectivity — how much the environment map affects the surface
- refractionRatio — index of refraction for an environment map using THREE.CubeRefractionMapping (0.98)
- combine — how to combine the result of the surface’s color with the environment map (options: THREE.Multiply (default), THREE.MixOperation, THREE.AddOperation)
- skinning — define whether the material uses skinning (false)
- morphTargets — define whether the material uses morphTargets (false)
- morphNormals — define whether the material uses morphNormals (false)
MeshPhongMaterial
This material is for shiny surfaces, evaluated per pixel.
- color — geometry color in hexadecimal (0xffffff)
- ambient — ambient color of the material, multiplied by the color of the AmbientLight (0xffffff)
- emissive — emissive (light) color of the material, essentially a solid color unaffected by other lighting (0x000000)
- specular – specular color of the material, i.e., how shiny the material is and the color of its shine. Setting this the same color as the diffuse value (times some intensity) makes the material more metallic-looking; setting this to some gray makes the material look more plastic (dark gray)
- shininess – how shiny the specular highlight is; a higher value gives a sharper highlight (30)
- shading — define shading type (THREE.SmoothShading)
- wireframe — render geometry as wireframe (false)
- wireframeLinewidth — line thickness (1)
- wireframeLinecap — define appearance of line ends (’round’)
- wireframeLinejoin — define appearance of line joints (’round’)
- vertexColors — define how the vertices gets colored (THREE.NoColors)
- fog — define whether the material color is affected by global fog settings (true)
- map — set color texture map (null)
- lightMap — set light map (null)
- specularMap — set specular map (null)
- envMap — set env map (null)
- reflectivity — how much the environment map affects the surface
- refractionRatio — index of refraction for an environment map using THREE.CubeRefractionMapping (0.98)
- combine — how to combine the result of the surface’s color with the environment map (options: THREE.Multiply (default), THREE.MixOperation, THREE.AddOperation)
- skinning — define whether the material uses skinning (false)
- morphTargets — define whether the material uses morphTargets (false)
- morphNormals — define whether the material uses morphNormals (false)
- bumpMap — set bump texture map (none)
Bump Maps
A bump map is a bitmap used to displace the surface normal vectors of a mesh to, as the name suggests, create an apparently bumpy surface. The pixel values of the bitmap are treated as heights rather than color values. For example, a pixel value of zero can mean no displacement from the surface and non-zero values can mean positive displacement away from the surface. Typically, single-channel black and white bitmaps are used for efficiency, though full RGB bitmaps can be used to provide greater detail, since they can store much larger values. The reason that bitmaps are used instead of 3D vectors is that they are more compact and provide a fast way to calculate normal displacement within the shader code. In the future we will continue talking about the maps.
Live Demo
[sociallocker]
download in package
[/sociallocker]


