
Webcam Video Capture in HTML5 and CSS3 filters
As we know – HTML5 defines a new element called <video> for embedding video. Usually people use this element to embed a video into web page. It is very convenient. Because the <video> element is designed to be usable without any detection scripts. You can just specify multiple video files, and browsers that support HTML5 video will choose one based on what video formats they support. Now, let’s imagine that we can use the same element to access a user’s camera and microphone. Our article opens these boundaries. I’m going to show you how to capture a video from your webcam in HTML5, and even more, I will show you how to pass this video into <canvas> object, and even – how to apply custom CSS3 filters to our video.
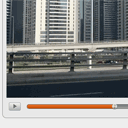
Today we will create a script which will capture a video stream from our webcam (into <video> element), at the right of our <video> element I will put a <canvas> element, and we will transfer the video from the video object directly into the canvas object. I’m going to use a new HTML5 – navigator.getUserMedia(). This function gives access to a user’s camera and microphone. Also, before we start I would like to inform you that our result works well only in few browsers, this are Chrome (I recommend to use the latest version) and Opera (version 12 and higher). But, it is going to work in future versions of FireFox browser too.
Live Demo
download package
Step 1. HTML
Our basic HTML markup does not contain a big deal, on the contrary – it is very easy:
index.html
<div class="warning"><h2>Native web camera streaming (getUserMedia) is not supported in this browser.</h2></div>
<div class="container">
<h3>Current filter is: None</h3>
<button>Click here to change video filter</button>
<div style="clear:both"></div>
<div class="col">
<h2>HTML5 <video> object</h2>
<video></video>
</div>
<div class="col">
<h2>HTML5 <canvas> object</h2>
<canvas width="600" height="450"></canvas>
</div>
</div>
There are a warning message (for browsers that do not support this functionality), a <video> element and <canvas> element.
Step 2. CSS
As I told in the beginning of our tutorial – we are going to use CSS3 filters. It is the time to define all these CSS3 filters:
style.css
.grayscale{
    -webkit-filter:grayscale(1);
    -moz-filter:grayscale(1);
    -o-filter:grayscale(1);
    -ms-filter:grayscale(1);
    filter:grayscale(1);
}

.sepia{
    -webkit-filter:sepia(0.8);
    -moz-filter:sepia(0.8);
    -o-filter:sepia(0.8);
    -ms-filter:sepia(0.8);
    filter:sepia(0.8);
}

.blur{
    -webkit-filter:blur(3px);
    -moz-filter:blur(3px);
    -o-filter:blur(3px);
    -ms-filter:blur(3px);
    filter:blur(3px);
}

.brightness{
    -webkit-filter:brightness(0.3);
    -moz-filter:brightness(0.3);
    -o-filter:brightness(0.3);
    -ms-filter:brightness(0.3);
    filter:brightness(0.3);
}

.contrast{
    -webkit-filter:contrast(0.5);
    -moz-filter:contrast(0.5);
    -o-filter:contrast(0.5);
    -ms-filter:contrast(0.5);
    filter:contrast(0.5);
}

.hue-rotate{
    -webkit-filter:hue-rotate(90deg);
    -moz-filter:hue-rotate(90deg);
    -o-filter:hue-rotate(90deg);
    -ms-filter:hue-rotate(90deg);
    filter:hue-rotate(90deg);
}

.hue-rotate2{
    -webkit-filter:hue-rotate(180deg);
    -moz-filter:hue-rotate(180deg);
    -o-filter:hue-rotate(180deg);
    -ms-filter:hue-rotate(180deg);
    filter:hue-rotate(180deg);
}

.hue-rotate3{
    -webkit-filter:hue-rotate(270deg);
    -moz-filter:hue-rotate(270deg);
    -o-filter:hue-rotate(270deg);
    -ms-filter:hue-rotate(270deg);
    filter:hue-rotate(270deg);
}

.saturate{
    -webkit-filter:saturate(10);
    -moz-filter:saturate(10);
    -o-filter:saturate(10);
    -ms-filter:saturate(10);
    filter:saturate(10);
}

.invert{
    -webkit-filter:invert(1);
    -moz-filter:invert(1);
    -o-filter: invert(1);
    -ms-filter: invert(1);
    filter: invert(1);
}
As you can see – vendors prefixes are required. It gives possibility to use these filters in all major browsers.
Step 3. HTML5 JavaScript
Now, the most important step – html5, please create an empty script.js file and paste the next code:
script.js
// Main initialization
document.addEventListener('DOMContentLoaded', function() {

    // Global variables
    var video = document.querySelector('video');
    var audio, audioType;
    var canvas = document.querySelector('canvas');
    var context = canvas.getContext('2d');

    // Custom video filters
    var iFilter = 0;
    var filters = [
        'grayscale',
        'sepia',
        'blur',
        'brightness',
        'contrast',
        'hue-rotate',
        'hue-rotate2',
        'hue-rotate3',
        'saturate',
        'invert',
        'none'
    ];

    // Get the video stream from the camera with getUserMedia
    navigator.getUserMedia = navigator.getUserMedia || navigator.webkitGetUserMedia ||
        navigator.mozGetUserMedia || navigator.msGetUserMedia;

    window.URL = window.URL || window.webkitURL || window.mozURL || window.msURL;
    if (navigator.getUserMedia) {

        // Evoke getUserMedia function
        navigator.getUserMedia({video: true, audio: true}, onSuccessCallback, onErrorCallback);

        function onSuccessCallback(stream) {
            // Use the stream from the camera as the source of the video element
            video.src = window.URL.createObjectURL(stream) || stream;

            // Autoplay
            video.play();

            // HTML5 Audio
            audio = new Audio();
            audioType = getAudioType(audio);
            if (audioType) {
                audio.src = 'polaroid.' + audioType;
                audio.play();
            }
        }

        // Display an error
        function onErrorCallback(e) {
            var expl = 'An error occurred: [Reason: ' + e.code + ']';
            console.error(expl);
            alert(expl);
            return;
        }
    } else {
        document.querySelector('.container').style.visibility = 'hidden';
        document.querySelector('.warning').style.visibility = 'visible';
        return;
    }

    // Draw the video stream at the canvas object
    function drawVideoAtCanvas(obj, context) {
        window.setInterval(function() {
            context.drawImage(obj, 0, 0);
        }, 60);
    }

    // The canPlayType() function doesn’t return true or false. In recognition of how complex
    // formats are, the function returns a string: 'probably', 'maybe' or an empty string.
    function getAudioType(element) {
        if (element.canPlayType) {
            if (element.canPlayType('audio/mp4; codecs="mp4a.40.5"') !== '') {
                return('aac');
            } else if (element.canPlayType('audio/ogg; codecs="vorbis"') !== '') {
                return("ogg");
            }
        }
        return false;
    }

    // Add event listener for our video's Play function in order to produce video at the canvas
    video.addEventListener('play', function() {
        drawVideoAtCanvas(this, context);
    }, false);

    // Add event listener for our Button (to switch video filters)
    document.querySelector('button').addEventListener('click', function() {
        video.className = '';
        canvas.className = '';
        var effect = filters[iFilter++ % filters.length]; // Loop through the filters.
        if (effect) {
            video.classList.add(effect);
            canvas.classList.add(effect);

            document.querySelector('.container h3').innerHTML = 'Current filter is: ' + effect;
        }
    }, false);

}, false);
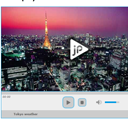
Let’s review our code. In order to use webcam (or microphone) we use new navigator.getUserMedia function. As params, we use {video: true, audio: true}. In this case when we open the page, Chrome browser can throw an information bar with request to allow or deny use your webcam and microphone. Allow it. This is just browser’s security system. Beside main params, we can point two callback functions for navigator.getUserMedia: onSuccessCallback and onErrorCallback. In case of any error – we hide Video and Canvas objects and the display warning message: ‘Native web camera streaming (getUserMedia) is not supported in this browser’. If everything is fine – we use the stream from the camera as the source of the video element and play it. Beside html5 video, you can see here html5 audio as well. Next, in order to produce video stream to the <canvas> object – I use basic ‘drawImage’ function (which is invoked periodically to re-draw the canvas object). And finally, when we need to apply custom CSS3 filter, we can just change className of our Video and Canvas objecs.
Live Demo
download package
Conclusion
The future is getting closer. I hope that everything is clean for today. If you have any suggestions about further ideas for articles – you are welcome to share them with us. Good luck in your work!


Getting “Native web camera streaming (getUserMedia) is not supported in this browser” error in the loaded page.
This is a really cool snippet, thanks for sharing.
Hi Hanumanth,
If you see this message, it means that your browser doesn’t support streaming video (with HTML5). Try to use another (modern) browser.