
Whenever one thinks of video or audio communication online, they remember Skype with its voice and video calls. However, Skype service is not the only option and is far from the best one.
When there is a need to create a software product (be it a web app or website) that supports voice and video communication, you have to use technology that, in plain words, allows to transfer audio and video information from browser to browser in real-time.
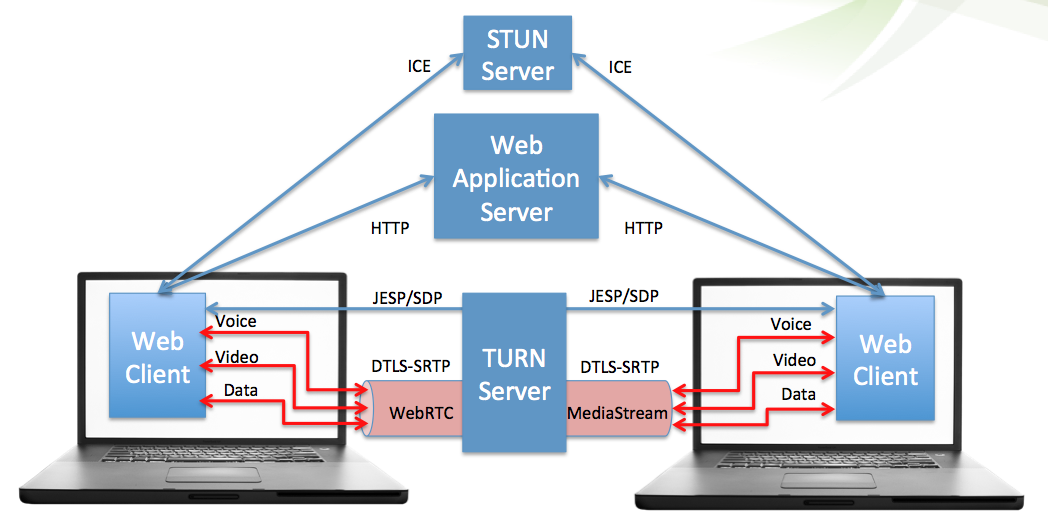
This is possible using WebRTC. It’s an open source technology that lets set up video and audio communication that is supported by web browsers. It’s worth mentioning that almost all browsers support WebRTC technology, however, some do it under certain conditions:
- The latest versions of Chrome allow access to media devices (such as microphone and webcam) only to the sites with SSL Certificate (i.e. secured sites that use HTTPS protocol)
- Safari doesn’t allow access to any media devices at all. Still, you can resolve this problem with the help of this plug-in.
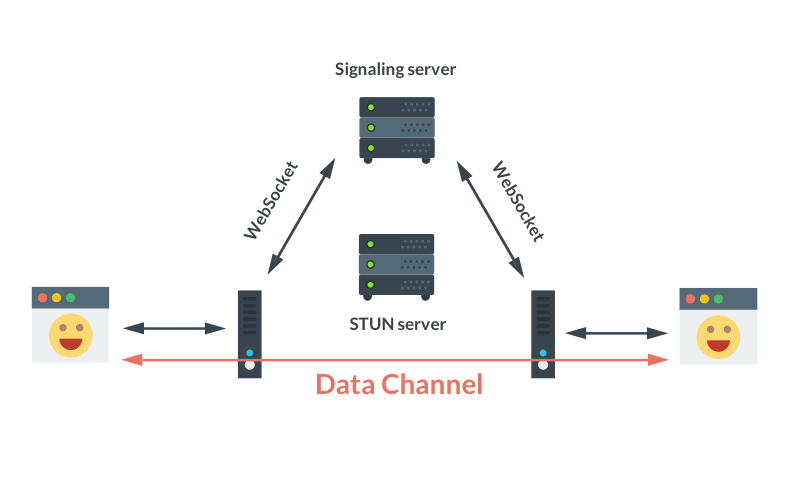
So, having mentioned the restrictions, let’s move to implementation process based on the real project. To begin with, to provide the audio/video connection between two clients, they have to identify each other. That’s why you should the signaling server as a layer between them. The most widespread solution for signaling server implementation is to use the WebSocket technology.
For the current project, the server side is written with NodeJS and Socket.io, while the client side is implemented using AngularJS framework.
Step 1. Checking browser support & Making a request to the signaling server
The first thing you have to do when trying to create the connection with the other user is to make sure that their browser or OS provides access to media devices.
SetupRTC function tests if the browser supports webRTC and has an access to needed media devices. If these conditions are satisfied, SetupRTC initializes PeerConnection and declares handlers.
StartCall verifies if WebRTC is supported and initialized on the client side and initiates the ‘callRequest’ using Socket.io library.
TargetId — user’s identifier in the database. The request for connection was sent to it.
EnableSelfVideo enables user’s camera, then takes and shows the video stream to the user through HTML5, for example. It also passes the stream to the object PeerConnection – $rootScope.pc.addStream(stream).
function setupRTC(targetId) {
  var isSupported = false;
  navigator.getUserMedia = navigator.getUserMedia || navigator.webkitGetUserMedia || navigator.mozGetUserMedia;
  window.PeerConnection = window.RTCPeerConnection || window.mozRTCPeerConnection || window.webkitRTCPeerConnection;
  window.IceCandidate = window.RTCIceCandidate || window.mozRTCIceCandidate || window.webkitRTCIceCandidate;
  window.SessionDescription = window.RTCSessionDescription || window.mozRTCSessionDescription || window.webkitRTCSessionDescription;
  isSupported = navigator.getUserMedia && window.PeerConnection && window.SessionDescription;
  if (isSupported) {
    var configuration = {
      "iceServers": [{ url: 'stun server url' }, {
        url: 'turn server url',
        username: 'turn server username',
        credential: 'turn server key'
      }]
    };
    //save Peer connection object to angular $rootScope to global access.
    $rootScope.pc = new PeerConnection(configuration);
    //add events handlers
    $rootScope.pc.onicecandidate = function(e) {
      if (e.candidate) {
        $rootScope.io.emit('rtc', {
          targetId: targetId,
          type: 'candidate',
          label: e.candidate.sdpMLineIndex,
          id: e.candidate.sdpMid,
          candidate: e.candidate.candidate
        });
      }
    };
    $rootScope.pc.onaddstream = function(e) {
      // here should be code for processing successful connection
      // for example save stream url to variable and insert it to HTML5 video player
      $rootScope.stream = e.stream
    };
    $rootScope.pc.oniceconnectionstatechange = function() {
      //if interrupted connection
      if ($rootScope.pc && $rootScope.pc.iceConnectionState == 'disconnected') {
        console.log('peer connection interrupted');
        // here should be code for handler of interrupted connection
        // for example hide video player
      }
    };
  }
  return isSupported;
}
startCall = function(targetId) {
  var isSupported = setupRTC(targetId);
  if (isSupported) {
    enableSelfVideo(function() {
      $rootScope.io.emit('callRequest', {
        type: 'video',
        targetId: targetId
      });
    });
  } else {
    alert('UserMedia or WebRTC is not supported');
  }
};
function enableSelfVideo(callback) {
  navigator.getUserMedia({ audio: true, video: true }, function(stream) {
    $rootScope.pc.addStream(stream);
    callback();
  }, function(err) {
    alert(err)
  });
}
Step 2. Processing interlocutor’s response
After successful connection request, the user that will receive the call should be notified. WebSocket transmits the signal to the server that Client A wants to start a video communication with Client B. Here, we can check if user A in users B’s ban-list and so on.
The function onRequest handles the callRequest event on the server.
In the following example, its functionality is shortened (there’s no Business Logic). However, when it comes to real projects, it’s very important to make all the crucial verifications that go before two users are successfully connected. One of the most important verification is whether user B is online. If not, the user will not receive user A’s request. User A, in its turn, won’t receive any response and will remain in a standby mode.
function onRequest(io, socket) {
  return function(data) {
    data.userId = socket.user.id;
    socket.to('User:' + data.targetId).emit('callRequest', data);
  };
}
Next, client B receives a callRequest socket event from the server with information about who the call comes from. If the user B accepted the call (either automatically or not, that depends on the realization), he has to go through the same verification that user A has already passed (access to media devices, for example).
var callAccept = function(targetId) {
  var isSupported = setupRTC(targetId);
  if (isSupported) {
    enableSelfVideo(function() {
      $rootScope.io.emit('callRequest', {
        type: 'video',
        targetId: targetId
      });
    });
  } else {
    $rootScope.io.emit('callDecline', {
      targetId: targetId,
      reason: 'some reason'
    });
  }
}
CallDecline event transmits to the server the signal that the call is finished. The server will inform client A that it will have to process this request.
If access to user B’s media devices is granted, the notification about successful call acceptance is sent to the server — ‘callAccept’, and the server notifies user A about that.
function onAccept(io, socket) {
  return function(data) {
    data.userId = socket.user.id;
    socket.to('User:' + data.targetId).emit('callAccept', data);
  };
}
Step 3. Video conference initialization
After user B accept the call, client A sends an ‘offer’ — a particular message to set up the connection between users.
function onCallAccept() {
  $rootScope.pc.createOffer(function(description) {
    $rootScope.pc.setLocalDescription(description, function() {
      description.type = 'offer';
      $rootScope.io.emit('rtc', description);
    }, onError);
  }, onError, mediaConstraints);
}
At this stage, the server performs as a router. There is no need to create any business logic as the handler of particular messages is one for all. So, the server receives messages and transmits them to the addressee.
function onRtc(io, socket) {
  return function(data) {
    data.fromId = socket.user.id;
    data.toId = socket.interlocutorId;
    socket.to('User:' + socket.interlocutorId).emit('rtc', data);
  };
}
socket.user.id is an identifier of the user that sent a message
socket.interlocutorId is an identifier of the user whom the message was sent
Here the information about the users is stored on the server in ‘socket’. But it’s not the only option: info can be stored in databases, RAM, etc.
All the messages that the clients and server receives are sent using ‘RTC’ event.
Here is how the client’s handler looks:
function onRtc(data) {
  switch (data.type) {
    case 'offer':
      onRtcOffer(data);
      break;
    case 'answer':
      onRtcAnswer(data);
      break;
    case 'candidate':
      onRtcCandidate(data);
      break;
  }
}
function onRtcOffer(data) {
  $rootScope.pc.setRemoteDescription(new SessionDescription(data), function() {
    $rootScope.pc.createAnswer(function(description) {
      $rootScope.pc.setLocalDescription(new SessionDescription(description), function() {
        description.type = 'answer';
        description.toId = data.fromId;
        console.log('sending answer');
        $rootScope.io.emit('rtc', description);
      }, onError);
    }, onError, mediaConstraints);
  }, onError);
}
function onRtcAnswer(data) {
  console.log('received answer');
  $rootScope.pc.setRemoteDescription(new SessionDescription(data), function() {}, onError);
}
function onRtcCandidate(data) {
  console.log('received candidate');
  var candidate = new RTCIceCandidate({
    sdpMLineIndex: data.label,
    candidate: data.candidate
  });
  $rootScope.pc.addIceCandidate(candidate);
}
This code enables the direct connection between two clients using WebRTC technology. All the events are executed consecutively client by client.
At first, the server sends ‘offer’ then ‘answer’. After that it sends ‘candidate’ a few times to choose the route of data transmission. If the connection is successfully established, $rootScope.pc.onaddstream is now active, so the users can start the video conference.
The biggest problem with implementing of the video conference is the technology known as NAT. To go round NAT rules, the external servers STUN and TUN are being used. There is no need to install these servers yourself as they are available and work steadily.
So here was a description of video conference implementation just in three steps using WebRTC technology. The code provided in the article is without business logic, client/server side architecture and visualization.


