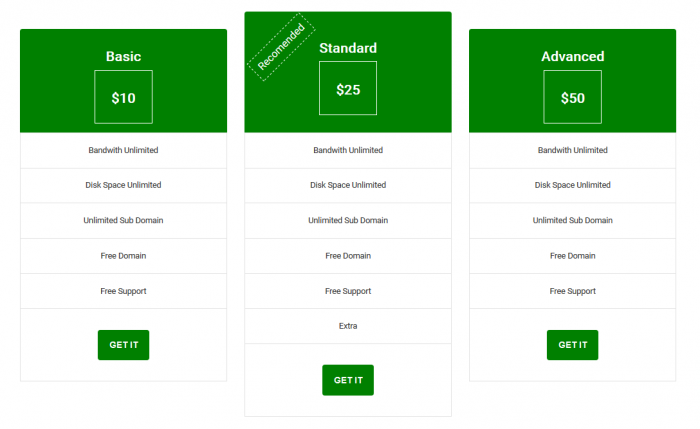
Pricing tables are widely used on many websites. If you haven’t created pricing tables with bootstrap, our tutorial will be useful for you. Simple responsive pricing tables – they look great on all devices. On big screens, we see the entire table, three columns in a row. On small screens, they will be placed from top to down, listing all the features vertically. We will also try to minimize the number of custom styles.
HTML structure
To start – create an empty ‘index.html’ file and add the following markup code into it:
<!DOCTYPE html>
<html lang="en">
<head>
  <meta charset="UTF-8">
  <title>Responsive Pricing Table with Bootstrap | Script Tutorials</title>
  <link rel="stylesheet" href="https://maxcdn.bootstrapcdn.com/bootstrap/3.3.5/css/bootstrap.min.css">
  <link rel="stylesheet" href="css/style.css">
</head>
<body>
  <section id="section-pricing" class="section-pricing">
    <div class="container">
      <div class="pricing-table">
        <div class="row">
          <!-- First package -->
          <div class="col-md-4">
            <div class="package">
              <div class="header-package-1 text-center">
                <h3>Basic</h3>
                <div class="price"><h3>$10</h3></div>
              </div>
              <!-- details -->
              <div class="package-features text-center">
                <ul>
                  <li>Bandwith Unlimited</li>
                  <li>Disk Space Unlimited</li>
                  <li>Unlimited Sub Domain</li>
                  <li>Free Domain</li>
                  <li>Free Support</li>
                </ul>
                <div class="wrp-button text-center"><a href="#" class="btn standard-button">GET IT</a></div>
              </div>
            </div>
          </div>
          <!-- Second package -->
          <div class="col-md-4">
            <div class="package">
              <div class="header-package-2 text-center">
                <div class="recomended"><h4>Recomended</h4></div>
                <h3>Standard</h3>
                <div class="price"><h3>$25</h3></div>
              </div>
              <!-- details -->
              <div class="package-features text-center">
                <ul>
                  <li>Bandwith Unlimited</li>
                  <li>Disk Space Unlimited</li>
                  <li>Unlimited Sub Domain</li>
                  <li>Free Domain</li>
                  <li>Free Support</li>
                  <li>Extra</li>
                </ul>
                <div class="wrp-button text-center"><a href="#" class="btn standard-button">GET IT</a></div>
              </div>
            </div>
          </div>
          <!-- Third package -->
          <div class="col-md-4">
            <div class="package">
              <div class="header-package-3 text-center">
                <h3>Advanced</h3>
                <div class="price">
                <h3>$50</h3>
                </div>
              </div>
              <!-- details -->
              <div class="package-features text-center">
                <ul>
                <li>Bandwith Unlimited</li>
                <li>Disk Space Unlimited</li>
                <li>Unlimited Sub Domain</li>
                <li>Free Domain</li>
                <li>Free Support</li>
                </ul>
                <div class="wrp-button text-center"><a href="#" class="btn standard-button">GET IT</a></div>
              </div>
            </div>
          </div>
        </div>
      </div>
    </div>
  </section>
  <script src="https://maxcdn.bootstrapcdn.com/bootstrap/3.3.5/js/bootstrap.min.js"></script>
</body>
</html>
In the head section we included all necessary css files: bootstrap.min.css and style.css with our custom styles. Since rows in bootstrap consist of 12 columns, and we need to display 3 pricing sections, each section will be 4-length column:
<div class="col-md-4">
  <div class="package">
    <div class="header-package-1 text-center">
      <h3>title</h3>
      <div class="price"><h3>price</h3></div>
    </div>
    <!-- details -->
    <div class="package-features text-center">
      <ul>
        <li>feature 1</li>
        <li>feature 2</li>
        <li>feature 3</li>
        <li>feature 4</li>
        <li>feature 5</li>
      </ul>
      <div class="wrp-button text-center"><a href="#" class="btn standard-button">GET IT</a></div>
    </div>
  </div>
</div>
As you see, we prepared all three sections total. Now, we can start stylize the sections.
CSS styles
Now, create another file: ‘css/style.css’ for our styles. First, we define the main styles for layout: paddings and margins:
css/style.css
@import url(http://fonts.googleapis.com/css?family=Roboto);
.section-pricing {
  padding:50px 0;
}
.pricing-table {
  font-family:Roboto, sans-serif;
  margin-top:35px;
}
.package {
  margin:20px 0;
  overflow:auto;
}
All pricing headers have green background, slightly rounded on top
.header-package-1,.header-package-2,.header-package-3 {
  background:green;
  border-radius:4px 4px 0 0;
  color:#fff;
  font-weight:700;
}
.header-package-1 {
  margin-top:30px;
  padding-bottom:15px;
  padding-top:15px;
}
.header-package-2 {
  padding-bottom:30px;
  padding-top:30px;
}
.header-package-3 {
  margin-top:30px;
  padding-bottom:15px;
  padding-top:15px;
}
.header-package-1 h3,.header-package-2 h3,.header-package-3 h3 {
  color:#fff;
  font-weight:800;
}
Price has a thin white border, with defined width, so it looks like a box. Probably you already noticed rotated ‘recommended’ label. It has dashed white border, and it is rotated by 45 degrees
.price {
  border:2px solid #fff;
  color:green;
  margin:0 auto;
  padding-bottom:20px;
  padding-top:15px;
  width:100px;
}
.recomended h4 {
  border:2px dashed #FFF;
  display:inline-block;
  left:15px;
  padding:10px;
  position:absolute;
  transform:rotate(-45deg);
}
The list of features has a thin border, as well as every feature in this list has the border (in bottom) of the same gray color
.package-features {
  border:1px solid #E3E3E3;
}
.package-features ul {
  padding:0;
}
.package-features ul li {
  border-bottom:2px solid #e3e3e3;
  list-style:none;
  overflow:auto;
  padding:20px 10px;
}
Last element of pricing tables is button. The button has rounded corners, with white text on green background
.wrp-button {
  padding:26px 10px 36px;
}
.package-features .standard-button {
  margin:0;
  padding:15px 20px;
}
.standard-button {
  background:green;
  border:0;
  border-radius:4px;
  color:#fff;
  font-family:sans-serif;
  font-size:16px;
  font-weight:700;
  line-height:inherit;
  margin:5px;
  padding:15px 30px;
  text-transform:uppercase;
  -webkit-transition:all ease .25s;
  transition:all ease .25s;
}
.standard-button:hover {
  color:#fff;
  opacity:0.8;
}
.standard-button:focus {
  color:#fff;
}
That’s it, our pricing table is ready. You can check the result.
Live Demo
[sociallocker]
download in package
[/sociallocker]


