Working with HTML we sometimes face with necessity of saving the results as image. The image can be saved on server or we can force downloading the result directly into your browser.
You may think it might be complex, but it is not in fact.
<canvas id="my-canvas" width="600" height="300"></canvas>
<script>
    var canvas = document.getElementById('my-canvas');
    var context = canvas.getContext('2d');
    var x = 125, y = 100;
    // begin custom shape
    context.beginPath();
    context.moveTo(x, y);
    context.bezierCurveTo(x - 40, y + 20, x - 40, y + 70, x + 60, y + 70);
    context.bezierCurveTo(x + 80, y + 100, x + 150, y + 100, x + 170, y + 70);
    context.bezierCurveTo(x + 250, y + 70, x + 250, y + 40, x + 220, y + 20);
    context.bezierCurveTo(x + 260, y - 40, x + 200, y - 50, x + 170, y - 30);
    context.bezierCurveTo(x + 150, y - 75, x + 80, y - 60, x + 80, y - 30);
    context.bezierCurveTo(x + 30, y - 75, x - 20, y - 60, x, y);
    // complete custom shape
    context.closePath();
    context.lineWidth = 5;
    context.fillStyle = '#8ED6FF';
    context.fill();
    context.strokeStyle = 'blue';
    context.stroke();
</script>
In this example, we use bezier curves to draw a simple cloud.
2. Next step is to convertthe canvas image to base64:
var canvasData = canvas.toDataURL("image/png");
3. Finally, we can send the result base64 to server
Currently it is quite difficult to find a company that does not use this method of project management. Since we have quite a lot of advantages, and we are talking not only about the field of software development, but also in other sectors. But let’s look at the agile development in details.
SCRUM is an agile way to manage your projects. You can think about the Agile software development with Scrum as a framework for managing a process: developing, delivering, and sustaining complex products. Designed for teams of nine-ten or fewer participants, who continuously break their work into smaller tasks / goals that can be achieved within certain time-boxed iterations.
The whole process can be represented as follows:
Scrum process
Scrum model suggests that projects progress via a series of sprints. In keeping with an agile methodology, sprints are timeboxed, usually two weeks, but no more than a month long. The main reason is that the modern market demands quality, fast delivery at lower costs, for which a company must be very agile and flexible in the development of products, to achieve short development cycles that can meet the demand of customers without undermining the quality of the result.
Scrum methodology recommends holding a planning meeting session at the start of the sprint (first day of a new sprint), where team members figure out how many tasks they can commit to, and then create a sprint backlog – a list of the selected tasks to perform during the sprint.
The event should occur after the sprint review and retrospective from the previous sprint so that any output from those discussions can be considered when planning for the new sprint. It does not have to occur immediately after those other two events. You’ll find it’s best to place a higher priority on scheduling sprint planning when the entire team is available.
During an agile Scrum sprint, the Scrum team takes a small set of features from idea to coded and tested functionality. At the end, these features are done, meaning coded, tested and integrated into the evolving product or system.
How is Sprint Planning Structured?
Sprint planning is typically split into two parts:
Part 1 – Scope
The team selects which items from a prioritized list of ready product backlog items (usually expressed as user stories) they forecast they will be able to complete during the sprint.
Here’s a sample agenda for the first part of sprint planning:
What is the goal for this sprint? Use this as a decision filter to determine which product backlog items to include in the sprint.
What product backlog items are ready and contribute toward the sprint goal?
Who is available for this sprint? Identify any vacations, holidays, other activities that will impact everyone’s availability during the sprint.
What is the team’s capacity based on everyone’s availability
What items will the team include on the sprint backlog based on the sprint goal and the team’s capacity.
How confident does the team feel that they’ll be able to meet the sprint goal.
Part 2 – Plan
The team discusses in more detail how they will deliver the selected product backlog items. This may (but does not have to) include identifying tasks for the product backlog items, whether there are any dependencies between the items, and signing up for the initial product backlog items that each team member works on.
On each day of the sprint, by mornings, all team members attend a daily standup (or Daily Scrum) meeting, including the ScrumMaster and the product owner. This meeting is timeboxed to no more than 15 minutes. During that time, team members share what they worked on yesterday, plans for today, and identify any blockers to progress. It helps to synchronize the work of team members as they discuss the work of the sprint.
At the end of a sprint, the team conducts a sprint review during which the team demonstrates the new functionality to the PO or any other stakeholder who wishes to provide feedback that could influence the next sprint.
This feedback loop within Scrum software development may result in changes to the freshly delivered functionality, but it may just as likely result in revising or adding items to the product backlog.
Another activity in Scrum project management is the Sprint Retrospective at the end of each sprint. The team reviews the completed goals of the finished sprint, write down the good and the bad, so as not to repeat the mistakes again. This stage serves to implement improvements from the point of view of the development process. The goal of the sprint retrospective is to identify possible process improvements and generate a plan to implement them in the next Sprint.
Roles in Scrum
In Scrum, the team focuses on building quality software. The owner of a Scrum project focuses on defining what are the characteristics that the product must have to build (what to build, what not and in what order) and to overcome any obstacle that could hinder the task of the development team.
The Scrum team consists of the following roles:
Scrum master: The person who leads the team guiding them to comply with the rules and processes of the methodology. Scrum master manages the reduction of impediments of the project and works with the Product Owner to maximize the ROI. The Scrum Master is in charge of keeping Scrum up to date, providing coaching, mentoring and training to the teams in case it needs it.
Product owner (PO): Is the representative of the stakeholders and customers who use the software. They focus on the business part and is responsible for the ROI of the project. They translate the vision of the project to the team, validate the benefits in stories to be incorporated into the Product Backlog and prioritize them on a regular basis.
Team: A group of professionals with the necessary technical knowledge who develop the project jointly carrying out the stories they commit to at the start of each sprint.
Scrum Methodology benefits
Easily Scalable: Scrum processes are iterative and are handled within specific work periods, which make it easier for the team to focus on definite functionalities for each period. This not only has the benefit of achieving better deliverables in line with the needs of the user, but also gives the ability to the teams to scale the modules in terms of functionality, design, scope and characteristics in an orderly, transparent and simple manner. Compliance of expectations: The client establishes their expectations indicating the value that each requirement/ history of the project brings, the team estimates them and with this information the Product Owner establishes its priority. On a regular basis, in the sprint demos, the Product Owner verifies that the requirements have been met and transmits feedback to the team. Flexible to changes: Quick reaction to changes in requirements generated by customer needs or market developments. The methodology is designed to adapt to the changing requirements that complex projects entail. Time to Market reduction: The client can start using the most important functionalities of the project before the product is completely ready. Higher software quality: The working method and the need to obtain a functional version after each iteration, helps to obtain a higher quality software. Timely Prediction: Using this methodology, we know the average speed of the team by sprint (story points), with which, consequently, it is possible to estimate when a certain functionality that is still in the backlog will be available. Reduction of risks: The fact of carrying out the most valuable functionalities in the first place and of knowing the speed with which the team advances in the project, allows to clear risks effectively in advance.
High-energy electromagnetic radiation or x-raying your architecture
The next step is to setup CloudWatch logs and start using X-Ray to make the debugging and tracing of what is going on with nodes of your AWS architecture easier. To utilize X-Ray you will need to use SDK or to set up out of the box X-Ray support for Lambdas and API gateway.
Lambda functions should have ‘Enable AWS X-Ray’ to be selected to be analyzed by the X-Ray.
For container microservices the SDK has to be utilized to be picked up by the X-Ray tracer engine.
For API Gateway X-Ray Tracing has to be enabled and a set of sampling rules has to determined.
When AWS SDK is used it takes the responsibility of sending the peace of JSON to X-Ray daemon which produces it to XRay API for further service map visualization.
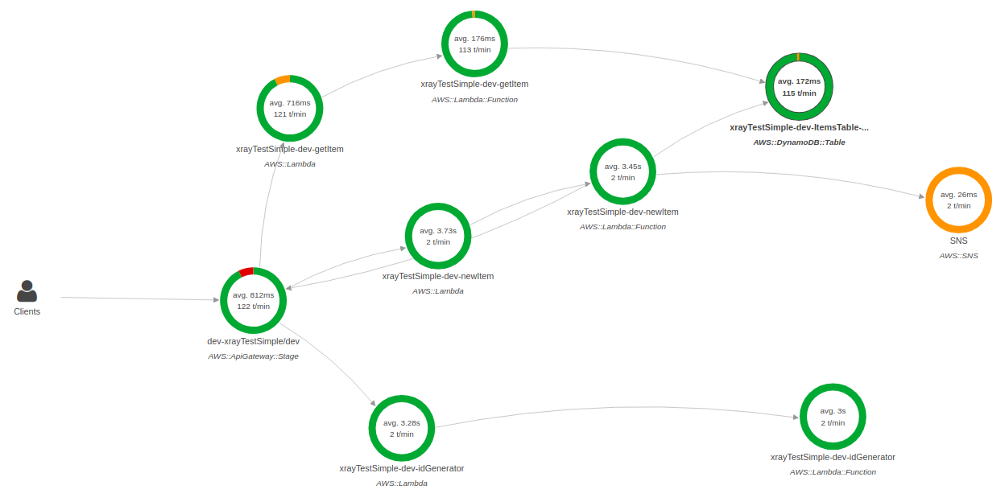
By looking at the image of the pretty small application below you can understand how complex it can be detected the problem without an ability to debug it just in microservices execution chain to. You can imagine the level of complexity to trace the problem within multiple chains.
So, basically X-Ray can be used as a kind of helper to the log which is used to construct the execution map and trace errors and grab information about performance, efficiency of the architecture and lambda execution time itself.
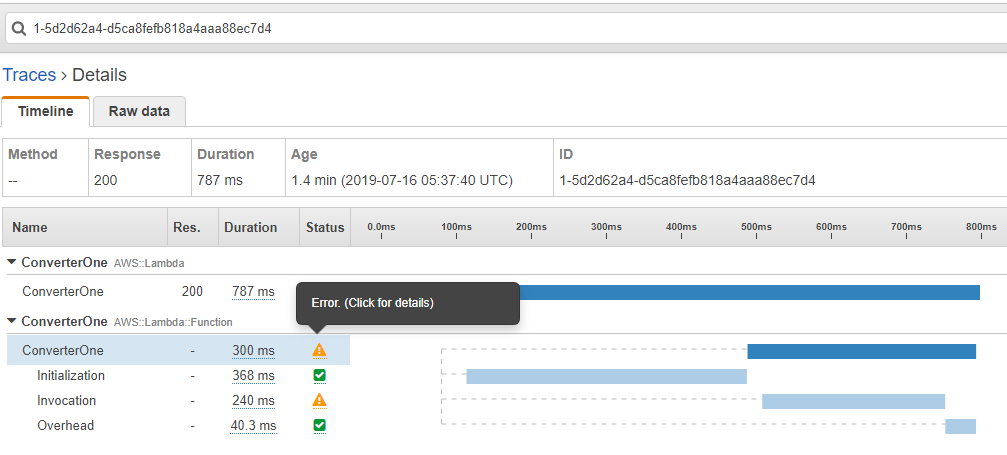
By looking at the image below you can get an understanding of where the problem comes from and what it is about.
Serverless authentication
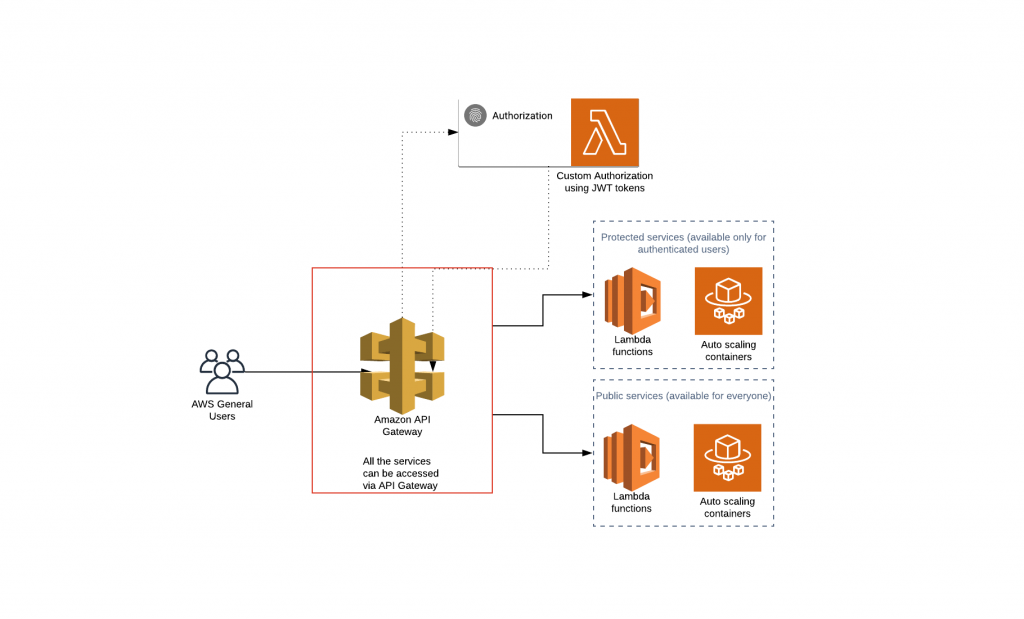
Almost all applications require an authentication mechanism. It can be different such as Basic authentication, OAuth authentication, token authentication, etc. In the world of serverless, some authentication types cannot be used due to the nature of serverless architecture which denies stateful types of authentication. There are various ways of dealing with it, however the most popular ways of doing authentication is to use Auth0 which is a cloud based platform for universal authentication & authorization for web and mobile applications. Apart of that AWS authorizers can be utilized. There are two types of authorizers provided by AWS platform using Cognito user pools which is a recommended option for mobile applications and custom authorizers using JWT (JSON Web Tokens) tokens. A great variety of developers use custom authorizers to protect there microservices sitting behind API Gateway. The idea behind it is that JWT are a compact and self-contained way for securely transmitting information and represent claims between parties as a JSON object. Simplified version of that process can be seen on the diagram presented below.
Testing in serverless
We all know how important it is to have at least unit tests. And you can have even more benefits by having integration tests as well. Some of you might have heard about companies which code is automatically delivered to prod with any manual testing being involved. The answer to the obvious question ‘how it is possible to be?’’ – is they have all tests set up. Some big companies such as Amazon or Netflix have thousands deployments a day. I am not going to discuss obvious benefits of using it in this document, especially in complex microservices architectures, so let’s come back to the topic.
Most of you have a solid work experience with unit tests for monolith application, but how it can be done when you code doesn’t have a server (technically it has, but it doesn’t have some known, managed by you place where it is executed)? AWS provides an awesome interaction between its build and deployment services (CodeBuild and CodePipeline) and running test actions. CodePipeline can orchestrate the Build, Test, and Deployment of your application every time there is a change to your code. Because of it in-built integration with other AWS services you can run any of your tests at any stage to make sure that the deploying package will pass all tests prior to the deployment.
Another great thing is that SAM which is used for Lambda deployments has in-built support for pre-traffic and post-traffic hooks to run test functions to verify that the newly deployed code is configured correctly and your application operates as expected and ability to roll back the deployment if CloudWatch alarms are triggered in the case of fail. Besides that SAM has a unique feature which allows developers to test their code locally before it even goes in any prod by using the SAM local invoke command to manually test their code by running Lambda functions locally. There is even a support for step-through debugging (links for doing it for .net and node.js development will be presented below).
Due to the fact that a separate document can be created for the whole testing part, I’ve decided to provide a set of useful links which can explain how you developers can test their code and how it can be tested as a part of the CICD.
Serverless best practises
As every application, serverless approach has its own set of recommendations which should be followed to prevent significant headache of debugging, tracing, maintainability, etc. Most of us are familiar with the design patterns (I hope that most of us) which are commonly used in everyday life, so servereless is not a rocket science which completely turned the world upside down. On the contrary, it is built on pillars of existing design patterns, aggregation of certain good dev practices and highly depend on the certain concepts such as SoC (separation of concerns) design principle and EDA (event driven architecture). In general these ideas can be aggregated to form the list of recommendations presented below:
Each function should do only one thing (most of you may know it as the single responsibility principle),
Functions should not call other functions. This can blow someone’s brain but that is really important gotcha in adopting serverless approach. It only sounds odd from the first perspective but this is just a different model of architecture. So, basically, it is not recommended because by doing it you double, triple or even quadruple your cost (depending on how many sub calls are). Moreover, the entire debugging process becomes more complex. Besides that it sets back the value of the isolation of your functions declared in the previous option. DevOps (let’s try to forget about separation between developers and operational, because you should become both if you want to be the efficient serverless practitioner) should change the model of their thinking from being get used to monolithic straightforward communication between modules and direct function calls to a total separation of nodes in the architecture map. Modules are no longer allowed to directly call each other or even know about each other. Functions should produce messages, push data to a data store or queue, communicate via event bus, etc. which in turn should trigger another function or be picked up by the subscribed function.
Use as few libraries in your functions as possible. That is the particularly interesting statement because many developers may argue with that and they will be right from some point of view. However, the reason to reduce the amount of libraries is mainly because functions have cold starts and warm starts. This is not that important for scripting languages like python or javascript, but .net core or java will suffer a lot on a cold start. Furthermore, cold starts are impacted by a number of things and both the size of the package and the number of libraries that need to be instantiated are a part of it. Although, it needs to be noted that generally, compiled code runs faster than interpreted code of scripting languages due to the fact that they are first converted native machine code. Nevertheless, cold start needs to be significantly taken into account considering the time limit of the lambda execution.
Use DDD (Domain-driven design). All your microservices should have an architectural style with a clear bounded context. Entire architecture has to be designed in a way that context within which a model applies is explicitly defined. You have to always perfectly analyze your domains and define bounded contexts. Use domain events to explicitly for interaction within your domain (SNS can be used to publish messages). Considering this you no longer need to scale up dependencies (see previous best practice) in your services since they will be dedicated for certain work and delegate the work to other services once it is needed. One side affect benefit of doing it for the serverless is that it helps to reduce the size of the microservice package which affects the cold start of the Lambda function (if you use). You can read more about it here.
Avoid using connection based services. In my some critical cases in can be used, but the number of exceptional situations when it is allowed is strictly limited. Most of the time it is related with the cases when you have a monolithic architecture of the code and database and cannot redesign dependencies and move out logic between microservices in a reasonable amount of time or when you have to load data from some third party database. It can sound hard, especially for web application specialists who got used to use monolithic architecture for their needs. However, it makes sense when you think deeply about the entire serverless architecture, limitations of execution time and memory. Moreover, connections use undetermined time to manage connections, change states, close connections, release memory, etc. In general it creates a significantly adds up I/O wait into the cold start of the function which can end up in unexpected performance degradation (when it is a cold start). Nevertheless, this rule doesn’t apply to serverless storage services such as DynamoDB and Aurora (serverless RDS engine based on MySQL or PostgreSQL) essentially due to the fact that their connections are different. You no longer have persistent connections from the client to a database server. Basically the difference is in how the data are read/write to/from the storage. With the RDS you have to open a connection to the engine and keep it open while the application/request/transaction is in use. However, when you execute a DynamoDB query or scan it works as an HTTP request. Communication with the DynamoDB should treated as a communication with the web service rather than database. So, remember if you realize that your function requires the connection and you cannot move storage of your microservice into DynamoDB or Aurora or store it in S3, then think about using auto scaling microservice container (AWS ECS or AWS Fargate can be used for this purpose) which will be more suitable for that job.
Use messages and queues. As it was partially mentioned in the document above, EDA is going to be the backbone of the serverless approach and entire microservices architecture. You have to start different, change the whole idea you interact with services and functions. Try to imagine two people sitting and play with the ball and we know that they cannot drop the ball otherwise the game will be finished. So they are tight together, we cannot remove one without breaking another, if one becomes sick or something happens it will automatically impact another. Think about it for a second. Now think that these two people are modules of your application, sounds scary to have that tightly coupled architecture, isn’t it? But it pales in comparison with the fact if we increase the amount of player up to 10, 100 or even 1000. Normally your app has definitely more than 2 functions, isn’t it? How can we solve this problem? The obvious answer is microservices because the whole document is about it, but in reality problem will persist if services know about each other and communicate directly. Imagine know that we sit all these players opposite to the wall and put obstacles between each player so they cannot see each. In order to continue playing the have to bounce ball of the wall now. This is essentially what EDA is about. You publish a message to the space which is caught by the subscribed service/lambda. When you do this you do not know how is subscribed to your event, but you can be sure everyone who is will get a message and start processing. It needs to be noted that sometimes even well designed systems have situations when some of those players start to sit in the group because they cannot leave without each other of the specific version etc. In most cases it is related with the breaches in the architecture or specific cases. You have to understand that this is not a my whim this is how distributed systems work. This is all about distributing your loads, services, storages, etc. Certainly, it creates an overhead, but it can be neglected because of the benefits distribution can bring to complex systems which require to manage thousands of services or deal with big data. So it basically works as a circuit breaker which is supposed to protect you from failures and the hell of dependencies. SNS and/or SQS or even the most new AWS EventBridge can be used for that purpose.
Avoid central centralized repository for your data. This is probably one of the most important aspects of distributed systems. Most of web developers are so inalienably tied up with the idea of central application and central database so they cannot imagine that it can be different. Maybe it should not? Well, the answer is – it depends. Parallel lines are not crossed as we know, but it depends on the mathematics which is used to describe the geometry. The same with the data storage, it depends on the architecture you need. Going back to microservices, it’s paramount aspect. In other words, your entire architecture becomes ultra depend on the data layer which means that it requires you to tremendously redesign your data layer. Certainly, it is not always possible to do in a reasonable amount of time, but by tidying up your services with data lakes you dig your own grave. Your data should start to flow through your system not to sit within central repos. Needless to say, that even with this approach you can end up in having some small data lakes, but at least it will not be data ocean. It is always easier to change, repoint or redirect small data flow rather than migrate or move enormous data lake. It can be one of the hardest problems which need to be resolved but it is essential in building complex, scalable, reliable and easily flexible systems.
Always design you microservices using DI technique. DI is a programming technique that makes a class independent of its dependencies. It achieves that by decoupling the usage of an object from its creation. The most significant benefit of doing it can be noticed at the stage of implementing unit tests because it allows you to mock dependencies which are not relevant for the test. Besides standard list of benefits, especially in the context of serverless, another benefit of following this technique is that if protects you from being locked by cloud provider. Try to move all your vendor specific services into a separate folder in order to deploy them separately into Lambda Layer, so they will be completely isolated from the microservice package. from By separating your vendor specific SDK services from your business logic you in the case of migration to another cloud provider you will only need to follow LSP and substitute dependencies implementation.
Always cover your microservices with unit tests. Unit tests are drastically important in software development but its importance is paramount in microservices architecture. Even the fact that microservices architecture decomposes the monolithic application into smaller interdependent services where each service is dedicated for some specific work, unit tests still required. Moreover, they fit perfectly into this model because they require the testing of the most basic functionality of code.
There are a lot of other aspects such as considering costing, the frequency of calls, the efficiency of calls, extra tags, deployment strategies, etc. For example standard message size of SNS/SQS is 64KB, but it supports messages up to 256KB in size, however by sending 256KB message you will be billed for 4 normal SNS/SQS requests. There are similar tricky restrictions for other services such as DynamoDB, API Gateway, S3 etc.
Besides that you should always consider auto-scale factor. The fact that most serverless services have out of the box auto scale doesn’t mean that it will work the same under load. It is significantly important to understand how your application will work under load.
In addition you should always consider drawbacks and restrictions of the existing AWS services and be proactive in reducing problems for the business, your colleagues and yourself. For instance, we know that that AWS console doesn’t allow you to separate your lambda functions by folders, so it is basically a flat list of functions. Considering it, it is essential for developers to follow the same name convention for all lambda functions in order to improve navigation and mitigate problems associated with identification of modules, dependencies, areas, etc. The good name convention should consider microservice name, function name, operation and it uses purpose which means how it is triggered etc. Because lambda functions can be called in response to API request and in response to trigger, so it should also be considered. Think about it from the perspective that you append ‘Controller’ to your controllers in the web application, ‘Service’ to you services, ‘Repository’ to you repositories, etc. In Lambdas it should be similar. I reckon lambdas which are going to be called in response to Api gateway should have name convention as following <ServiceName>_<FunctionName>_<Method>. Internal functions can have a convention using the method or event which triggers them like <ServiceName>_<Event>_<FunctionName>.
Similarly with following name convention you should use Lambda layers for your lambda functions. It is drastically important from the deployment perspective because using them you can configure your Lambda function to pull in additional code form the layers. A layer is a ZIP archive that contains libraries, a custom runtime, or other dependencies. With layers, you can use libraries in your function without needing to include them in your deployment package. It helps to significantly reduce the size of deployment packages and time respectively. There are also limitations for using layers for you functions as well, so basically you cannot use more than 5 layers per function. However, considering that you can create many layers permutations it should not be a problem.
The next one can sound pretty obvious but it needs to be mentioned. Always use versions and aliases for your Lambda functions. It helps easily shift traffic from one version to another in case of deployment or rolling back. Apart of that it allows us to utilize the most efficient deployment automation of serverless code. By having canary deployment in place in place it allows invocation traffic to be routed to the new function versions based on the weight specified. Detailed CloudWatch metrics for the alias and version can be analyzed during the deployment, or other health checks performed, to ensure that the new version is healthy before proceeding.
At the end I would like to highlight the idea which was implicitly mentioned in the SAM section – all serverless code should have a yaml file which will be used for its deployment. It is important to have it, otherwise deployment will be hard.
With the release of the AWS serverless services and the rising popularity of micro services and serverless architecture accompanied with the increased demand on the use of NoSQL databases, there have been a lot of questions from developers community about how these two technologies relate to each other and when you should use one or the other or both.
Serverless is the native architecture of the cloud that enables you to shift more of your operational responsibilities to the cloud. Serverless architectures are application designs that incorporate third-party “Backend as a Service” (BaaS) services, and/or that include custom code run in managed, ephemeral containers on a “Functions as a Service” (FaaS) platform. Serverless allows you to build and run applications and services without thinking about servers. It other words, it allows you to build and run applications without provisioning, scaling, and managing any servers. Therefore, it eliminates infrastructure management tasks such as server or cluster provisioning, patching, operating system maintenance, and capacity provisioning. There are its own pros and cons in tandem with certain system architecture requirements which will be presented below.
One of the greatest advantages of using serverless is a deployment which is achieved by no administration of infrastructure needed. That is to say, that developers and operations do not need to worry about any Dockerfiles or Kubernetes configurations,but think about right server configuration, etc.
Similarly with the simplified deployments, the process of functions modifications becomes drastically easier. Furthermore, this benefit is partially connected with the first one, which demonstrates how quickly these changes can be deployed. Another benefit is that by using serverless you can make absolutely scalable platform because it is automatically provided by the cloud provider.
There are a variety of other advantages among which:
It has in built support for versioning
Simple integration with other cloud provider service
Out of the box support for event triggers which makes serverless functions to be a great for pipelines and sequenced workflows.
Apart from the technological benefits, there are benefits for the business which are related with how serverless is paid. Because it is a FaaS (Function as a Service) platform you pay per function execution and resources it consumes which makes serverless dramatically cheaper than containers or monolith applications deployed to instances in the cloud or on-premises instances. This benefit makes serverless technologies to be the prevalent choice for startups that are short on cash. However, as any other technology serverless has its own disadvantages. Where one of the most obvious one is that serverless is a “black box” technology, which makes functions to be executed on the environment without giving you an understanding what’s going on.
Another drawback, and probably the most severe one, is the complexity of the serverless architecture which can exponentially grow with linear application grow. In other words, without the proper tools to be configured the process of troubleshooting can take hours if not days. For instance, AWS provides you with services which can help with:
logging (CloudWatch) your Lambdas and API Gateway,
constructing service maps (AWS X-Ray) which can significantly reduces time on tracing the problem,
preparing flowcharts of your microservices execution chains (AWS Step Functions),
simplifying the entire deployment process (AWS SAM, CodeDeploy, CodeBuild, CodePipeline),
hoocking different deployment stages by embedded interaction between AWS services.
Tools will be described in a little bit more detailed further in the document.
Next disadvantage is a consequence of some benefits declared above. Due to the high integrity of cloud provider services which can be utilized by hundreds if not thousands of functions and the fact that the entire serverless architecture depends on a third party vendor, then it becomes almost impossible to easily change a cloud provider even if it is needed. The key word here is ‘almost’ because these risks can be mitigated by choosing the right architecture. In order to reduce the risk of being locked by vendor the entire architecture should not have any parts wirth strong coupling between business logic and the AWS SDK specific logic. Technically Lambda is a just function and S3 is a simple storage, the same like DynamoDB is just a database. Therefore, considering this, you can secure yourself by using a couple of abstraction layers for processing and outputting data. Basically, none of your services should have a direct communication with Amazon service which will certainly make code less straight forward, but will save you from enormous migration costs and will allow reuse your business logic as much as possible if you decide to move to a different serverless provider one day. This approach also makes you code more readable and maintainable. Moreover it is better for testing. To achieve it all microservices should be designed using DI technique. A good example can be found here.
The last but not least, it is worth to expose some of the system architecture requirements. Most of the requirements are related with serverless platform restrictions such as 900 seconds as the up limit of function execution or the maximum amount of memory which can be allocated.
Lastly, the stack of services in the cloud provider can be selected based on the company needs or pre-existing aspects such as cloud services which are already in use. Serverless computing can be backed by the variety of cloud provider services such as Amazon AWS Lambda, Microsoft Azure functions, Google GCF or Google Cloud Functions. However, this document will focus on description of the serverless and container related services provided by the AWS and how architecture can be established more efficiently. Moreover, this document will elucidate how auto deployments and orchestration can be configured and how distributed serverless applications can be built and debugged using visual workflows.
Tools and services
Prior to talk over serverless best practices, file structure, name conventions, what data storage should be used, what services we need, we have to understand what our stack will be, what core AWS services will be utilized and will become the main pillars of the architecture we are building. A central part of every app is a code, which in the case of serverless is a compute service which is called AWS Lambda. It can execute code in response to events in a massively parallel way. Moreover, it can respond to HTTP requests using the AWS API Gateway, events raised by other AWS services, or it can be invoked directly using an SDK. But Lambdas on their own cannot make the system. Furthermore, as it can be concluded from the mentioned above information without mitigating the complexity, all the benefits of using microservices or even serverless will be outweighed by their disadvantages. It can be achieved by selecting the proper tools and by understanding of how the system should work. Needless to say, that there are a variety of different services which can be utilized in order to make the fully working serverless application, however like everywhere else certain things should be done first and certain things can make the architecture more convoluted or even non efficient. Thereby, further in the document most of the core AWS serverless services and other important for the development stuff will be highlighted.
Guidelines and best practices
Because now we have an understanding of what problems we can face with and familiar with the stack of technologies we will utilize, we have to formalize the steps of how the project will be built and what are the best practices, etc.
Based on the knowledge that one of the main pitfalls of using microservices is the complexity, our first step should be how it can be mitigated in order to prevent the nightmare of both maintainability and problems identification. Therefore, before doing any microservices work we should set up the infrastructure properly.
Deployment automation has to go first
To begin with SAM has to be configured to automate the deployment of all serverless services which we are going to build. Without this step any further work on building serverless modules should be delayed because the complexity can become significantly high pretty quickly which will make the life of operational engineers, developers and deployment manager drastically harder. After you develop and test your serverless application locally, you can deploy your application by using the SAM package and sam deploy commands. The SAM package command zips your code artifacts, uploads them to Amazon S3, and produces a packaged AWS SAM template file that’s ready to be used. The sam deploy command uses this file to deploy your application. The following steps should be done in order to package and then deploy your serverless code:
Install Python
Download the latest version of python https://www.python.org/downloads
Install it. If it was successfully installed, then by typing python in your cmd you should see this message.
If you do not see it, please do the following steps:
Press Win+R
Type sysdm.cpl
Go to Advanced tab
Open Environment Variables
Select Path
Add a new path entry for Python (on my laptop it is this – C:\Users\admin\AppData\Local\Programs\Python\Python37-32)
Add one more entry for Python Scripts (on my laptop it is this – C:\Users\admin\AppData\Local\Programs\Python\Python37-32\Scripts)
Install pip if it was not installed with the python (latest version of python normally has pip installed with it) by executing this command python get-pip.py. In order to do this you have to download pip in any of your folders (can be done from here https://bootstrap.pypa.io/get-pip.py), open cmd from the folder where you save your downloaded get-pip.py and execute python get-pip.py.
Install aws sam cli by executing this command pip install aws-sam-cli
Create an S3 bucket: aws s3 mb s3://mysammainbucket --region ap-southeast-2 #use the bucket name and region name of your choice - it must match the default region that you are working in.
Package your deployment sam package --template-file lambda.yml --output-template-file sam-template.yml --s3-bucket admin-mainsambucket #use the bucket name you used in the previous step After the package is successfully generated you should see successful message and the result sam-template.yml will look like this:
Deploy your package sam deploy --template-file sam-template.yml --stack-name sam-teststack --region ap-southeast-2 --capabilities CAPABILITY_IAM
After the package is successfully deployed you should see this message
In the case when application contains one or more nested applications, you must include the CAPABILITY_AUTO_EXPAND capability in the sam deploy command during deployment.
AWS SAM can be used with a number of other AWS services to automate the deployment process of your serverless application:
CodeBuild: You use CodeBuild to build, locally test, and package your serverless application.
CodeDeploy: You use CodeDeploy to gradually deploy updates to your serverless applications.
CodePipeline: You use CodePipeline to model, visualize, and automate the steps that are required to release your serverless application.
Think about flowcharts describing your architecture
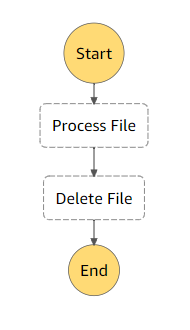
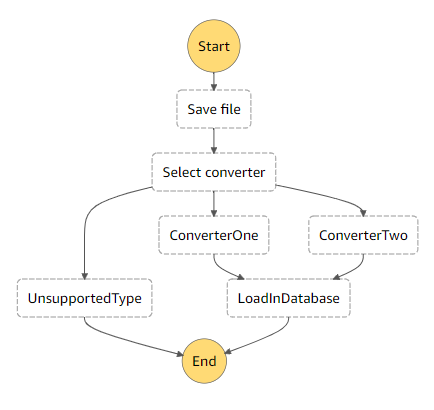
In this paragraph I would like to discuss aws service without which you relationship with FaaS systems can easily develop into the nightmare due to the fact that your workflow simply does not fit into the model of small code fragments executed by events. In other words this means either your project requires a more complex organization, or you need the program to run continuously – or for some significant period of time, which is essentially the same thing. Projects with a complex organization has to be covered by AWS Step Functions. It allows the developer by using a graphical interface to create flowcharts that describe lengthy processes. Any Step Function is defined the steps of your workflow in the JSON-based Amazon States Language which you basically need to learn. There are various ways step functions can be used. You can have the most trivial form of it by having a sequential step which can be described this way:
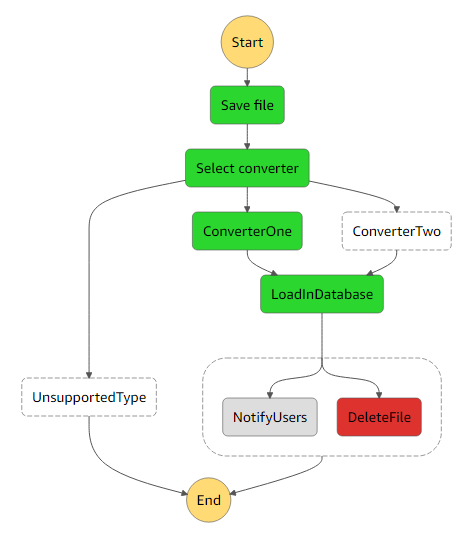
Besides the sequential path you can declare a more complex flowchart with the branching steps and even parallel steps. There is an example of how it can look like below:
After your design is finished you can create resources for your work using cloudformation template which will be automatically generated based on your steps definition. When all resources are created you can start the execution and have a real time visualization of your defined flow. The visualization will looks like the image on the right and it demonstrates you how the execution is going. All the steps are logged and can be reviewed at the bottom of the execution window, so developers can easily detect the problem and find a solution. In this particular example, toy can see that there is an error occuring during execution.
You may have heard about microservices, about their advantages and disadvantages. I tried to gather all the possible information in order to create a comprehensive documentation on microservices. This guide will act as a helping hand for those who want to know this in details.
Definitions
ARN – Amazon resource name
AWS – Amazon Web Services
AWS CodeBuild – CI service that compiles source code, runs tests, and produces software packages
AWS CodeDeploy- service that automates software deployments to a variety of services such as Amazon AWS Fargate, AWS Lambda, etc.
AWS CodePipeline – CD service that automates your software release process
AWS Fargate – Engine for Amazon ECS that allows you to run containers as serverless nodes
AWS Lambda – Amazon function which is used as a separate serverless service
Amazon Aurora – Serverless MySQL and PostgreSQL relational database built for the cloud
Amazon Cloudwatch – Monitoring and management service, can be used for logging and producing events
Amazon DynamoDB – Serverless key-value and document database that delivers single-digit millisecond performance
Amazon S3 – Simple Storage Service
Amazon SAM – Serverless Application Model
Amazon SNS – Simple Notification Service
Amazon SQS – Simple Queue Service
Amazon X-Ray – Referrers to a service allowing to x-ray all your amazon architecture
CORS – Cross-Origin Resource Sharing
DDD – Domain-driven design
DI – Dependency injection
Docker – Operating-system-level virtualization to develop and deliver software in packages called containers
EDA – Event driven architecture
JWT – JSON web token
LSP – Liskov substitution principle
NVM – Node version manager
SoC – Separation of concerns design principle
Overview
With every product, there comes a phase when adding a new feature to the existing code base becomes so hard that the cost of implementing the new functionality exceeds all its benefits. Undoubtedly, good and attentive solutions architects can help in advancing and guiding the development in the right direction. Moreover, the evolution of technologies has changed the way we build the architecture of applications. The most popular approach at the moment involves cutting one large piece of code into many small projects, where each is responsible for their specific job. But before designing such systems it is necessary to understand the differences between monolithic and microservice architecture, discuss what type of architecture should be used by teams for which projects, and explore their advantages and disadvantages. It is essential to have a solid understanding of what we are building and which purpose, so that future changes do not require rewriting everything to hell. This document will describe:
what are microservices
crucial benefits and drawbacks of using microservices architecture as opposed to monolith approach
Serverless architecture
key serverless services which can be utilized in designing the system
the key differences between RDBMS and NoSQL databases
go through authentication mechanisms and disclose the microservices/serverless automation deployment process
provides guidance for developers about how to design micro service architecture when to use AWS Lambdas, Docker containers, NoSQL databases, etc.
Microservices – what is it about?
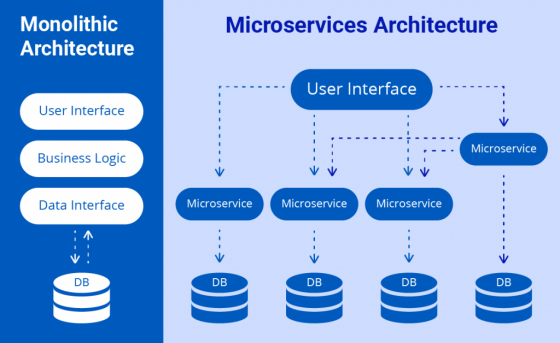
There is more than one definition, however it can be described using a good variety of requirements for the system, according to which it could be attributed to the microservice architecture. The system can be called microservice if microservice works only with a granular module, as limited as possible area and it performs the minimum number of functions to achieve a specific goal. Moreover, in the theory of microservices it is often often assumed that microservices must be completely independent and communicate with other services remotely over the network using REST, event bus , message broker software or some other RPC protocol (event buses and message brokers are the most preferable since microservices should not know about each other). Microservices architecture allows big application to divide into small, loosely coupled services. On the image below an example of a possible implementation of the platform is presented.
As it can be seen the obvious difference between these two designs is that the left one is implemented in a form of a single large block – monolith, whereby the right is presented as a more complex structure of small specific services where each service has its own specific role. By looking at this scheme at this level of detail, it is easy to see its attractiveness.The following visible advantages can be distinguished:
Tiny independent components can be created by small independent teams. The group can work on changes in the one service without affecting another service or even knowing about it. Furthermore, the amount of time required to learn the way component works, is significantly reduced, therefore it becomes easier to develop new functions.
The fact that each component can be deployed independently, allows you to release new features quickly and with less risk. Fixes or features for one component can be deployed without the need to redeploy other parts of the system.
Independent scalability of the components provides an ability to scale highly loaded components without the need to scale other moderately used ones. It makes scaling flexible and helps to reduce costs associated with the scaling.
Because components are dedicated for a specific responsibility, it makes it easier to reuse them in other services.
Taking into account all the points presented above by looking at it from a high level perspective, the advantages of the microservice model over the monolithic seem obvious. Albeit, if it is tremendously advantageous, then why it is not used across the board and why it was not brought into development before? In order to answer this question we have to remember that it was actually in use for a pretty long period of time. There were a variety of patterns, tools and principles which can be considered as prototypes and components of microservices. It can be stated that microservices emerged from service-oriented architecture employing its inalienable tools such as bounded context pattern and enterprise service bus as a communication system.
The reason for its wide popularity is just because recent technological improvements have allowed us to reach a new level in this approach and make the development of distributed computing architecture smoother and sustainable. However, we know that every big benefit has its own shade where all drawbacks are hidden.
Extremely high architectural complexity which includes developers and operational complexity. Developers will need to have all services whey have to deal with to be run on their workstations which can partially be resolved by proper containers set up and different tools, but the problem will still stay relevant. Moreover, the entry threshold into the whole system for developers will be grown dramatically. On the other side people who are dealing with supporting existing services will need to maintain tens, hundreds, or thousands of different services. Even that can be partially resolved by truly adopting DevOps practice by all engineers. Although, the problem with that is that many companies do still have separate operational and development departments (our company is not an exception in this area).
Without a serious competence, the process can become detrimental for the company. In order to understand more clearly, just think about an organization where everything is not ideal with the work even of a single monolithic system. Why, with an increase in the number of systems, which complicates the operation, testing and development the situation will become better? However, it is necessary to say that results can be great if the work was done by experts.
Dependencies between services can tear apart the whole architecture. In other words, there is a huge gap between theory and practice. It can be illustrated by the fact that all resources describing the benefits of microservices, do it using small independent components. Unfortunately, in practice the components are not independent. Usually when you get to the bottom of all the details, it is easy to find that everything is much more sophisticated than in the intended model. This is where everything becomes very complex. It can easily happen that even in the case of the theoretical possibility of an isolated deployment of services you will end up doing deployments of components with mutual dependencies as a group. Thereby, you will need to maintain consistent versions of services that have been tested in the integration. This problem can partially be leveled by using blue green deployments but it if you do not have a properly configured automation deployment process then it can be detrimental issue.
There are other problems associated with the use of microservice approach in the system design. Many of them are no less severe than the previous ones. Among the problems, it can also be highlighted the problems associated with the control and isolation of connections, problems of synchronization and control of data integrity between different nodes of the system due to partitioning of data, testing of microservices, etc.
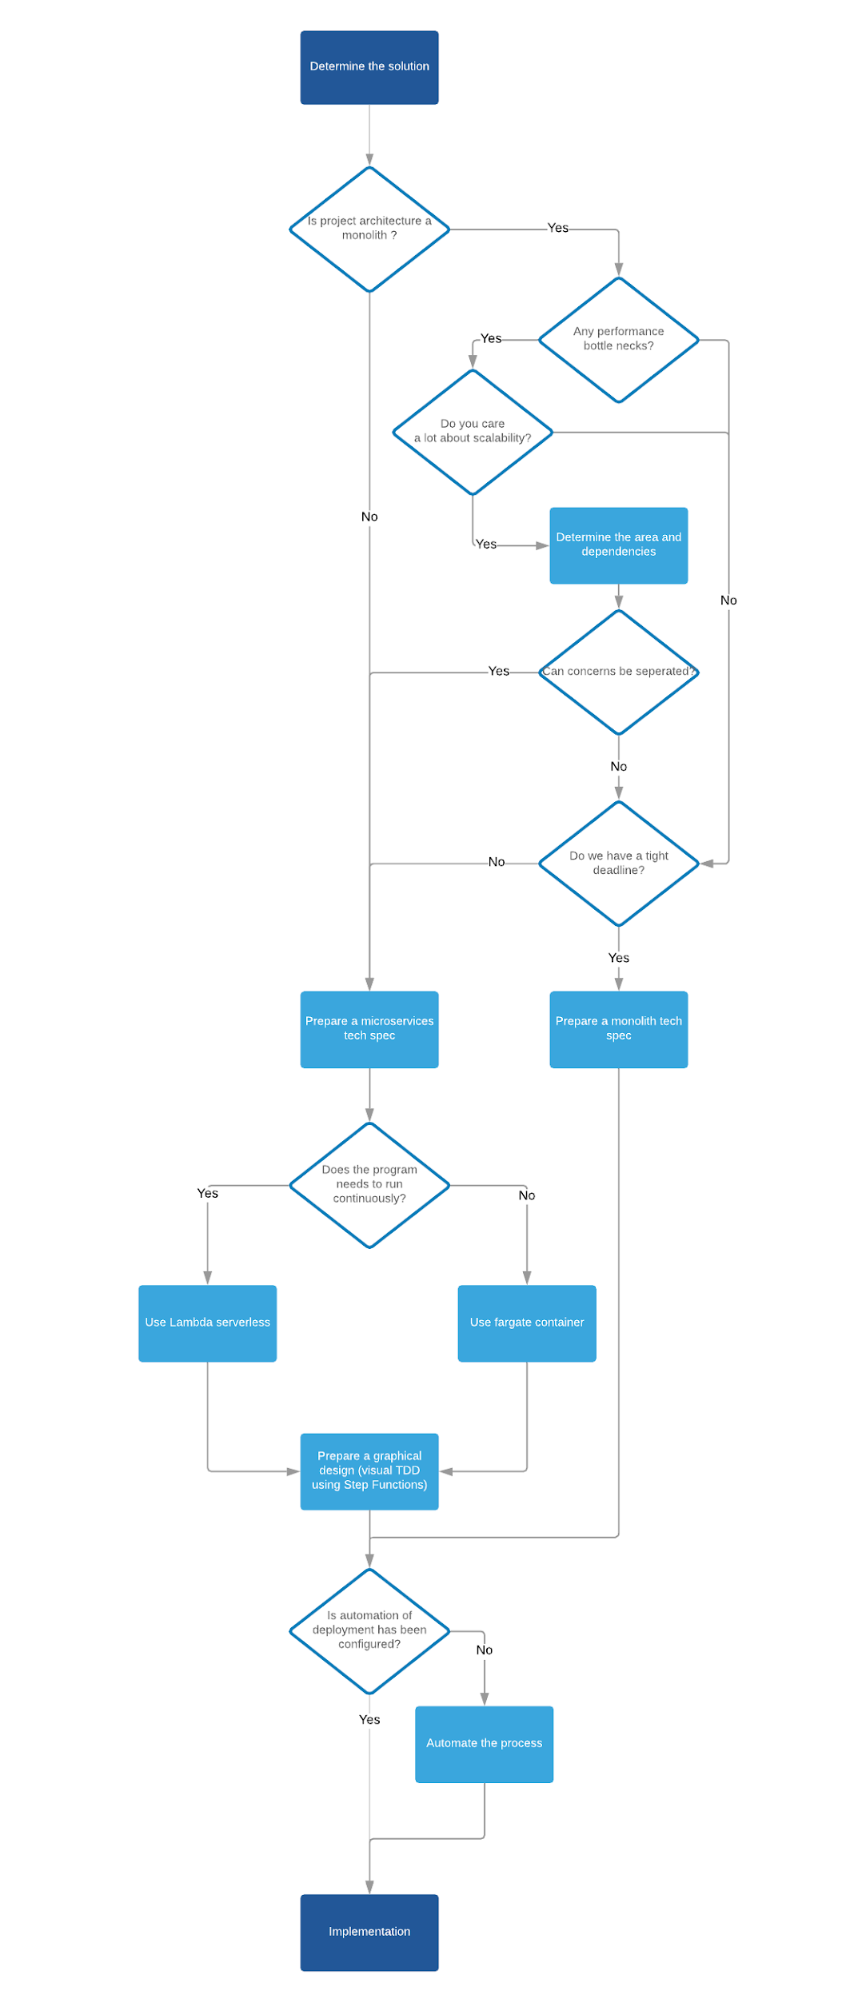
It can be concluded that microservices can be used if you:
company does not have a tight deadline because development of the project using microservices, requires a solid architecture planning to ensure it works and how it will be functioning;
have a large team of developers (if all your team can sit at one table, perhaps monolith is a better choice for you and the entire architecture of your product should be reviewed rather than constructing a solution using a complex architecture);
team have knowledge of different languages;
company has a good reason for worrying a lot about the scalability and reliability of your product (however the reliability can be achieved even using monolith);
already have the monolith app which has performance problems with its modules.
All the above points can be schematically be presented on below flow diagram.
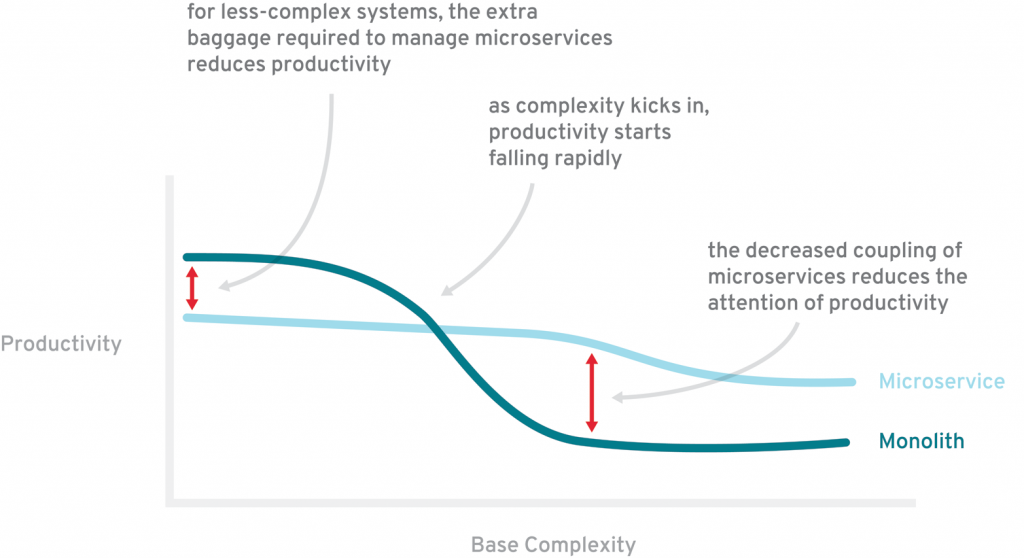
Ultimately, it can be presented on the diagram below which shows that during the system development there is a moment when the price of microservices pays off by reducing the costs of a decrease in the productivity of the team when the system becomes more complex. Moreover, it shows that smaller projects wirth the medium complexity, can have more advantages of using the monolithic approach.
Nevertheless, some of the problems associated with the microservices can be mitigated which makes benefits are more bright and drawbacks are less painful. By architecturing your entire platform or at least areas for which microservices are supposed to be created and distributed, to be stateless, the development process can be improved, deployments simplified and overhead reduced.
The menu is one of the most important marketing elements. It is the last stage before the customer decides to spend his / her money. Therefore, you need to try to create a truly selling menu that can make new visitors interested and ensure repeated sales.
How to Start Developing a Menu for a Restaurant or Café
The main and universal criteria are quality and affordability. Indeed, only a well-composed menu can increase sales by more than 15%. This marketing element will help you balance the costs of ingredients and the sums in guests’ receipts. To experience all the advantages of a quality menu, you need to follow these simple points when creating it:
Analyse the basic principles of your business. Make sure that every item in the menu corresponds to the general concept of your place.
Divide assortment into separate sections. For the convenience of using the menu, divide the assortment into next sections: soups, main dishes, drinks.
Design a restaurant or café menu. Organize good navigation and menu accessibility.
Use programs and graphic editors to create your own menu.
Use the logo to design the menu. This helps visitors remember your corporate style.
Download your layout in vector or psd-format and send the result for printing.
What do You Need to Consider while Developing a Menu?
Even the most attractive type of menu loses its advantages if it is isolated from the general corporate style. Here are a few aspects that we recommend to consider when developing:
Target Audience
Most likely, you have already determined the main criteria of your target audience: age, gender, nationality, financial condition, etc. Obviously, these indicators are different for visitors of children’s cafes, pubs, specialized bars and gourmet restaurants. When designing, it is also worth considering the tastes of your target audience. Children will be glad to see a lot of different colors and pictures. At the same time, craft beer lovers would prefer a country-style design with a minimal number of colorful shades. Study your visitors and offer them a list of dishes in the menu that is best to make your customers order.
Cuisine Specification
Well-developed menu should support the concept of your cuisine. This is especially true if you own a restaurant with a specific national cuisine. It is best to emphasize the specifics of the cuisine with the help of national symbols or associative objects and colors. For example, Japanese cuisine welcomes fonts in the hieroglyphic style, fans and geishas, so you can use them in the names of dishes, and the menu of Indian cuisine looks harmoniously in warm colors with mantras and silhouettes of animals, especially elephants.
The Format of the Place
Single-page or wall-mounted menus look very organic in fast foods, as they usually do not offer a wide selection and focus on fast customer service. Menus of several pages are studied by visitors longer, which means customer service in such establishments requires more time, and, according to these factors, the amount of sales is smaller. But thanks to the extra charge, restaurants can allow themselves to pay more attention to each visitor. Also, the format of your place has to correspond to all other components of the menu.
Cost of the Dish
Customer understands the real cost of the dish very well. Margin can become proper in several ways. First, include an exotic, expensive ingredient in the dish. Secondly, indicate the dish as “branded” or “prepared by the chef”. Keep in mind that the description and the name of the dish on your menu should not radically differ from the result. If the usual vegetable salad in the menu is described as something unique and has a high margin set, then visitors will consider this trick as a fraud and will no longer trust you.
Designers’ Advice on Developing a Menu
If you already know what your ideal menu should be, do not rush to implement this idea. First of all, make sure that it complies with the rules for creating a truly selling design and analyze how good your idea is:
Simplicity
Some tips on how to create a cafe menu:
Do not make your customers rack their brains, they have sudoku and crosswords for this purpose. A selling menu should be simple and affordable. The main reasons of complexity are: an overabundance of photos and texts, the lack of structure of the list and too large amount of dishes. Put prices in one column so that it is easier for the customer to navigate your pricing policy. But do not set the price in gradation order; give the visitor the opportunity to explore all the items from the menu. In multi-page menus, the main thing is not to overdo it with the number of dishes. Large assortment scares and frustrates. It is enough to place only 4 positions in the first courses section and 5-6 in the main courses, etc.
The Rule of “A Golden Triangle”
In order to find out what sequence is the most profitable in terms of placing an assortment,use the Golden Triangle rule, according to which:
1. middle: first of all, visitors look at the middle part of the page, therefore they often place special offers there;
2. upper right corner: next customers look at the area in the upper right corner, therefore it is a great place for the main courses;
3. upper left corner: in the end, the visitors’ gazes move to the upper left corner of the sheet, it is best to place light snacks here.
This rule is indispensable if you plan to make the menu on one sheet.
Choosing the Font
When choosing a font, focus on the general style of your place. You can also use branded fonts if you have already had one. If not, we recommend you to buy the logo and the entire corporate identity, which is appropriate to use on the menu pages. The service offers a wide selection of icons, colors and typography options for every taste. When you have decided on the style of suitable fonts, make sure they are readable. A menu that cannot be read is useless. You should also not overload it with the number of various fonts: 2-3 combined fonts are quite enough. Use spaces, italics, bold, and colorful text only where they are appropriate and do not spoil the page view.
The Description of the Dishes
The description of the dishes is necessary not only to inform the visitor about the composition of the dish, but also to make them more attractive. A boring list of ingredients is not able to convince a customer to make an order. But if you add a little imagination and creativity, then you can make a real advertisement for your dishes of the usual description. It is also important to take into account the particular length of the text in the description. If you do not want to make unnecessary accents, then use the same text length for each description.
Currency Signs are not Recommended
Show your friendliness to the client and do not focus on prices. Naturally, it is necessary to attach a price to each unit in the menu, but avoid the currency signs “€”, “£”, “$”, etc. Tell the client what he can get in a colorful way and briefly point to what he must give for it. So you can build trust and attract loyal customers
Ways to Develop a Menu for the Restaurant
No man is an island. Therefore, it is very cool that you are not alone in the struggle to develop a selling design. There are many ways to help you with this:
Online Designers
This way of creating a layout for the menu requires a use of special services that provide design services. They can be either expensive or completely free. It all depends on the amount of funds available to you.
Advantages:
• The quick process of creating a menu layout.
• Availability of free offers.
• A large selection of online designers, such as: Canva, Menugo, iMenuPro, MustHave Menus, etc.
• You can use the simple Logaster online service to create a logo and design the menu in a single corporate style.
Disadvantages:
• Designs are limited to the assortment of the designer.
• Usually you need to pay for creative tools.
• Tools are free to access, which means they are not unique.
Graphic Editors
This is about Photoshop. If you have the skills of work in a graphic editor, then it will not be difficult for you to create a design for the menu that will captivate your customers. Some of the innovations can be learned by watching online lessons. But to start work in the editor from scratch means to postpone the creation of a high-quality layout for the menu for a long time.
Advantages:
• You can create your own unique restaurant menu design
• There are many free tools for Photoshop.
• You manage the menu development process yourself.
Disadvantages:
• Without certain skills, it’s difficult to understand the editor.
• More interesting Photoshop tools are expensive.
• The process can take a lot of time.
Designers
This method means that you hire a person or a whole company so that they will develop a layout for your menu design. There are many ways to find a contractor, but experienced designers usually take a considerable amount of money for their work. If you decide to save on a designer by ordering work from a newbie, the result may upset you.
Advantages:
• you do not need to do the work yourself;
• a large amount of designers for any budget;
• you can find an inexpensive designer;
Disadvantages:
• it is necessary to draw up a clear statement of work;
• the initial idea of ??the restaurant menu and the final result of the contractor may be too different;
• designers who are able to offer a quality layout are expensive.
Templates
The method requires using ready-made menu templates from Pinterest, Shutterstock, etc., so you can overlay your own text and images. The quality of the result is often not the best. You still need to use graphic editors, trying to save the appearance of the background during conversion.
Advantages:
• you can find free templates;
• a bunch of the work has been done, you just have to slightly modify the menu for yourself;
• a large selection of creative ready-made templates.
Disadvantages:
• there is no way to edit the finished template;
• after all the improvements, the quality of the final layout is often severely distorted;
• if you do not have a designer feeling, your work may stylistically not correspond to the original layout.
Developing a selling menu is not a big deal. The main thing is to follow the advice of leading designers and study the trends in the restaurant business. Make your own unique menu and let customers easily make their orders.