HTML5 Game Development – Lesson 1
HTML5 tutorial. Starting today we begin a series of articles on game development in HTML5. In our first article we will cover the basics – working with the canvas, creating simple objects, fill, and some linked event handlers by mouse. Also, pay attention at this stage, we will study this basis, not immediately work in 3D with WebGL. But we will get back to WebGL in the future.
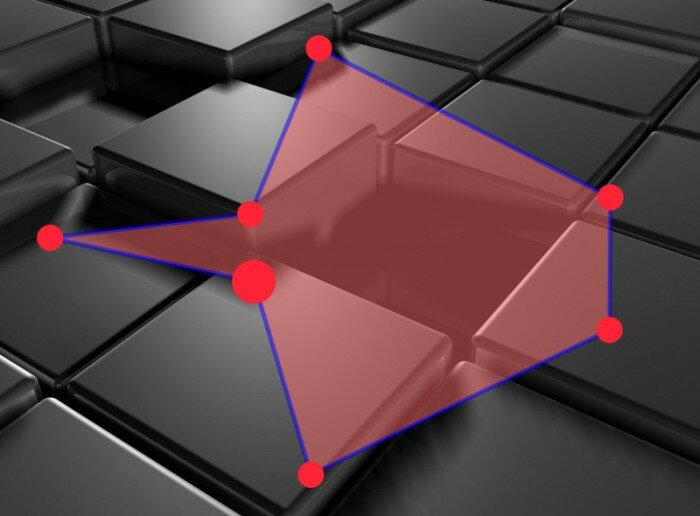
In each next article we will make something new. The first time we create an object with seven vertices, in these vertices we will draw circles, we will able to move these vertices with dragging circles. Also we fill our result object with semi-transparent color. I think that this is enough for beginning.
Live Demo
Ok, download the example files and lets start coding !
Step 1. HTML
Here are all html of my demo
index.html
<!DOCTYPE html>
<html lang="en" >
    <head>
        <meta charset="utf-8" />
        <title>HTML5 Game step 1 (demo) | Script Tutorials</title>
        <link href="css/main.css" rel="stylesheet" type="text/css" />
        <!--[if lt IE 9]>
          <script src="http://html5shiv.googlecode.com/svn/trunk/html5.js"></script>
        <![endif]-->
        <script type="text/javascript" src="js/jquery-1.5.2.min.js"></script>
        <script type="text/javascript" src="js/script.js"></script>
    </head>
    <body>
        <div class="container">
            <canvas id="scene" width="800" height="600"></canvas>
        </div>
        <footer>
            <h2>HTML5 Game step 1</h2>
            <a href="https://www.script-tutorials.com/html5-game-development-lesson-1" class="stuts">Back to original tutorial on <span>Script Tutorials</span></a>
        </footer>
    </body>
</html>
Step 2. CSS
Here are used CSS styles.
css/main.css
/* general styles */
*{
    margin:0;
    padding:0;
}
body {
    background-color:#bababa;
    background-image: -webkit-radial-gradient(600px 300px, circle, #ffffff, #bababa 60%);
    background-image: -moz-radial-gradient(600px 300px, circle, #ffffff, #bababa 60%);
    background-image: -o-radial-gradient(600px 300px, circle, #ffffff, #bababa 60%);
    background-image: radial-gradient(600px 300px, circle, #ffffff, #bababa 60%);
    color:#fff;
    font:14px/1.3 Arial,sans-serif;
    min-height:1000px;
}
.container {
    width:100%;
}
.container > * {
    display:block;
    margin:50px auto;
}
footer {
    background-color:#212121;
    bottom:0;
    box-shadow: 0 -1px 2px #111111;
    display:block;
    height:70px;
    left:0;
    position:fixed;
    width:100%;
    z-index:100;
}
footer h2{
    font-size:22px;
    font-weight:normal;
    left:50%;
    margin-left:-400px;
    padding:22px 0;
    position:absolute;
    width:540px;
}
footer a.stuts,a.stuts:visited{
    border:none;
    text-decoration:none;
    color:#fcfcfc;
    font-size:14px;
    left:50%;
    line-height:31px;
    margin:23px 0 0 110px;
    position:absolute;
    top:0;
}
footer .stuts span {
    font-size:22px;
    font-weight:bold;
    margin-left:5px;
}
h3 {
    text-align:center;
}
/* tutorial styles */
#scene {
    background-image:url(../images/01.jpg);
    position:relative;
}
Step 3. JS
js/jquery-1.5.2.min.js
We will using jQuery for our demo. This allows easy bind different events (for mouse etc). Next file most important, just because contain all our work with graphic:
js/script.js
var canvas, ctx;
var circles = [];
var selectedCircle;
var hoveredCircle;
// -------------------------------------------------------------
// objects :
function Circle(x, y, radius){
    this.x = x;
    this.y = y;
    this.radius = radius;
}
// -------------------------------------------------------------
// draw functions :
function clear() { // clear canvas function
    ctx.clearRect(0, 0, ctx.canvas.width, ctx.canvas.height);
}
function drawCircle(ctx, x, y, radius) { // draw circle function
    ctx.fillStyle = 'rgba(255, 35, 55, 1.0)';
    ctx.beginPath();
    ctx.arc(x, y, radius, 0, Math.PI*2, true);
    ctx.closePath();
    ctx.fill();
}
function drawScene() { // main drawScene function
    clear(); // clear canvas
    ctx.beginPath(); // custom shape begin
    ctx.fillStyle = 'rgba(255, 110, 110, 0.5)';
    ctx.moveTo(circles[0].x, circles[0].y);
    for (var i=0; i<circles.length; i++) {
        ctx.lineTo(circles[i].x, circles[i].y);
    }
    ctx.closePath(); // custom shape end
    ctx.fill(); // fill custom shape
    ctx.lineWidth = 5;
    ctx.strokeStyle = 'rgba(0, 0, 255, 0.5)';
    ctx.stroke(); // draw border
    for (var i=0; i<circles.length; i++) { // display all our circles
        drawCircle(ctx, circles[i].x, circles[i].y, (hoveredCircle == i) ? 25 : 15);
    }
}
// -------------------------------------------------------------
// initialization
$(function(){
    canvas = document.getElementById('scene');
    ctx = canvas.getContext('2d');
    var circleRadius = 15;
    var width = canvas.width;
    var height = canvas.height;
    var circlesCount = 7; // we will draw 7 circles randomly
    for (var i=0; i<circlesCount; i++) {
        var x = Math.random()*width;
        var y = Math.random()*height;
        circles.push(new Circle(x,y,circleRadius));
    }
    // binding mousedown event (for dragging)
    $('#scene').mousedown(function(e) {
        var canvasPosition = $(this).offset();
        var mouseX = e.layerX || 0;
        var mouseY = e.layerY || 0;
        for (var i=0; i<circles.length; i++) { // checking through all circles - are mouse down inside circle or not
            var circleX = circles[i].x;
            var circleY = circles[i].y;
            var radius = circles[i].radius;
            if (Math.pow(mouseX-circleX,2) + Math.pow(mouseY-circleY,2) < Math.pow(radius,2)) {
                selectedCircle = i;
                break;
            }
        }
    });
    $('#scene').mousemove(function(e) { // binding mousemove event for dragging selected circle
            var mouseX = e.layerX || 0;
            var mouseY = e.layerY || 0;
        if (selectedCircle != undefined) {
            var canvasPosition = $(this).offset();
            var radius = circles[selectedCircle].radius;
            circles[selectedCircle] = new Circle(mouseX, mouseY,radius); // changing position of selected circle
        }
        hoveredCircle = undefined;
        for (var i=0; i<circles.length; i++) { // checking through all circles - are mouse down inside circle or not
            var circleX = circles[i].x;
            var circleY = circles[i].y;
            var radius = circles[i].radius;
            if (Math.pow(mouseX-circleX,2) + Math.pow(mouseY-circleY,2) < Math.pow(radius,2)) {
                hoveredCircle = i;
                break;
            }
        }
    });
    $('#scene').mouseup(function(e) { // on mouseup - cleaning selectedCircle
        selectedCircle = undefined;
    });
    setInterval(drawScene, 30); // loop drawScene
});
I commented all necessary code, so I hope that you will not get lost here.
Live Demo
[sociallocker]
download in package
[/sociallocker]
Conclusion
Cool, isn’t it? I will be glad to see your thanks and comments. Good luck!


I’ve written an article about optimising the performance of html5 games, maybe you’ll find some of the tips helpful.
Thanks!
Thanks for you comment, bookmarked :-)
thanxs for this tutorial, but should me learn javascript first ,for using it with html5, or it’s not nessesary learn JS and learn html5 enough?
2mohamed
But you can`t learn HTML5 without knowledges of JS, Just because HTML5 is JS (generally)
thanks for the all the efforts …it’s very helpful
All I got when clicking the live demo was a blank screen. I’m using IE 7 on an xp box.
Hello Mike,
I can advise you to try this demo at more modern browser, like IE9, FF, Chrome, Safary
it’s very useful.
I’m just getting into a web design program and got through HTML/CSS and just started JavaScript. In my spare time I started looking into this kind of thing and found this site. Needless to say its bookmarked and trying to figure it out currently. Thanks so much for posting this.
your website is very nice. i have learnt new things for your site.
thanks
Thanks for the info here, very useful. I have one question though. Why the dragging doesnt work with jquery 1.7.2 and works with 1.5.2
Hello Buff,
Yes, interesting question, I think that it related with inner changes in functions of 1.7.2.
Did you get any JS errors when you try it with jQuery 1.7.2 ?
I renamed the init function to showing and passing it the number of circles. But I am unable to re-configure the number of circles.
code snip starts:
form name=”form”
input type=”submit” onClick=”showing(‘5’);”
/form
div class=”container”
canvas id=”scene” width=”800″ height=”600″ /canvas
/div
script showing(‘3’); /script
code snip stops
Every time I click submit, it reloads with 3 circles instead of 5. Any ideas?
Hello ddiinnxx,
By default we have:
var circlesCount = 7;
in the initialize code. What do you have in your version?
Great site! I’m loving these tutorials.
By the way, e.layerX and e.layerY are deprecated since jQuery 1.7, that’s why it didn’t work to Buff. Just changing them for e.pageX and e.pageY solves the issue.
Thank you Daniel for your remark, yes, this is true
Thanks for the tuts.
I tried the code and it doesn’t work for me. Even when I replaced e.layerX and e.layerY with e.pageX and e.pageY – the circles still won’t draw. Please assist.
Hello Siya,
How did you try it – as own modified version, or you tried our package? And, which browser do you use? Have you tried it in another browser?
To make this tutorial work in more recent versions of jQuery (i.e. >=1.7) you have to calculate the mouse position differently:
var canvasPosition = $(this).offset();
var mouseX = (e.pageX || 0) – canvasPosition.left;
var mouseY = (e.pageY || 0) – canvasPosition.top;
Thank you Oli for your clarification, it is useful
Hi and thanks for the lesson!
I’m not quite sure why this first lesson went with jquery for the mouse events when it’s not that difficult nor much code to add the event listeners to the canvas ourselves…I was having trouble with jquery 1.8.2 (like others above) and then decided to avoid it by adding listeners:
canvas.addEventListener(“mousedown”,doMouseDown,false);
canvas.addEventListener(“mousemove”,doMouseMove,false);
canvas.addEventListener(“mouseup”,doMouseUp,false);
And then moving your binding code for each mouse event into each individual doMouse[Down|Move|Up] function… The only other thing I needed to do was add the onLoad parameter to the body tag in index.html to get it to load my “main” function. Maybe there is a better reason for jquery in a subsequent lesson? Guess I’ll see when I get there.
Hello Michael,
Thank you for your weighty comment, generally you are right, it is not very necessary to use jQuery here, we already can handle the most easy events with their native methods. Maybe this is why I used to use jQuery? :-)
as usual, when I develop something – I include jQuery (just in case). Because I can make something hardly to do in usual javascript (but what is easy to do with jQuery). So I just can forgot to try to disable jquery in the final version.
Hello Andrew,
This is a good tutorial and it helps me to learn HTML5 and jQuery. Thanks a lot!
There is something I found in your game and I thought this might relate to your mouse click and release action. Here is the thing:
We you hover a node and hold your mouse button down, drag the dot out of the background image( – your board) then release the button. Put your mouse back to screen, and see – you can still drag your node!
I thought when you mouse is out of board, the script doesn’t catch your release action, so it will think you are still dragging your node, am I right?
Hello Oscar,
Yes, you are right, it doesn’t release ‘down’ status, next time I will add ‘mouseout’ even handler to release statuses, thanks for your note :-)
What book did you get from packt publishing?
Hi James,
They gave me several books. The one of them was HTML5-Games-Development-by-Example-Beginners.pdf
Hello Andrew,
Great Tutorial! :-)
I have followed everything above, and even the updates to the jQuery version issue in the posts, however when I click on one of the vertices to move it, it shoots off to the right, and slightly lower then my actual mouse cursor, all the functionality works just fine, besides the major offset of the cursor and the vertices. Has anyone else experienced this? And if you did, how did you manage to resolve this issue?, as I’ve now been fiddling for quite a couple of hours now, but I just can’t seem to get the vertex to be in the exact position as my cursor?
Hello Nicholas,
Please use
var mouseX = e.layerX || 0;
var mouseY = e.layerY || 0;
if (e.originalEvent.layerX) {
mouseX = e.originalEvent.layerX;
mouseY = e.originalEvent.layerY;
}
rather then:
var canvasPosition = $(this).offset();
var mouseX = e.layerX || 0;
var mouseY = e.layerY || 0;
for both event handlers
hello sir,
the program was exellent but, please expalin the code which makes us easy to learn…..
Nice article bro i learnt alot . When i am seeing your online demo it is working fine . but when i coppied the code and tried in my pc ,the ball are neither getting hovered nor getting dragged . i am using google chrome 25 . Please tell me what am i misssing
okay Solved .. I was using j query 1.9 min version . replaced that with 1.5 . and it started working . But why its not working with j query 1.9
Hello ashisha, this is because few things were changed in jQuery library between the versions. In similar cases, it is useful to activate a Firebug and look for errors.
Hi,
Great tutorial. And love the way you have laid out the content. I have a question which is more related to the Math you have used to find out whether the mouse is close to the circle or not. What exactly is the logic behind it? Hope you do not mind me asking :).. My Math is a bit rusty.
Hi Denika, everything is in the ‘mousemove’ event handler, please refer to this function to understand our logic
Hello,
When i run it in Opera browser (version 12.16) it doesn’t work (looks fine, only the circles can’t be moved). Is there a reason for this?
Also, is there any program i can use to debug javascript, html, etc.?
Hello,
This browser may doesn’t support some HTML5 functions, this is the main reason. Try to use more common (and powerful) browser. There might be a special plugin for Opera to debug (similar as Firebug for Firefox)
I really enjoy your tutorials, they are very helpful and informative. Great work!!!
Input do now work on mobile, can you make is responsive for all devices?
Hi Shukerullah,
In general, in order to make it responsive we need to resize it, and display the elements of this demo depending of screen size of devices