
HTML5 Drag and Drop Multiple File Uploader
Our new article is going to tell you about HTML5 file upload. Yes, I explained basics of html5 file upload in the past (in one of our previous articles), but today I would like to give you another example, the better one. Now, you can just drag and drop your images (multiple images) in order to start uploading. Plus, the script displays overall progress (in percentage, plus – files left) and server response (without actual uploading). I am going to display progress at CANVAS element in realtime. And, at the last – our script can upload files not only into own server, but to another too (we can say, that this is cross-site uploader).
Here are our demo and downloadable package:
Live Demo
download in package
Ok, download the sources and lets begin !
Step 1. HTML
As the first – html markup:
index.html
<div class="container">
<div class="contr"><h2>Drag and Drop your images to 'Drop Area' (up to 5 files at a time, size - under 256kb)</h2></div>
<div class="upload_form_cont">
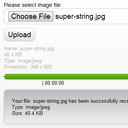
<div id="dropArea">Drop Area</div>
<div class="info">
<div>Files left: <span id="count">0</span></div>
<div>Destination url: <input id="url" value="http://script-tutorials.com/demos/257/upload.php"/></div>
<h2>Result:</h2>
<div id="result"></div>
<canvas width="500" height="20"></canvas>
</div>
</div>
</div>
<script src="js/script.js"></script>
As you can see, it consists of several main elements: ‘Drop area’ at the left and ‘Info block’ at the right. When we drag and drop image files on our dropArea, in the Info block we will get response from server. Pay attention, that there is ‘Destination url’ element. Right now it connected to our server. But you can change it to your url anytime.
Step 2. CSS
css/main.css
Now, its time to customize our layout:
css/main.css
.container {
    overflow:hidden;
    width:960px;
    margin:20px auto;
}
.contr {
    background-color: #212121;
    color: #FFFFFF;
    padding: 10px 0;
    text-align: center;

    border-radius:10px 10px 0 0;
    -moz-border-radius:10px 10px 0 0;
    -webkit-border-radius:10px 10px 0 0;
}
.upload_form_cont {
    background: -moz-linear-gradient(#ffffff, #f2f2f2);
    background: -ms-linear-gradient(#ffffff, #f2f2f2);
    background: -webkit-gradient(linear, left top, left bottom, color-stop(0%, #ffffff), color-stop(100%, #f2f2f2));
    background: -webkit-linear-gradient(#ffffff, #f2f2f2);
    background: -o-linear-gradient(#ffffff, #f2f2f2);
    filter: progid:DXImageTransform.Microsoft.gradient(startColorstr='#ffffff', endColorstr='#f2f2f2');
    -ms-filter: "progid:DXImageTransform.Microsoft.gradient(startColorstr='#ffffff', endColorstr='#f2f2f2')";
    background: linear-gradient(#ffffff, #f2f2f2);

    color: #000;
    overflow: hidden;
}
.info {
    background-color: #EEEEEE;
    border: 1px solid #DDDDDD;
    float: left;
    font-weight: bold;
    height: 530px;
    margin: 20px;
    position: relative;
    width: 560px;
}
.info > div {
    font-size: 14px;
    font-weight: bold;
    padding: 10px 15px 5px;
}
.info > h2 {
    padding: 0 15px;
}
.info > canvas {
    margin-left: 15px;
    margin-bottom: 10px;
}
.info #url {
    width: 400px;
}
#dropArea {
    background-color: #DDDDDD;
    border: 3px dashed #000000;
    float: left;
    font-size: 48px;
    font-weight: bold;
    height: 530px;
    line-height: 530px;
    margin: 20px;
    position: relative;
    text-align: center;
    width: 300px;
}
#dropArea.hover {
    background-color: #CCCCCC;
}
#dropArea.uploading {
    background: #EEEEEE url(loading.gif) center 30% no-repeat;
}
#result .s, #result .f {
    font-size: 12px;
    margin-bottom: 10px;
    padding: 10px;

    border-radius:10px;
    -moz-border-radius:10px;
    -webkit-border-radius:10px;
}
#result .s {
    background-color: #77fc9f;
}
#result .f {
    background-color: #fcc577;
}
Step 3. HTML5 JS
js/script.js
// variables
var dropArea = document.getElementById('dropArea');
var canvas = document.querySelector('canvas');
var context = canvas.getContext('2d');
var count = document.getElementById('count');
var destinationUrl = document.getElementById('url');
var result = document.getElementById('result');
var list = [];
var totalSize = 0;
var totalProgress = 0;

// main initialization
(function(){

    // init handlers
    function initHandlers() {
        dropArea.addEventListener('drop', handleDrop, false);
        dropArea.addEventListener('dragover', handleDragOver, false);
    }

    // draw progress
    function drawProgress(progress) {
        context.clearRect(0, 0, canvas.width, canvas.height); // clear context

        context.beginPath();
        context.strokeStyle = '#4B9500';
        context.fillStyle = '#4B9500';
        context.fillRect(0, 0, progress * 500, 20);
        context.closePath();

        // draw progress (as text)
        context.font = '16px Verdana';
        context.fillStyle = '#000';
        context.fillText('Progress: ' + Math.floor(progress*100) + '%', 50, 15);
    }

    // drag over
    function handleDragOver(event) {
        event.stopPropagation();
        event.preventDefault();

        dropArea.className = 'hover';
    }

    // drag drop
    function handleDrop(event) {
        event.stopPropagation();
        event.preventDefault();

        processFiles(event.dataTransfer.files);
    }

    // process bunch of files
    function processFiles(filelist) {
        if (!filelist || !filelist.length || list.length) return;

        totalSize = 0;
        totalProgress = 0;
        result.textContent = '';

        for (var i = 0; i < filelist.length && i < 5; i++) {
            list.push(filelist[i]);
            totalSize += filelist[i].size;
        }
        uploadNext();
    }

    // on complete - start next file
    function handleComplete(size) {
        totalProgress += size;
        drawProgress(totalProgress / totalSize);
        uploadNext();
    }

    // update progress
    function handleProgress(event) {
        var progress = totalProgress + event.loaded;
        drawProgress(progress / totalSize);
    }

    // upload file
    function uploadFile(file, status) {

        // prepare XMLHttpRequest
        var xhr = new XMLHttpRequest();
        xhr.open('POST', destinationUrl.value);
        xhr.onload = function() {
            result.innerHTML += this.responseText;
            handleComplete(file.size);
        };
        xhr.onerror = function() {
            result.textContent = this.responseText;
            handleComplete(file.size);
        };
        xhr.upload.onprogress = function(event) {
            handleProgress(event);
        }
        xhr.upload.onloadstart = function(event) {
        }

        // prepare FormData
        var formData = new FormData();
        formData.append('myfile', file);
        xhr.send(formData);
    }

    // upload next file
    function uploadNext() {
        if (list.length) {
            count.textContent = list.length - 1;
            dropArea.className = 'uploading';

            var nextFile = list.shift();
            if (nextFile.size >= 262144) { // 256kb
                result.innerHTML += '<div class="f">Too big file (max filesize exceeded)</div>';
                handleComplete(nextFile.size);
            } else {
                uploadFile(nextFile, status);
            }
        } else {
            dropArea.className = '';
        }
    }

    initHandlers();
})();
Most of code is already commented. I hope that you can understand all this code. Anyway – some explanation how it works: in the beginning, we have linked two handlers to our DropArea: ‘drop’ and ‘dropover’. When we keep our dragged files over our Drop area, we can apply custom styles to our drop area. Then, when we drop our files, our script starts executing ‘processFiles’ function (it pushs all the dropped files into array, and starts uploading them step by step). In the result, we send data through XMLHttpRequest object to custom recipient server. During sending the files, we also display overall progress at our canvas element.
Step 4. PHP
upload.php
<?php

// set error reporting level
if (version_compare(phpversion(), '5.3.0', '>=') == 1)
  error_reporting(E_ALL & ~E_NOTICE & ~E_DEPRECATED);
else
  error_reporting(E_ALL & ~E_NOTICE);

function bytesToSize1024($bytes, $precision = 2) {
    $unit = array('B','KB','MB');
    return @round($bytes / pow(1024, ($i = floor(log($bytes, 1024)))), $precision).' '.$unit[$i];
}

if (isset($_FILES['myfile'])) {
    $sFileName = $_FILES['myfile']['name'];
    $sFileType = $_FILES['myfile']['type'];
    $sFileSize = bytesToSize1024($_FILES['myfile']['size'], 1);

    echo <<<EOF
<div class="s">
    <p>Your file: {$sFileName} has been successfully received.</p>
    <p>Type: {$sFileType}</p>
    <p>Size: {$sFileSize}</p>
</div>
EOF;
} else {
    echo '<div class="f">An error occurred</div>';
}
Its server-side file. It doesn’t upload files of course. But it returns some information about our files (which we will display at our receiver (client) side).
Live Demo
download in package
Conclusion
Hope this helped to you! Welcome back to read our new articles about HTML5. Good luck!
Related Articles
HTML5 Drag and Drop – sorting photos between albums
Pure HTML5 file upload

HTML5 Image uploader with Jcrop


This is awesome! Quick question, what’s the largest file size someone can upload with this?
Hello Rob,
It depends only on limits of your server.
how can i upload to the file to the server.?
Hello, you can perform actual upload in upload.php file.
Yes, uploads are possible.
This script is amazing, thanks !
Script is working fine in Chrome, but not with IE9.
Hi Kartik,
Yes, basically because HTML5 is not supported by IE9 (especially in case of upload functions)
Didn’t work for me. I got a message which said progress 100% and an index listing of files in the folder specified in the destination URL. The image file I tested with wasn’t listed.
Hi Bob,
Our script doesn’t save files at server, it has all functional to send and receive, but I didn’t add actual save to server’s disk. In the result of upload you should get short info about received file. Where exactly it didn’t work? At our demo page or at your computer?
Hi, is it possible to have two of these on the same page? There seems to be issues when doing this even when using different ids as the handles.
Hello Gareth,
Do you mean – two drop areas, or two drop areas + 2 results areas? Anyway, everything is possible. Yes, you can add few more drop areas, and – in this case you will need just to add more ‘addEventListener’ for your new objects.
How easy would it be to implement some security such as a password to this to stop everyone from uploading junk? Thanks
Hello Dave,
You should implement any kind of login system. And after – check, if a member is logged in or not every time you perform upload or even display upload form.
Hello Andrew,
How to replace destination url with ‘upload.php’ ?
thank you so much for you’r example.
Hi Kufer,
destination url is already ‘upload.php’ (by default). It is on line 8 in index.html